Showing posts with label network forensics. Show all posts

The Defender's Toolkit: Orchestrating Incident Response with Open-Source Precision

The digital battlefield is a perpetual war of attrition, and tonight, the enemy isn't just sophisticated; it's patient. Budgets tighten, resources dwindle, and the defenders find themselves on the defensive, armed with less than ideal weaponry. Proprietary software, a luxury often locked behind procurement cycles and hefty price tags, becomes a distant dream. Yet, the ghosts in the machine—the indicators of compromise—don't wait for a purchase order. They exploit the gaps, the blind spots, the very real limitations faced by those tasked with safeguarding the network. This isn't a call for pity; it's a blueprint for resilience. We're not just talking about incident response; we're dissecting it, phase by phase, and arming you with the open-source arsenal that can turn the tide, immediately, without breaking the bank.

In this deep dive, we’ll dissect the anatomy of a cyber-attack through its four critical stages. For each phase, we’ll identify concrete use cases where open-source tools become your frontline defense. Imagine being able to conduct initial incident response investigations with the same rigor and depth, regardless of your budget constraints. This is about empowering the blue team, the silent guardians who operate in the shadows, ensuring that when the alarm sounds, they have the tools to not just react, but to *investigate* and *understand* with surgical precision. We’ll then turn our gaze to the future, exploring how these same tactics can be scaled to protect even the most sprawling enterprise environments. By the end of this analysis, you'll possess the actionable intelligence to deploy effective incident response strategies, proving that true defense isn't about the license key, but about the grit and ingenuity of the operator.

Table of Contents

The Unseen Adversary: Budget Constraints and the OSS Advantage

The current threat landscape is a brutal testament to asymmetric warfare. While adversaries evolve their tactics with alarming speed, the defenders are often forced to operate under duress, their budgets stretched thinner than a compromised state actor’s VPN connection. This isn't a new narrative, but its consequences are stark: a limited capability to adequately protect the digital fortresses entrusted to their care. When proprietary software, the shiny new toys that defense contractors promise will save the day, gets bogged down in procurement purgatory, the defenders are left to improvise. The struggle to conduct in-depth investigations within their own organization's environment becomes a daily grind. This presentation is a wake-up call. It’s about recognizing that powerful defense doesn't always wear a vendor's logo. It can be found in the collaborative, community-driven world of open-source intelligence and tooling. We're shifting the paradigm from costly licenses to accessible, potent solutions that any dedicated defender can deploy.

Mapping the Kill Chain: Open-Source Tools for Each Stage

Understanding the attacker's methodology is paramount for effective defense. The Cyber Kill Chain, a framework that outlines the phases of a cyber-attack, provides a structured approach to identifying, analyzing, and responding to threats. We'll walk through each stage, highlighting how open-source tools can be leveraged to gain visibility and collect critical evidence.

Stage 1: Reconnaissance and Initial Access - Seeing the Unseen

Before the first shot is fired, the attacker surveys the battlefield. This phase involves gathering information about the target, identifying vulnerabilities, and planning the entry vector. For the defender, this means looking for signs of probing, unusual network connections, or suspicious reconnaissance activities. Tools like Nmap (for network scanning and service enumeration), theHarvester (for gathering OSINT like email addresses and subdomains), and Masscan (for high-speed port scanning) can help identify what an attacker might see from the outside. Analyzing firewall logs with tools like Logstash or custom scripts can reveal patterns of suspicious external scans. The key here is to detect the reconnaissance before it transitions into active exploitation.

Stage 2: Execution and Persistence - Identifying the Foothold

Once access is gained, the attacker executes their payload and establishes a foothold to maintain access. This could involve exploiting a vulnerability, phishing, or using compromised credentials. Defenders must focus on detecting unauthorized process execution, suspicious file modifications, or unusual scheduled tasks and services. Open-source endpoint detection tools such as Sysmon (Windows System Monitor) are invaluable for logging detailed process creation, network connections, and file activity. For Linux environments, tools like auditd provide similar granular logging. Malware analysis tools like Ghidra or IDA Free can dissect unknown executables, revealing their malicious intent. Network traffic analysis with Wireshark or tcpdump is crucial for spotting command-and-control (C2) communication.

Stage 3: Privilege Escalation and Lateral Movement - Tracking the Intruder

Having established a base, the attacker will attempt to elevate their privileges and move across the network to reach high-value targets. This involves exploiting local vulnerabilities, credential harvesting, or abusing legitimate administrative tools. Defensive measures here include monitoring for privilege escalation attempts, unusual account activity, and unexpected network connections between internal systems. Tools like PowerShell (with advanced logging enabled) on Windows can detect suspicious script execution. For cross-platform analysis, frameworks like OSSEC or Wazuh provide host-based intrusion detection capabilities. Network monitoring tools can help identify internal port scans or RDP/SSH connection attempts to systems where they shouldn't be occurring. Analyzing authentication logs (e.g., using Splunk or Elasticsearch with appropriate parsing) is vital for spotting compromised credentials being used.

Stage 4: Exfiltration and Impact - Documenting the Damage

The final stages involve the attacker exfiltrating data or impacting the organization's operations. This could be data theft, ransomware deployment, or service disruption. Defenders must focus on detecting unusual outbound network traffic, large data transfers, or critical system failures. Tools like Zeek (formerly Bro) can provide deep network protocol analysis to identify anomalous data flows. Filesystem analysis tools like The Sleuth Kit and its graphical front-end, Autopsy, are essential for digital forensics, helping to recover deleted files, examine file system changes, and trace data movement. Understanding the scope of the breach, the data compromised, and the extent of the damage is critical for remediation and recovery. This stage requires meticulous documentation, which can be facilitated by scripting and data analysis tools like Pandas in Python.

Scaling the Defense: From a Single Workstation to Enterprise-Wide Operations

The principles of incident response remain consistent, but scaling them across an enterprise requires a strategic approach. It’s not just about having the right tools; it’s about integrating them into a cohesive detection and response strategy. Automation is key. Scripting common tasks using Python, PowerShell, or Bash allows for faster analysis across numerous endpoints and servers. Centralized logging, managed by Security Information and Event Management (SIEM) systems like ELK Stack (Elasticsearch, Logstash, Kibana) or Graylog, aggregates telemetry from across the network, providing a single pane of glass for threat hunting and incident analysis. Developing threat hunting hypotheses based on known adversary tactics, techniques, and procedures (TTPs) and then using these open-source tools to test them proactively is crucial. This involves building dashboards and alerts that can flag anomalies indicative of compromise, allowing for a swifter response. It's about transforming individual tool capabilities into an enterprise-grade defense posture.

Arsenal of the Operator: Essential OSS Tools for IR

To effectively conduct incident response without relying on expensive proprietary solutions, a defender needs a well-curated toolkit. Here are some indispensable open-source tools that form the backbone of many blue teams:

  • Network Analysis: Wireshark, tcpdump, Zeek, Nmap
  • Endpoint Forensics: The Sleuth Kit/Autopsy, Sysmon, auditd, Volatility Framework (for memory analysis)
  • Malware Analysis: Ghidra, IDA Free, Cuckoo Sandbox
  • Log Management & Analysis: ELK Stack, Graylog, OSSEC/Wazuh
  • Scripting & Automation: Python (with libraries like Pandas, Scapy), PowerShell
  • Threat Intelligence & OSINT: theHarvester, Maltego (Community Edition)

Mastering these tools, understanding their nuances, and knowing how to chain them together is what separates a reactive IT department from a proactive security operation. Investing time in learning these open-source powerhouses is an investment in your organization's security resilience.

Taller Defensivo: Analyzing Network Traffic for Anomalies

Detecting subtle signs of compromise often starts with scrutinizing network traffic. Attackers need to communicate with their C2 servers, move laterally, or exfiltrate data. Identifying deviations from normal network behavior is a core offensive tactic that defenders can mirror.

  1. Capture Traffic: Use tcpdump or tshark (Wireshark's command-line companion) to capture network packets. For example, to capture traffic on interface eth0 and save it to a file:
    sudo tcpdump -i eth0 -w capture.pcap -s 0
  2. Initial Triage with Wireshark: Open the capture.pcap file in Wireshark. Use display filters to narrow down traffic. Look for:
    • Unusual protocols or ports being used.
    • Connections to known malicious IP addresses or domains (use threat intelligence feeds).
    • High volumes of outbound traffic, especially to unexpected destinations.
    • Suspicious DNS queries.
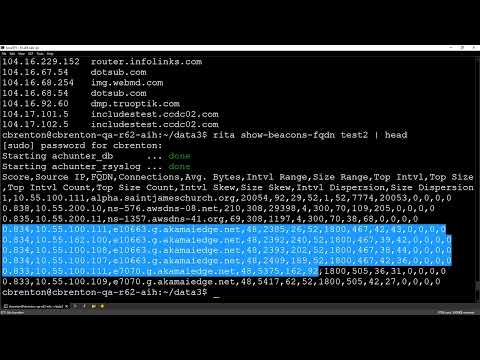
  3. Deep Analysis with Zeek: Zeek provides powerful, high-level logs that make analysis more straightforward than raw packet captures. Install Zeek and configure it to monitor key network segments. Key log files include:
    • conn.log: Summaries of all TCP, UDP, and ICMP connections.
    • http.log: Details of HTTP traffic.
    • dns.log: DNS requests and responses.
    • files.log: Information about files transferred over the network.
    Analyze these logs for patterns that deviate from your baseline. For instance, a sudden spike in DNS requests for unfamiliar domains could indicate C2 activity.
  4. Identify Anomalies: Correlate findings from Zeek logs with other telemetry. For example, if conn.log shows a suspicious outbound connection from a particular server, investigate that server using endpoint tools like Sysmon to see what process initiated the connection.
  5. Document Findings: Meticulously record timestamps, source/destination IPs, ports, protocols, and any identified payloads. This documentation is critical for incident reporting and future threat hunting.

Remember to always perform such analysis on authorized systems and in compliance with your organization's policies.

FAQ: Incident Response in the Trenches

Q: What is the most critical piece of advice for a junior incident responder?
A: Don't panic. Stick to your playbook, document everything, and ask for help when you need it. The network is a complex beast, and no one knows it all.
Q: How can I ensure my open-source tools are reliable for critical investigations?
A: Community support, active development, and rigorous testing are key. Tools like Wireshark, Zeek, and Autopsy have strong communities and a proven track record in real-world incidents. Always use thoroughly vetted versions.
Q: What's the difference between threat hunting and incident response?
A: Incident Response is reactive – it deals with known or suspected compromises. Threat Hunting is proactive – it's a search for threats that have bypassed existing security controls, often focusing on TTPs rather than specific IOCs.
Q: Can open-source tools truly replace commercial SIEMs for enterprise logging?
A: For many organizations, advanced open-source SIEMs like the ELK Stack or Graylog offer robust logging, analysis, and alerting capabilities that rival commercial solutions, often at a fraction of the cost, though they may require more in-house expertise to manage.

El Contrato: Your First Network Forensics Gig

Imagine you've just been handed a Wireshark capture file (`incident.pcap`) from a network segment where unusual outbound traffic was detected. Your mission: analyze this capture using only open-source tools to determine if it represents malicious activity, and if so, what kind. Document your findings, including source/destination IPs, ports, protocols, and any identified malicious indicators. If you can, identify the likely attacker TTP involved. Present your findings as if you were reporting to a senior security analyst.

Automatic Protocol Reverse Engineering: A Defensive Blueprint

The digital shadows lengthen, and the whispers of unwritten protocols echo in the data streams. In this concrete jungle of ones and zeros, understanding the language of machines is paramount. Protocol reverse engineering isn't just an academic exercise; it's the forensic art of deciphering the hidden conversations machines have, the ones that can betray their secrets or reveal their nefarious intent. It's about dissecting the binary, line by line, to expose the underlying rules of engagement. This isn't about breaking in; it's about understanding the architecture of an unknown system to build stronger walls, or to spot the Trojan horse before it breaches the gates.

Manual protocol reverse engineering is akin to translating an ancient, cryptic text by hand – a painstaking, error-prone process that demands immense patience and deep expertise. Yet, in the realm of cybersecurity, time is a luxury few can afford. Anomalies in network traffic, unexpected communication patterns from seemingly dormant devices, or the silent, persistent chatter of a botnet – these are the breadcrumbs left behind. Identifying these requires not just observation, but an ability to infer the unspoken rules, the protocol specifications that govern this digital discourse.

This is where automation steps from the shadows. We're not talking about brute-forcing a lock, but about employing sophisticated tools that can analyze executable code and automatically deduce the network protocol it implements. The ability to extract a protocol specification directly from binary code is a powerful capability, especially when dealing with proprietary systems, undisclosed communication channels, or malicious software where documentation is, by design, absent. This knowledge is invaluable for a multitude of security-related contexts:

The Defensive Imperative: Why Protocol RE Matters

Understanding how a protocol works under the hood is critical for several defensive postures:

  • Identifying Implementation Bugs: Flaws in protocol implementation can lead to vulnerabilities. By reverse engineering, we can uncover these weaknesses before an adversary exploits them, allowing for timely patching and mitigation.
  • Ensuring Standard Conformance: In environments with strict compliance requirements, verifying that a system adheres to a defined network protocol standard is crucial. Reverse engineering allows for an independent check against the specification.
  • Exposing Botnet Command and Control (C&C): Many botnets rely on custom or obfuscated protocols to communicate with their C&C servers. Extracting these specifications is a vital step in disrupting command structures, tracking malicious infrastructure, and developing effective countermeasures.
  • Network Anomaly Detection: By understanding the expected protocols and their typical traffic patterns, security analysts can more effectively identify deviations that might indicate an intrusion or malicious activity.

Anatomy of Automation: The Tooling Approach

The challenge has always been the manual burden. The introduction of tools capable of automating this process shifts the paradigm. Instead of dedicating weeks to manually dissecting binary, these tools offer a streamlined approach. They analyze the binary code, identifying patterns, data structures, and control flows that are characteristic of network protocol implementations. This allows for the rapid extraction of a protocol specification, transforming a laborious task into a manageable analytical process.

Imagine receiving a network packet capture from an unknown source, or a suspicious executable file. Without prior knowledge, its purpose and communication methods remain obscure. An automated reverse engineering tool can take this binary, ingest it, and spit out a digestible description of the protocol it uses. This might include:

  • Packet structures and field definitions.
  • Communication states and state transitions.
  • Data encoding and encryption schemes (if not too complex).
  • Key commands and responses.

This is not magic; it's applied computer science leveraging techniques such as static analysis, dynamic analysis, and pattern recognition within the binary and its execution. The goal is to reconstruct the 'intent' behind the code as it relates to network communication.

The "Blue Team" Advantage: Leveraging RE for Defense

While the term "reverse engineering" might evoke images of attackers, its application from a defensive standpoint is where its true value for the ethical security professional lies. As Ron Marcovich and Gabi Nakibly presented, the focus is on understanding *what is*, to better defend *what could be*. This knowledge is armament.

For the blue team, an automated protocol reverse engineering tool acts as an intelligence-gathering asset. It allows security operations centers (SOCs) to:

  • Develop Custom Signatures: Once a protocol is understood, unique signatures can be created for Intrusion Detection Systems (IDS) and Intrusion Prevention Systems (IPS) to reliably flag or block malicious traffic.
  • Enhance Network Monitoring: Knowing the expected structure of protocol traffic allows for more granular and accurate monitoring, reducing false positives and increasing the detection rate of sophisticated threats.
  • Perform Threat Hunting: Analysts can proactively hunt for specific protocol implementations within their network that match those associated with known malicious actors or C&C frameworks.
  • Facilitate Incident Response: During a breach, quickly understanding the communication protocols used by the attackers is critical for containment and eradication. Automated RE can significantly speed up this phase.

Arsenal of the Operator/Analyst

To effectively leverage protocol reverse engineering, an analyst requires a robust toolkit and continuous learning:

  • Disassemblers and Decompilers: Tools like IDA Pro, Ghidra, and radare2 are fundamental for static analysis of binaries.
  • Debuggers: For dynamic analysis, debuggers such as GDB, WinDbg, and x64dbg are indispensable for observing code execution in real-time.
  • Network Analyzers: Wireshark remains the gold standard for capturing and analyzing network traffic.
  • Protocol Analyzers: Specialized tools or custom scripts built using libraries like Scapy can help in crafting and dissecting packets based on reverse-engineered specifications.
  • Machine Learning Frameworks: For advanced automated analysis, frameworks like TensorFlow or PyTorch, coupled with libraries for data science (Pandas, NumPy), can train models to identify protocol patterns.
  • Online Resources: Platforms like GitHub host many open-source RE tools and research. Staying updated on the latest academic papers and conference talks (e.g., Black Hat, DEF CON, USENIX Security) is crucial.
  • Essential Reading: "The IDA Pro Book" and "Reversing: Secrets of Reverse Engineering" are foundational texts for anyone serious about diving deep into binary analysis.

Veredicto del Ingeniero: Is Automated Protocol RE a Game-Changer?

Automated protocol reverse engineering represents a significant leap forward in our ability to understand and defend against complex cyber threats. For defenders, it democratizes a capability previously reserved for highly specialized experts. The ability to quickly decipher the language of unknown or malicious software drastically reduces the time-to-knowledge, which is a critical factor in incident response and threat hunting. However, it's not a silver bullet. Complex protocols, heavy obfuscation, and advanced anti-RE techniques can still pose significant challenges. The true power lies not just in the tool's output, but in the analyst's ability to interpret and act on that information. It's a force multiplier, not a replacement for human ingenuity and critical thinking.

FAQ

What is the primary benefit of automated protocol reverse engineering for cybersecurity professionals?
It significantly speeds up the process of understanding network protocols, enabling faster identification of vulnerabilities, malicious C&C channels, and network anomalies, thereby enhancing defensive strategies.
Can automated tools completely replace manual reverse engineering?
No, while highly effective for many scenarios, complex, heavily obfuscated, or novel protocols may still require significant manual analysis and expertise for full comprehension.
What are the ethical considerations when performing protocol reverse engineering?
It is crucial to only perform reverse engineering on systems and networks for which you have explicit authorization. Unauthorized access or analysis constitutes illegal activity.
How does protocol RE aid in threat hunting?
By understanding the specifications of known malicious protocols, threat hunters can develop more targeted queries and detection rules to search for their presence within a network.

The Contract: Fortifying Your Network Against the Unknown

Your network is a landscape of potential vulnerabilities, often hidden within the very protocols you rely on. The knowledge gained from reverse engineering is your reconnaissance. Your contract is to use this intelligence not to exploit, but to fortify. Design your defenses based on a deep understanding of how systems communicate, both legitimately and maliciously. Implement network segmentation based on protocol criticality, deploy IDS/IPS with signatures derived from known protocol weaknesses, and continuously monitor for traffic patterns that deviate from established norms.

Now, your mission:

Select a simple, open-source network service (e.g., a basic TCP echo server). Write a minimal client for it. Then, use a network sniffer (like Wireshark) to capture the client-server communication. Analyze the captured traffic to infer the protocol's structure and key elements. Document your findings and any potential vulnerabilities you might discover if this were a real-world, critical service. Share your analysis and documented protocol structure in the comments below. Let's see what secrets you can uncover.

Anatomy of CTF Challenges: A Deep Dive into SANS Holiday & Insomni'hack 2022

The digital realm is a battlefield, and Capture The Flag (CTF) events are the training grounds. These aren't just games; they are meticulously crafted simulations designed to test the mettle of aspiring and seasoned security professionals alike. In February 2022, a particular set of challenges from the SANS Holiday Challenges and Insomni'hack CTF emerged, showcasing elegant attack vectors and demanding analytical rigor. This report dissects the architecture of these challenges, not to replicate exploits, but to understand the defensive principles they embody and the skills a blue team operator needs to thrive.

Welcome to Sectemple. Today, we peel back the layers of virtual fortifications and explore how these CTF challenges serve as invaluable blueprints for building robust defenses. Forget the flashy headlines of breaches; true mastery lies in understanding the adversary's playbook from the inside out. Let's dive into the mechanics of "ExPiltration," "Herald," "Slot Machine Investigation," and "Customer Complaint Analysis."

Table of Contents

Analysis Overview: The CTF Landscape

CTFs are more than just coding puzzles; they are concentrated doses of real-world security scenarios. Each challenge is a microcosm of an attack chain, forcing participants to think like an adversary and, crucially, to document their findings. For the blue team, this documentation is gold. Understanding how a "flag" is hidden – whether through steganography, obscure log entries, or network traffic anomalies – directly informs where to look for similar malicious activity in a production environment. The true value of CTFs for defenders isn't in the capture, but in the process of analysis and the potential for threat hunting hypothesis generation.

Insomni'hack CTF: ExPiltration - Data Exfiltration Tactics

Data exfiltration is the silent killer of security. Challenges like "ExPiltration" typically simulate scenarios where an attacker has gained initial access and is attempting to siphon sensitive data undetected. This often involves understanding various covert channels: DNS tunneling, ICMP exfiltration, or leveraging seemingly benign protocols like HTTP/S for data transfer. A defender's goal is to identify anomalous traffic patterns that deviate from normal baseline activity. This means knowing what "normal" looks like for your network – typical ports, protocols, data volumes, and destinations. Anomalies are the whispers in the digital wind.

Key defensive takeaways here revolve around network monitoring, deep packet inspection (DPI), and behavioral analysis. Understanding the *intent* behind the traffic is paramount. Is that large DNS query to an unknown domain legitimate, or is it an attacker using DNS for command and control or data smuggling? This requires robust logging, efficient log analysis tools, and potentially, Security Information and Event Management (SIEM) systems tuned to detect suspicious deviations.

Insomni'hack CTF: Herald - Network Forensics and Anomaly Detection

Network forensics is the art of reconstructing events from network traffic. Challenges themed around "Herald" often provide a packet capture (PCAP) file and expect the participant to identify malicious activity within it. This could range from detecting malware C2 communication, identifying the transfer of sensitive files, or even uncovering encrypted command channels. For a defender, mastering tools like Wireshark or tcpdump is non-negotiable. It's about dissecting packets, understanding protocols at a granular level, and spotting the tell-tale signs of compromise.

Defensive strategies involve deploying network intrusion detection systems (NIDS) that can alert on known malicious signatures and baseline normal traffic. More advanced defenses involve User and Entity Behavior Analytics (UEBA) to detect deviations from established norms, even for novel threats. The ability to effectively analyze PCAPs, extract relevant artifacts, and correlate them with other security events is a core competency for any incident response team.

SANS Holiday Challenge: Slot Machine Investigation - Log Analysis and Incident Response

Incident response is where theory meets chaos. A challenge like "Slot Machine Investigation" likely places participants in a simulated breach scenario, requiring them to analyze logs from various systems (servers, endpoints) to understand the attacker's narrative. This is where the value of centralized logging and a well-defined incident response playbook becomes apparent. Attackers often leave digital breadcrumbs – failed login attempts, unusual process execution, file modifications, or network connections – scattered across logs.

Defenses must focus on comprehensive logging, ensuring that critical systems are logging enough detail without becoming unmanageable. The ability to query, filter, and correlate logs from different sources is essential. This is the domain of SIEMs and log aggregation platforms. Furthermore, having a structured incident response plan, including containment, eradication, and recovery phases, ensures that when an incident occurs, the team can react methodically rather than in panic.

SANS Holiday Challenge: Customer Complaint Analysis - Threat Hunting with Context

Threat hunting is proactive. It's about searching for threats that have evaded existing security controls. A "Customer Complaint Analysis" challenge likely provides a realistic scenario where a user report (e.g., slow performance, suspicious emails) is the initial indicator. The hunter must then use various tools and techniques to investigate, validate the complaint, and determine if it's a genuine security incident or a false positive. This often involves endpoint detection and response (EDR) tools, threat intelligence feeds, and a deep understanding of attacker tactics, techniques, and procedures (TTPs).

Building a threat hunting capability requires developing hypotheses based on current threat landscapes and internal telemetry. For instance, if a new ransomware strain is known to exploit a specific vulnerability, a hunter might proactively search endpoints for evidence of that vulnerability being exploited or for the characteristic registry keys or file names associated with the malware. This shifts the security posture from reactive to proactive, significantly reducing the dwell time of attackers.

Engineer's Verdict: CTF Value for Defense

CTF challenges are invaluable for defenders, but their value is unlocked through a specific mindset. They offer a safe sandbox to practice the skills needed to thwart real-world attacks. The true ROI comes not from winning the challenge, but from the deep understanding gained. For instance, successfully navigating an "ExPiltration" challenge teaches you precisely which network traffic patterns or endpoint behaviors to monitor for in your own infrastructure. These are not abstract exercises; they are practical lessons in adversary emulation that directly translate into more effective defensive controls and more targeted threat hunting.

Operator's Arsenal: Essential Tools for CTF Mastery

To excel in the digital arena, whether as an attacker or a defender, a well-equipped arsenal is critical:

  • Network Analysis: Wireshark, tcpdump, Zeek (Bro). Essential for dissecting network traffic from pcap files or live interfaces.
  • Endpoint Forensics: Volatility Framework (memory analysis), Autopsy (disk imaging and analysis), Sysinternals Suite. To investigate compromises on individual machines.
  • Log Analysis & SIEM: Splunk, ELK Stack (Elasticsearch, Logstash, Kibana), KQL (Kusto Query Language). For aggregating, searching, and correlating log data at scale.
  • Threat Hunting Platforms: EDR solutions (e.g., Crowdstrike, SentinelOne), specialized threat hunting tools.
  • Reverse Engineering: Ghidra, IDA Pro, Binary Ninja. For understanding malware or custom binaries.
  • Scripting: Python (with libraries like Scapy, Pandas, Requests), Bash. For automating tasks and custom tool development.
  • Capture The Flag Platforms: Hack The Box, TryHackMe, VulnHub. For hands-on practice.
  • Books: "The Web Application Hacker's Handbook," "Practical Malware Analysis," "Applied Network Security Monitoring."
  • Certifications: OSCP (Offensive Security Certified Professional) for offensive skills, GCFA (GIAC Certified Forensic Analyst) or GCIH (GIAC Certified Incident Handler) for defensive skills.

Defensive Workshop: Building Your CTF Defense Strategy

Successfully navigating CTF challenges as a defender requires a structured approach:

  1. Understand the Objective: What is the challenge asking you to achieve? Is it data found on a system, network traffic analysis, or vulnerability exploitation?
  2. Hypothesize Attacker Behavior: Based on the challenge type, what steps would an attacker likely take?
  3. Identify Key Telemetry Sources: Which logs, network traffic, or system artifacts are most likely to contain the flag or evidence of the attacker's actions?
  4. Tool Selection: Choose the right tools for the job. This might involve Wireshark for network traffic, Volatility for memory dumps, or log analysis tools for server logs.
  5. Systematic Analysis: Methodically examine the chosen telemetry. Look for known indicators of compromise (IoCs) or deviations from normal behavior.
  6. Artifact Extraction: If a flag is found within a file, piece of data, or network packet, extract it cleanly.
  7. Documentation: Record every step taken, every tool used, and every observation made. This is crucial for learning and for building incident response playbooks.
  8. Defensive Translation: How does this specific attack vector translate to your production environment? What alerts can you implement? What threat hunting queries can you build?

Frequently Asked Questions

Q: Are CTFs primarily for offensive security roles?
A: While many CTFs are designed with offensive skills in mind, they offer immense value for defenders. Understanding attack methodologies is fundamental to building effective defenses.
Q: How can I best use CTFs to improve my defensive skills?
A: Focus on the analysis phase. After finding a flag, ask: "How would I detect or prevent this in a real environment?" Document your findings and build threat hunting hypotheses.
Q: What's the difference between a CTF and a real incident?
A: Real incidents lack perfect documentation, time is critical, and there's significant pressure. CTFs provide a controlled environment to build the foundational skills that are then applied under duress.
Q: Is it ethical to practice on CTF platforms?
A: Absolutely. CTF platforms are specifically designed for legal and ethical practice. Participating helps develop skills while contributing to a community focused on security improvement.

The Contract: Your Next Defensive Drill

Consider a recent breach where data exfiltration was the primary objective. Your task is to outline a threat hunting plan. Identify at least three distinct hypotheses for how data *could* have been exfiltrated based on common techniques (e.g., DNS tunneling, encrypted cloud storage uploads, covert channels over HTTP). For each hypothesis, specify the types of logs and network telemetry you would need to collect and analyze, and the specific indicators you would look for to confirm or deny it. This exercise transforms passive knowledge into proactive defense.

```html

Anatomy of a Wi-Fi Breach: Detecting and Defending Your Network

The glowing screen reflects the dimly lit room, a constant hum of activity from the router a subtle reminder of the unseen pathways connecting your digital life. Your Wi-Fi isn't just a convenience; it's the front door to your entire digital home. And like any doorway, it can be forced open. Cybercriminals, those ghosts in the machine, often target these private networks, not for a grand raid, but for the quiet accumulation of data, the subtle redirection of traffic, or the simple piggybacking on your bandwidth. Understanding the signs of a breach is not about succumbing to paranoia; it's about tactical awareness. It's about knowing when the whispers of compromise turn into a full-blown intrusion.

The digital realm is a battlefield, and your home Wi-Fi network is a critical outpost. When an attacker breaches this perimeter, the consequences can cascade rapidly. They gain access to all your connected devices – a gateway to your sensitive files, your financial data, your private communications. Worse, they can use your network as a launchpad for their own nefarious activities, turning your trusted connection into a tool for distributing malware or conducting other illicit operations, all while obscuring their tracks. Vigilance isn't optional; it's a core defensive tenet.

Table of Contents

Wi-Fi Hacking Threats

The threat landscape for wireless networks is as varied as the attackers themselves. A compromised Wi-Fi can lead to:

  • Device Compromise: An attacker can exploit your Wi-Fi connection to gain unauthorized access to your computers, smartphones, and IoT devices.
  • Data Theft: Once inside your network, criminals can intercept sensitive data, including login credentials, personal files, and financial information.
  • Identity Theft: Stolen personal information can be used for identity fraud, leading to significant financial and personal repercussions.
  • Malware Distribution: Your network can be used to spread malware to other devices on your network or even to external targets.
  • Bandwidth Theft: Attackers can consume your internet bandwidth for their own activities, such as large downloads, streaming, or even illegal activities, leading to a noticeable slowdown.
  • Network Redirection: They might redirect your traffic through malicious servers, leading you to phishing sites or compromising your online activities.

Signs of a Hacked Wi-Fi Network

Detecting a breach requires more than just a passing glance. Look for these critical indicators:

1. Unexplained Slowdowns

Your internet speed has always been a reliable indicator of your service. However, if you're experiencing persistent, inexplicable slowdowns that aren't tied to peak usage times or ISP issues, it's a major red flag. An intruder siphoning off your bandwidth for their own activities—whether it's distributing malware, establishing remote connections, or simply piggybacking—will invariably degrade your network's performance. This isn't about a temporary dip; it's about a consistent, frustrating lag that disrupts your online operations.

2. Unrecognized Devices on Your Network

Every device connected to your network has a unique identifier. The most direct way to spot an intruder is by examining the list of connected devices. Access your router's administration interface via your web browser (typically by typing its IP address, like 192.168.1.1 or 192.168.0.1, into the address bar). Navigate to the list of connected clients or DHCP clients. Compare the listed devices against your known devices (laptops, phones, smart TVs, etc.). An attacker's device might appear with an unusual or generic hostname, or its IP address might not align with the typical private address range of your router's subnet. This is where a basic understanding of IP addressing becomes crucial for threat hunting.

"The simplest way to be fooled is to be convinced that you are not being fooled." - Robert Noyce, co-founder of Intel. Never assume your network is pristine just because you haven't noticed anything overtly wrong.

3. Inability to Access Router Settings

Cybercriminals understand that your ability to reassert control hinges on your access to the router's management console. After penetrating your network, one of their first actions is often to change the router's administrative credentials. If you find yourself unable to log in with your established username and password, assume the worst. This isn't a mere glitch; it's a strong signal that an unauthorized party has taken control of your network's control panel, fortifying their position and locking you out.

4. Unrecognized Software or Settings Changes

Beyond the router itself, an attacker might try to push malicious software onto your devices or alter network settings to facilitate their operations. Keep an eye out for any unfamiliar applications installed on your computers or mobile devices. Similarly, if your router's firmware has been updated without your intervention, or if DNS settings have been mysteriously altered, these are strong indicators of compromise.

What to Do if Your Wi-Fi Network Has Been Hacked

Discovering a breach can be unsettling, but panic is the enemy of effective response. Implement the following steps methodically:

  1. Factory Reset Your Router: This is your digital panic button. Performing a factory reset reverts your router to its original default settings. To do this, locate the small reset button (often recessed on the back or bottom of the router) and press and hold it with a paperclip for about 10-15 seconds while the router is powered on. This will erase any malicious configurations and potentially remove certain types of malware embedded in the router's firmware.
  2. Change Router and Wi-Fi Passwords Immediately: This is non-negotiable. After the reset, you'll need to reconfigure your network. Create strong, unique passwords for both your router's login and your Wi-Fi network (SSID password). Avoid default credentials like "admin" or "password," and use a combination of uppercase and lowercase letters, numbers, and symbols. Consider a password manager for generating and storing these securely.
  3. Uninstall Suspicious Software: Log in to all your connected devices and meticulously review installed applications. Remove anything you don't recognize or didn't intentionally install. Run a full anti-malware and antivirus scan on each device to detect and remove any lingering threats.
  4. Disconnect Unrecognized Devices: If you identified any unauthorized devices during your router inspection, disconnect them immediately. You can usually do this through the router's interface or by blocking their MAC addresses.
  5. Disable Remote Administration: Most routers offer a remote administration feature, allowing you to manage settings from outside your home network. While sometimes convenient, it's also a prime target for attackers. Access your router's settings and disable this feature unless you have a very specific, well-understood need for it.
  6. Run a Comprehensive Malware Scan: Even after resetting the router and removing suspicious software, it's prudent to run in-depth malware scans on all critical devices. This ensures no persistent threats remain hidden.

How to Prevent Your Wi-Fi Network Being Hacked

Proactive defense is always more effective than reactive damage control. Fortify your network by adopting these best practices:

  • Keep Software Updated: Regularly update your router's firmware and the operating systems and applications on all your connected devices. Patches often address critical security vulnerabilities.
  • Use Strong, Unique Passwords: As mentioned, this is paramount. Implement a robust password policy for your router and Wi-Fi. Consider using WPA3 encryption if your router supports it; it's significantly more secure than older WPA2.
  • Avoid Suspicious Links and Downloads: This is a fundamental principle of cybersecurity applicable beyond just Wi-Fi. Phishing attempts often lead users to compromise their network security through deceptive links or malicious downloads.
  • Use a Virtual Private Network (VPN): A VPN encrypts your internet traffic, creating a secure tunnel between your device and the VPN server. This makes it much harder for attackers to snoop on your online activities, even if they manage to gain access to your local network. For serious security-conscious users, a reputable VPN like NordVPN is an essential tool, not a luxury. It provides an additional layer of abstraction and security, masking your IP address and encrypting your data.
  • Secure Your Router's Administration Panel: Even after changing the default password, consider adding an extra layer of security to your router's admin interface, such as IP whitelisting or two-factor authentication if available.
  • Disable WPS (Wi-Fi Protected Setup): While designed for convenience, WPS has known vulnerabilities that can be exploited to gain network access. If you don't use it, disable it in your router settings.

Verdict of the Engineer: Is Your Wi-Fi a Fortress or a Sieve?

Your Wi-Fi router is the gateway to your digital life. Treating it with anything less than rigorous security protocols is an invitation to disaster. The signs of a compromise are often subtle, requiring an analyst's eye to detect. A slow connection, unrecognized devices, or an inaccessible admin panel aren't mere annoyances; they are alarm bells. While a factory reset and password change are crucial immediate actions, the true defense lies in a proactive, multi-layered strategy. This includes consistent updates, strong credentials, and crucially, the use of a VPN. For those serious about protecting their digital perimeter, investing in a reputable VPN service like NordVPN is not an option; it's a requirement for operating in today's threat landscape. Don't wait for the breach; build your defenses now.

Arsenal of the Operator/Analyst

To effectively monitor, detect, and defend your network, consider these tools and knowledge assets:

  • Router Administration Interface: Your primary tool for monitoring connected devices and configuring security settings.
  • Network Scanning Tools: Applications like Nmap, Fing (mobile app), or Angry IP Scanner can help identify devices on your network.
  • Password Manager: Tools like Bitwarden, 1Password, or KeePass for generating and storing strong, unique passwords.
  • Antivirus/Anti-Malware Software: Reputable solutions like Malwarebytes, Bitdefender, or ESET for scanning and cleaning devices.
  • Virtual Private Network (VPN): Services such as NordVPN, ExpressVPN, or ProtonVPN for encrypting traffic and enhancing privacy.
  • Understanding of Network Fundamentals: Knowledge of IP addressing, subnetting, DHCP, and DNS is crucial for effective analysis.
  • Security Best Practices Guides: Resources on hardening network devices and secure configuration.

Frequently Asked Questions

Q: Can my ISP see if my Wi-Fi has been hacked?
Your ISP can see traffic flowing to and from your home, but they generally cannot tell if your *internal* Wi-Fi network has been compromised by an unauthorized user on your network. They can detect unusual traffic patterns from your connection to the internet, though.
Q: How often should I change my Wi-Fi password?
While not strictly necessary to change it frequently if it's strong and your network is secure, changing it periodically (e.g., every 6-12 months) or immediately after any suspicious activity is a good security hygiene practice.
Q: Is WPA3 encryption significantly better than WPA2?
Yes, WPA3 offers enhanced security features, including stronger encryption, improved protection against brute-force attacks, and better handling of open networks. If your router supports WPA3, it's recommended to use it.
Q: What are the risks of using public Wi-Fi?
Public Wi-Fi is inherently insecure. Attackers can easily set up fake hotspots (evil twin attacks) or sniff traffic on legitimate ones. Using a VPN is strongly recommended when connecting to any public Wi-Fi.

The Contract: Secure Your Digital Outpost

You've learned the tell-tale signs of a network breach and the critical steps to reclaim control. Now, it's time to act. Your mission, should you choose to accept it, is to perform a full audit of your current home network security. Log into your router, review connected devices, and verify your passwords and encryption status. If you find anything amiss, execute a factory reset and reconfigure your network with strong, unique credentials. Do not dismiss this as a mere suggestion; consider it your defense contract. Report back in the comments with your findings or any unusual devices you discovered. Let the audit begin.

Your move. What are you securing next?

Hacker Hunting with Wireshark: Unmasking Malware in Encrypted Traffic

The digital ether hums with secrets, a constant, silent war waged in the shadows of networks. While firewalls stand as supposed sentinels and logs aim to chronicle every transgression, the true story is always in the packets. They don't lie, not really. You can mask processes, scrub logs until they're pristine, but the raw data of communication—the packets—will always whisper truths. Malware is a persistent phantom, a stain on the pristine canvas of modern networks. Today, we're not just patching vulnerabilities; we're performing digital autopsies, guided by the master of the sniff, Chris Greer. We'll delve into the heart of network traffic with Wireshark, even when the conversation is shrouded in SSL encryption, to hunt down those elusive digital phantoms.

This isn't about breaking in; it's about standing your ground. Understanding how the enemy moves is the first step in building impregnable defenses. We'll dissect Greer's methods, transforming his insights into actionable intelligence for the blue team.

Table of Contents

The Unseen Battlefield: Packets as Truth

The digital realm is a labyrinth, and within its corridors, data flows ceaselessly. While administrators often focus on endpoint security and perimeter defenses, the network traffic itself is a goldmine of forensic evidence. Malware, in its myriad forms, rarely announces its arrival. It slithers, disguised, infecting systems and exfiltrating data with chilling efficiency. Chris Greer, a recognized luminary in packet analysis, demonstrates the power of Wireshark—an indispensable tool in any security operator's arsenal—to unearth these hidden threats, even when communication channels are ostensibly secured by SSL/TLS.

Sharkfest / DEFCON Insights: Lessons from the Trenches

Conferences like Sharkfest and DEFCON are crucibles where cutting-edge research and practical battlefield experience converge. Greer's participation in these events highlights the ongoing evolution of network threats and the corresponding advancements in detection methodologies. Understanding the context of these gatherings provides insight into the adversarial mindset and the continuous cat-and-mouse game between attackers and defenders.

What is Threat Hunting? The Proactive Stance

Threat hunting is not a reactive measure; it's a proactive, iterative approach to searching for and identifying threats that have evaded existing security controls. It's about assuming compromise and actively seeking out the adversary's presence within your network before they can achieve their objectives. Unlike traditional incident response, which waits for alerts, threat hunting involves formulating hypotheses and using data to validate or invalidate them. It's the deep reconnaissance of the defender, an essential practice in today's complex threat landscape.

Why Hunt Threats with Wireshark? The Packet-Level Advantage

Wireshark, at its core, is a packet analyzer. It captures and dissects network traffic, presenting it in a human-readable format. Its true power for threat hunting lies in its granular visibility. While encryption can obscure payloads, packet headers, flow patterns, and metadata often reveal anomalies that signal malicious activity. By examining packet captures (PCAPs), security professionals can reconstruct events, identify command-and-control (C2) channels, exfiltration attempts, and the lateral movement of malware.

Understanding Indicators of Compromise (IoCs): The Digital Fingerprints

Indicators of Compromise (IoCs) are the tell-tale artifacts left behind by malicious actors. These can range from specific IP addresses and domain names used for C2 communication, to unusual file hashes, registry keys, or even specific network traffic patterns. Identifying IoCs is fundamental to threat hunting. In Wireshark, IoCs might manifest as connections to known malicious IPs, unusual DNS queries, or traffic volumes that deviate from normal baselines.

Why Should We Care? The Stakes of Negligence

The consequences of failing to detect malware can be catastrophic. Data breaches lead to financial losses, reputational damage, regulatory fines, and loss of customer trust. Malware can cripple operations, destroy critical data, or be used as a staging ground for more sophisticated attacks. For organizations relying on sensitive data, the threat is existential. Proactive threat hunting with tools like Wireshark is not a luxury; it's a necessity for survival in the modern cybersecurity landscape.

Decoding Packets and PCAPs: The Raw Data

A Packet Capture (PCAP) file is essentially a snapshot of network traffic. It's the raw material of network forensics. Analyzing PCAPs requires patience and a systematic approach. Key elements to examine include:

  • Source and Destination IPs/Ports: Where is the traffic originating from and going to? Are there connections to unusual or known malicious destinations?
  • Protocols: What protocols are being used (HTTP, DNS, SMB, etc.)? Are they being used legitimately?
  • Packet Size and Timing: Anomalies in packet size or the frequency of communication can indicate data exfiltration or C2 activity.
  • Payloads (where visible): Even in encrypted traffic, metadata or unencrypted fragments can provide clues.

Chris Greer emphasizes that understanding the protocols is paramount. "You need to know what normal looks like to spot what's abnormal," he often states.

Identifying 'Low-Hanging Fruit': Quick Wins in Analysis

Not every threat requires deep, complex analysis. Greer highlights the importance of identifying "low-hanging fruit"—obvious anomalies that can be spotted with basic filtering and observation. These might include:

  • Connections to known sinkholes or C2 servers.
  • Unusual DNS queries or excessive DNS traffic.
  • Traffic patterns that deviate sharply from historical baselines.
  • Unexpected protocols or ports being used.

Focusing on these initial indicators can quickly narrow down the scope of investigation.

Mastering TCP Stream Analysis: Reconstructing Conversations

Wireshark's ability to reconstruct TCP streams is invaluable. By right-clicking on a TCP packet and selecting "Follow > TCP Stream," you can view the entire conversation between two endpoints as if it were a chat log. This is crucial for understanding the context of communication and identifying malicious commands or data exchanges, even if the payload is largely obfuscated.

Advanced Stream Analysis Techniques

Beyond basic TCP streams, advanced analysis involves correlating flows and looking for patterns across multiple connections. This includes examining UDP traffic, QUIC, and understanding how encrypted sessions are established and maintained. Even encrypted traffic leaves a fingerprint, and understanding these session parameters can be as revealing as plaintext.

"The greatest deception men suffer is from their own opinions." - Leonardo da Vinci. In cybersecurity, the greatest deception is believing your network is clean. Always assume. Always hunt.

Knowing What to Look For: The Art of Observation

This is where expertise truly shines. Greer stresses that effective threat hunting requires a deep understanding of common malware behaviors and attack vectors. Attackers often reuse tactics, techniques, and procedures (TTPs). Familiarity with:

  • Standard C2 communication protocols (HTTP/S, DNS tunneling, custom protocols).
  • Common exfiltration methods.
  • Lateral movement techniques (SMB, RDP).
  • Malware reconnaissance activities.

allows an analyst to recognize suspicious patterns amidst the noise.

The JA3 Client Fingerprint: Unmasking Connections

One of Greer's key techniques involves the JA3 fingerprint. JA3 is a method of creating a hash of the TLS client hello packet. This hash uniquely identifies the client's SSL/TLS library and its configuration. By comparing JA3 hashes against known malicious or anomalous fingerprints, analysts can identify potentially compromised clients or C2 communication, even within encrypted traffic. This is a powerful way to gain visibility through encryption.

Leveraging ja3er.com and Alternatives

Resources like ja3er.com allow you to look up JA3 hashes and see if they are associated with known malicious software. Greer also points to alternative resources for malware analysis PCAPs, which are essential for practicing these techniques. Being able to generate and compare these fingerprints is a critical skill.

Exploring Brim Security for Packet Analysis

For those looking to streamline packet analysis, tools like Brim Security offer innovative ways to query PCAP files using a combination of Sigma rules and native query languages. This can significantly accelerate the threat hunting process, allowing for more efficient identification of IoCs within large datasets.

Harnessing TSHARK for Command-Line Power

While Wireshark's GUI is powerful, its command-line counterpart, TSHARK, is essential for automation and large-scale analysis. TSHARK can be scripted to process PCAPs, extract specific fields, and apply filters, making it a vital tool for operators who need to analyze vast amounts of data or integrate packet analysis into larger security workflows.

Handling Large Data Examples

Real-world network captures can be massive, spanning gigabytes or even terabytes. Greer's approach involves efficient filtering, sampling, and using tools like TSHARK or dedicated SIEM/log analysis platforms to manage and analyze these large datasets. Techniques like focusing on specific protocols, time ranges, or IP addresses are critical to avoid being overwhelmed.

Chris Greer's Comprehensive Course

For those serious about mastering network forensics and threat hunting with Wireshark, Chris Greer offers in-depth courses. Platforms like Udemy host these valuable training resources. Investing in specialized training ensures you gain the expertise needed to effectively defend against sophisticated threats, covering everything from basic packet capture to advanced analysis techniques like JA3 fingerprinting.

"The function of a good security system is part psychology, part engineering." - Bruce Schneier. Wireshark analysis is no different; it requires understanding both the technical details and the human/malicious intent behind the traffic.

Conclusion: The Vigilant Operator

The network is a living entity, and its traffic is its lifeblood. Learning to read that blood—to diagnose its ailments—is the hallmark of a skilled security operator. Chris Greer's work with Wireshark provides a clear roadmap for unmasking the malware that lurks within, even behind the veil of encryption. By understanding packet structures, utilizing tools like JA3, and adopting a proactive threat hunting mindset, defenders can significantly enhance their ability to detect and neutralize advanced threats.

The Operator's Challenge: Fortifying Your Network Against the Whispers

You've seen the anatomy of a network hunt. Now, take the reins. Download a sample PCAP file from a reputable source (like those mentioned by Greer) or capture traffic from your *authorized* lab environment. Your challenge: identify three distinct anomalies within the traffic that could indicate suspicious activity. This could be an unusual connection, a strange protocol usage, or a deviation in traffic volume. Document your findings, the filters you used in Wireshark or TSHARK, and the potential implications for network security. Post your findings and methodology in the comments below. Let's see who can uncover the most critical secrets hidden in plain sight.

Threat Hunting: Unmasking FQDN Beacons and Advanced Defensive Strategies

The digital realm is a shadow-drenched alleyway, and tonight, we're not just walking through it; we're mapping its every dark corner. The hum of servers, the flicker of compromised indicators – this is the symphony of an ongoing digital conflict. Today, we peel back the layers of sophisticated network techniques, focusing on the elusive "FQDN Beacons," a method that can leave even seasoned defenders fumbling in the dark. This isn't about cracking systems; it's about dissecting the enemy's playbook to build an impenetrable fortress. We're diving deep into the mechanics of threat hunting, turning the attacker's art into our shield.

This analysis is brought to you by cha0smagick, your guide through the labyrinthine world of cybersecurity, operating from the shadows of Sectemple. Expect no easy answers, only the grim, methodical truth behind the threats that loom in the digital ether. We'll dissect the anatomy of FQDN beacons, understand their purpose, and most importantly, forge strategies to detect and neutralize them before they become catastrophic breaches. This is a critical deep-dive, essential for any blue team operative looking to elevate their game.

The Shadow Play: Understanding FQDN Beacons

In the intricate dance of network reconnaissance and command and control (C2), attackers constantly seek methods to blend in, to become ghosts in the machine. One potent technique involves Weaponizing the Domain Name System (DNS) itself. FQDN (Fully Qualified Domain Name) beacons, at their core, are a form of DNS tunneling or covert communication. Attackers leverage DNS queries to exfiltrate small amounts of data or to send commands to compromised hosts, masquerading these malicious transmissions as legitimate network traffic.

Imagine a silent signal, a whisper carried on the wind of global network requests. An attacker crafts a series of DNS queries, each containing a piece of data encoded within a subdomain or the domain name itself. The victim machine, infected with malware, makes these requests to a domain controlled by the attacker. The attacker's infrastructure then processes these queries, extracting the encoded information. Conversely, the attacker can embed commands within DNS responses, effectively controlling the compromised host without direct, detectable C2 channels.

Anatomy of a Beacon: How They Work

The elegance of FQDN beacons lies in their deceptive simplicity and their grounding in legitimate network protocols. Here's a breakdown of the mechanics:

  • Encoding Data: Attackers encode data (commands, exfiltrated files, system information) into strings that are valid as DNS subdomains or entire domain names. This can involve simple character substitution, Base64 encoding, or more complex transformations. For example, a query for SGVsbG8gV29ybGQ=.attacker-domain.com might be a Base64 encoded message.
  • DNS Queries: The malware on the compromised host initiates these specially crafted DNS queries. These queries are directed towards authoritative DNS servers controlled by the attacker, often through a series of recursive lookups that eventually reach the attacker's infrastructure.
  • Data Exfiltration/Command Insertion:
    • Exfiltration: As the DNS query traverses the network, the payload is embedded within the query itself. The attacker's DNS server receives these queries and extracts the encoded data.
    • Command Insertion: In the reverse process, the attacker embeds commands into the DNS response. This could be within the DNS TXT record, CNAME, or even subtly within the IP address or other record types, depending on the attacker's sophistication and chosen tunneling method.
  • Low Bandwidth, High Stealth: These methods are typically low-bandwidth, meaning they are not suitable for large file transfers. However, this limitation is a feature for stealth. Small, intermittent data transfers blend easily into the background noise of normal network activity, making detection a formidable challenge.

The Attacker's Edge: Why FQDN Beacons are Dangerous

From a defender's perspective, FQDN beacons present a multifaceted threat:

  • Stealth and Evasion: They leverage a fundamental, high-volume protocol (DNS) that is often permitted through firewalls with minimal inspection. This makes them incredibly difficult to distinguish from legitimate traffic.
  • Resilience: DNS infrastructure is inherently distributed and resilient. Attackers can set up multiple fallback domains and servers, making it harder to shut down their C2 operations completely.
  • Bypassing Traditional Security: Standard network intrusion detection systems (IDS) and firewalls may not inspect the payload of DNS queries deeply enough to identify encoded data or malicious intent.
  • Persistent Access: Once established, FQDN beacons can provide a stable, albeit slow, channel for attackers to maintain access, issue commands, and exfiltrate sensitive data over extended periods.

Threat Hunting: Strategies for Detection and Mitigation

Hunting for FQDN beacons requires a shift in focus from traditional network traffic analysis to the granular inspection of DNS logs and the behavior of endpoints. It's about looking for anomalies, deviations from the norm, and patterns that scream "malice" in a sea of legitimate requests.

Hypothesis: Malicious DNS Behavior is Present

Our initial hypothesis is that compromised hosts are utilizing FQDN beacons for covert communication, aiming to exfiltrate data or receive commands, by sending unusually structured or voluminous DNS queries to specific domains or IPs.

Phase 1: Log Collection and Baseline Establishment

The foundation of effective threat hunting lies in comprehensive data. You cannot hunt what you cannot see.

  • DNS Server Logs: These are your primary source. Collect logs from internal DNS servers, forwarders, and any security appliances that inspect DNS traffic. Key fields to look for include:
    • Timestamp
    • Source IP address (of the querying client)
    • Destination IP address (of the DNS server being queried)
    • Query Type (A, AAAA, TXT, CNAME, MX, etc.)
    • Query Name (the FQDN being requested)
    • Response Code (NXDOMAIN, NOERROR, etc.)
    • Response Data (if available and logged)
  • Endpoint Logs: Process execution logs, network connection logs (e.g., Sysmon Event ID 3, 11), and application logs can provide context about which processes are initiating DNS queries.
  • Firewall/Proxy Logs: While often limited in DNS payload inspection, these can show connections to suspicious DNS servers or unusual traffic patterns associated with DNS requests.

Establishing a Baseline: Before hunting, you must understand what "normal" looks like. Analyze typical DNS query volumes, query types, and the FQDNs that internal hosts commonly resolve. This baseline is critical for identifying outliers.

Phase 2: IoCs and Detection Techniques

Now, we translate our hypothesis into actionable detection methods. We're looking for the fingerprints of the adversary.

  • Unusual Subdomain Depth and Length: Attackers often encode data by creating long, multi-level subdomains. Look for queries with an excessive number of dots or exceptionally long FQDNs.
    
    let avgSubdomainDepth = avg(strlen(query_name) - strlen(tld));
    // Example KQL for Azure Sentinel to find deeply nested subdomains
    DnsEvents
    | extend DomainParts = split(Name, '.')
    | extend SubdomainDepth = array_length(DomainParts) - 2 // -2 for TLD and root domain
    | summarize Count = count() by DnsServerIp, RemoteIP, SubdomainDepth
    | where SubdomainDepth > 5 // Adjust threshold based on baseline
    | project DnsServerIp, RemoteIP, SubdomainDepth, Count
        
  • High Volume of NXDOMAIN Responses: While legitimate DNS can result in NXDOMAIN (non-existent domain), a disproportionately high rate from a specific client or to a peculiar domain can indicate brute-force attempts at guessing or probing for a C2 channel.
  • Anomalous Query Types: While A and AAAA records are standard, attackers might leverage less common types like TXT, NULL, or custom DNS records for data exfiltration if their infrastructure supports it. A sudden surge in these types from a particular host is suspicious.
  • Entropy Analysis of FQDNs: Attackers often use pseudo-random or encoded strings. High entropy within subdomain names suggests randomness rather than human-readable hostnames. Tools can be used to calculate entropy scores for FQDNs.
  • Beaconing Patterns: Analyze the timing of DNS requests. Are they occurring at regular intervals (e.g., every 60 seconds), or in bursts that don't align with normal user activity? This periodicity can be a strong indicator of automated C2 communication.
  • Geographic Anomalies: If your organization's typical DNS traffic is directed towards specific regional servers, sudden spikes in queries to domains hosted in unusual geographic locations can warrant investigation.
  • Domain Blacklisting and Reputation: While basic, checking queried domains against threat intelligence feeds and blacklists is a fundamental step. However, advanced attackers use newly registered domains (NRDs) or compromised legitimate domains, making this less effective in isolation.

Phase 3: Mitigation and Containment

Detection is only half the battle. Once an FQDN beacon is identified, swift action is paramount.

  • Network Segmentation: Isolate the suspected compromised host(s) from the rest of the network to prevent lateral movement and further data exfiltration.
  • DNS Sinkholing: Redirect malicious FQDNs to a controlled sinkhole server. This can prevent the malware from communicating with the attacker's C2 infrastructure and provide valuable intelligence on the scope of the infection.
  • Endpoint Remediation: Remove the identified malware from the compromised host. This often involves in-depth forensic analysis to ensure all malicious components are eradicated.
  • DNS Firewalling/Policy Enforcement: Implement stricter DNS policies. Block queries to known malicious domains, enforce query length limits, restrict uncommon record types for untrusted clients, and consider using DNS security solutions that perform deep packet inspection.
  • Process Monitoring: Use endpoint detection and response (EDR) solutions to monitor process behavior, especially network connections originating from unusual processes or exhibiting anomalous DNS query patterns.

Veredicto del Ingeniero: ¿Vale la pena adoptar estas técnicas de Hunting?

Absolutely. Ignoring the potential for DNS-based C2 and data exfiltration is akin to leaving your castle gates wide open. FQDN beacons are not theoretical; they are a persistent threat employed by sophisticated adversaries, from APTs to advanced ransomware groups. The investment in DNS logging, log analysis tools (like SIEMs or dedicated threat hunting platforms), and the training of your security personnel to recognize these patterns is not an expense – it's a critical investment in organizational resilience. The trade-off for the effort is a significant reduction in the attack surface and a heightened ability to detect and respond to some of the most insidious threats. The time to hunt is always now.

Arsenal del Operador/Analista

  • SIEM Solutions: Splunk Enterprise Security, Azure Sentinel, ELK Stack (Elasticsearch, Logstash, Kibana)
  • Endpoint Detection and Response (EDR): CrowdStrike Falcon, Microsoft Defender for Endpoint, SentinelOne
  • Network Traffic Analysis (NTA): Zeek (Bro), Suricata, Wireshark
  • Threat Intelligence Platforms (TIP): MISP, Anomali ThreatStream
  • Specialized DNS Security Tools: Infoblox, Cisco Umbrella, Quad9
  • Books: "The Art of Network Security Monitoring" by Richard Bejtlich, "Practical Threat Hunting" by Kyle Rainey
  • Certifications: GIAC Certified Incident Handler (GCIH), Certified Threat Intelligence Analyst (CTIA), Offensive Security Certified Professional (OSCP) - Yes, knowing offensive techniques is key to defending.

Taller Práctico: Fortaleciendo tu Defensa DNS

Let's craft a basic detection script. This example uses Python to analyze DNS logs for common indicators of FQDN beaconing. It's a starting point, not a definitive solution, but illustrates the concepts.

  1. Set up your environment: Ensure you have Python installed and a way to feed your DNS logs (e.g., a CSV file exported from your DNS server).
  2. Install necessary libraries: You might need dnspython for more advanced DNS parsing and potentially libraries for entropy calculation. For this basic example, we'll focus on string manipulation.
  3. Scripting the analysis:
    
    import re
    import collections
    
    def analyze_dns_logs(log_file_path, min_subdomain_depth=4, max_fqdn_length=100, entropy_threshold=3.0):
        """
        Analyzes DNS logs for potential FQDN beacon indicators.
        Requires logs formatted such that each line contains at least:
        'timestamp, client_ip, query_name, query_type'
        """
        suspicious_queries = collections.defaultdict(list)
        entropy_calculator = EntropyCalculator() # Assume EntropyCalculator class is defined elsewhere
    
        try:
            with open(log_file_path, 'r') as f:
                for i, line in enumerate(f):
                    # Basic log parsing: adjust regex as needed for your log format
                    match = re.match(r'(\d{4}-\d{2}-\d{2} \d{2}:\d{2}:\d{2}), ?([\d\.]+), ?([^,]+), ?([^,]+)', line)
                    if not match:
                        print(f"Skipping malformed line {i+1}: {line.strip()}")
                        continue
    
                    timestamp, client_ip, query_name, query_type = match.groups()
    
                    # Indicator 1: Excessive Subdomain Depth
                    domain_parts = query_name.split('.')
                    # We subtract 2 for the TLD and the root domain (e.g., example.com)
                    # This logic might need tuning based on your domain structures
                    subdomain_depth = len(domain_parts) - 2
                    if subdomain_depth > min_subdomain_depth:
                        suspicious_queries[client_ip].append(f"Depth={subdomain_depth} ({query_name})")
    
                    # Indicator 2: Excessive FQDN Length
                    if len(query_name) > max_fqdn_length:
                        suspicious_queries[client_ip].append(f"Length={len(query_name)} ({query_name})")
    
                    # Indicator 3: High Entropy (Requires EntropyCalculator implementation)
                    # For simplicity, let's assume we're looking at the subdomain part before the TLD
                    if len(domain_parts) > 2:
                        subdomain_part = ".".join(domain_parts[:-2])
                        if subdomain_part: # Ensure there's a subdomain part to analyze
                             try:
                                 entropy = entropy_calculator.calculate(subdomain_part)
                                 if entropy > entropy_threshold:
                                     suspicious_queries[client_ip].append(f"HighEntropy={entropy:.2f} ({query_name})")
                             except Exception as e:
                                 print(f"Error calculating entropy for {subdomain_part}: {e}")
    
    
        except FileNotFoundError:
            print(f"Error: Log file not found at {log_file_path}")
            return
        except Exception as e:
            print(f"An unexpected error occurred: {e}")
            return
    
        # Report findings
        print("\n--- Suspicious DNS Activity Report ---")
        if not suspicious_queries:
            print("No immediate suspicious activity detected based on current criteria.")
        else:
            for ip, indicators in suspicious_queries.items():
                print(f"Client IP: {ip}")
                for indicator in indicators:
                    print(f"  - {indicator}")
                print("-" * 20)
    
    # Placeholder for an Entropy Calculator class
    class EntropyCalculator:
        def calculate(self, text):
            from math import log, fsum
            if not text:
                return 0
            text = text.lower() # Normalize
            prob = collections.Counter(text)
            total = len(text)
            # Shannon entropy: H(X) = -sum(p(x_i) * log2(p(x_i)))
            entropy = -fsum(count/total * log(count/total, 2) for count in prob.values())
            return entropy
    
    # --- Example Usage ---
    # Create a dummy log file for testing
    dummy_log_content = """
    2023-10-27 10:00:01, 192.168.1.100, google.com, A
    2023-10-27 10:00:02, 192.168.1.101, example.com, A
    2023-10-27 10:00:03, 192.168.1.100, very.long.subdomain.encoded.data.example.com, A
    2023-10-27 10:00:04, 192.168.1.102, example.com, A
    2023-10-27 10:00:05, 192.168.1.101, this.is.another.deeply.nested.subdomain.beacon.example.com, A
    2023-10-27 10:00:06, 192.168.1.100, google.com, A
    2023-10-27 10:00:07, 192.168.1.103, verylongfqdnstringthatisintentionallymadeextralongtoexceedstandardlimitsandtestlimits.attackerdomain.net, A
    2023-10-27 10:00:08, 192.168.1.101, data.f0r.exfil.com, TXT
    2023-10-27 10:00:09, 192.168.1.104, normal.domain.net, A
    2023-10-27 10:00:10, 192.168.1.103, a1b2c3d4e5f67890......longencodedstring.attacker.io, A
    """
    
    dummy_log_file = "dns_sample.log"
    with open(dummy_log_file, "w") as f:
        f.write(dummy_log_content)
    
    # Run the analysis
    analyze_dns_logs(dummy_log_file, min_subdomain_depth=4, max_fqdn_length=70, entropy_threshold=2.5)
        
  4. Integrate and Automate: Feed live DNS logs into this script or a more sophisticated version running on your SIEM. Set up alerts for IPs triggering multiple indicators.

Frequently Asked Questions

What is the primary goal of an FQDN beacon?

The primary goal is to establish a covert communication channel for commands or data exfiltration by leveraging DNS queries, aiming for stealth and evasion of traditional security controls.

Are there legitimate uses for DNS tunneling?

Yes, DNS tunneling can be used for legitimate purposes like troubleshooting, network monitoring, or secure access in highly restricted environments. However, its structure and usage patterns often differ significantly from malicious implementations.

How can I differentiate between malicious and legitimate DNS tunneling?

Key indicators include the entropy of queried names/subdomains, unusual query volumes, non-standard query types, periodicity of requests, and the reputation of the queried domain. Establishing a strong baseline of normal traffic is crucial.

Is DNS tunneling slow?

Generally, yes. DNS has inherent limitations in terms of the amount of data that can be transmitted per query/response. It's typically used for command and control or small data chunks, not large file transfers.

What is the role of TXT records in DNS beaconing?

TXT records are commonly used because they are designed to hold arbitrary text strings, making them suitable for embedding larger amounts of data or commands compared to other record types.

El Contrato: Secure Your DNS Perimeter

The digital shadows are deep, and FQDN beacons are just one of the phantoms lurking within. Your enemy isn't static; they adapt. Your defenses must do the same. This isn't about chasing every anomaly; it's about building a robust, layered detection strategy that focuses on the indicators of compromise that truly matter. Fortify your DNS infrastructure. Log everything. Analyze intelligently. Hunt relentlessly. The compromise of your network might be just one DNS query away. Are you ready to prevent it?