Introduction: Unveiling the Digital Frontlines
The digital landscape is a battlefield, and knowledge is your sharpest weapon. In the relentless pursuit of understanding system vulnerabilities, mastering attack vectors, and solidifying defenses, we often find ourselves needing specialized tools. Today, we're diving deep into one such utility: Tool-X. This isn't just about installation; it's about integrating a critical piece of your offensive security arsenal. Forget the quick fixes and the fragmented tutorials. We're building a robust understanding, step-by-step, for those who understand that true mastery requires meticulous execution.
Understanding Tool-X: More Than Just a Script
Tool-X is a powerful, albeit sometimes raw, framework designed to streamline the installation of various penetration testing tools. While it might not possess the polished interface of commercial alternatives, its utility lies in its ability to quickly deploy a wide array of scripts and applications often essential for reconnaissance, scanning, and exploitation phases. Think of it as a Swiss Army knife for the budding penetration tester, albeit one that requires a bit of hands-on sharpening. Its effectiveness hinges on understanding its architecture and dependencies.
Phase 1: Establishing the Foundation - System Preparation
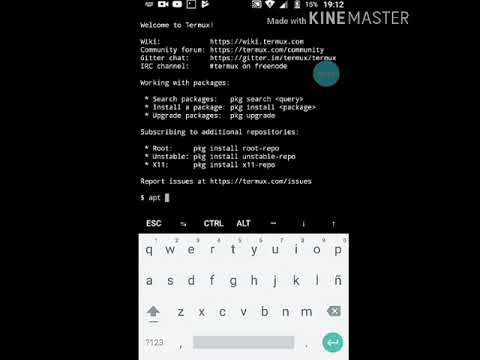
Before we can deploy Tool-X, we need to ensure our environment is ready. This typically involves package manager updates and ensuring essential development tools are present. For systems like Termux on Android or Kali Linux, this means leveraging their respective package managers.
Prerequisites: The Bare Minimum
For this operation, you'll need a terminal-based environment. We'll assume you're running a Linux distribution or a compatible mobile environment like Termux. The primary dependencies are Git for cloning the repository and the package manager itself (e.g., `pkg` for Termux, `apt` for Debian/Ubuntu derivatives).
Phase 2: Acquiring the Arsenal - Cloning Tool-X
The first actual step in bringing Tool-X into your operational sphere is to clone its repository from its source. This ensures you have the latest version directly from the developers, minimizing the risk of using outdated or potentially compromised code. The standard procedure involves using Git, a version control system that is the backbone of most collaborative software development and open-source projects.
The command to fetch the Tool-X repository is:
git clone https://ift.tt/3rb76lTThis command will download the entire Tool-X project into a new directory named `Tool-X` within your current working directory. It’s crucial to monitor the output for any errors during this cloning process, as network interruptions or repository issues can halt the operation.
Phase 3: Navigating the Labyrinth - Directory Entry
Once the repository is successfully cloned, you need to navigate into the newly created directory to access the installation scripts. This is a fundamental step in interacting with the Tool-X framework.
Use the `cd` (change directory) command to enter the Tool-X folder:
cd Tool-XAfter entering the directory, it's good practice to list the contents to verify that the files have been downloaded correctly. The `ls` command will display all files and subdirectories within the current location.
lsPhase 4: Initiating the Deployment - The Installation Script
Within the `Tool-X` directory, you'll find an installation script. This is the core executable that sets up the framework and its dependencies. The script is typically run using a shell interpreter.
Execute the installation script with the following command:
sh install.shNote: Some versions might use `.aex` as an extension. If `install.sh` doesn't work, try `sh install.aex`.
This script will automate the process of downloading and installing numerous supporting packages and tools that Tool-X relies upon. Pay close attention to the output. You might be prompted to confirm installations or accept licenses. Thorough review of these prompts is advisable to understand exactly what is being added to your system.
Phase 5: Launching Tool-X - Accessing the Interface
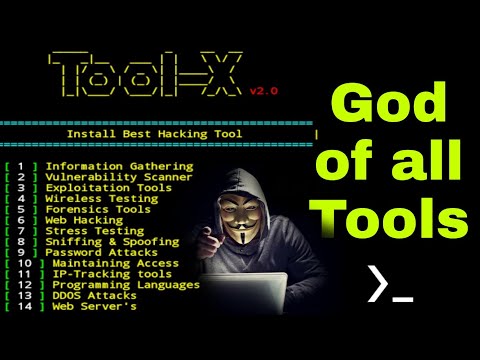
Post-installation, Tool-X is ready to be run. The framework typically provides a command-line interface (CLI) that allows you to browse, search, and install individual tools bundled within its ecosystem.
To launch Tool-X, simply type the command:
Tool-XThis action should present you with the main menu or prompt, listing the categories of tools available for installation. The interface will guide you through selecting and installing specific packages as per your operational needs.
Phase 6: Package Management within Tool-X
Once Tool-X is running, you can manage other packages. The system allows you to download and install various tools that are categorized and made accessible through its interface. The process often involves selecting a package number and confirming the download. This is where the 'package' in "install packages" comes into play.
For example, if you see a list of tools and wish to install one, you would typically enter the corresponding number associated with that tool and follow the on-screen prompts. The framework handles the backend process of fetching and setting up these additional utilities.
Veredicto del Ingeniero: Eficiencia vs. Robustez
Tool-X offers undeniable efficiency for rapidly deploying multiple security tools, especially in environments where manual installation of each component would be time-consuming. Its strength lies in its comprehensiveness and its ability to act as a central hub for various scripts. However, it's crucial to acknowledge its limitations. The maintenance and security of such a repository are dependent on its maintainers. For enterprise-level security operations or highly sensitive engagements, a more controlled and audited approach to tool deployment is often preferred. Tool-X is best suited for individual practitioners, researchers, or educational purposes where the speed of tool acquisition is paramount and the user can exercise due diligence regarding the scripts being executed.
Arsenal del Operador/Analista
- Core Environment: Kali Linux, Parrot Security OS, Termux (Android)
- Scripting & Automation: Python, Bash
- Version Control: Git
- Network Analysis: Wireshark, tcpdump
- Web Application Testing: Burp Suite (Professional recommended for serious engagements), OWASP ZAP
- Exploitation Frameworks: Metasploit Framework
- Password Cracking: Hashcat, John the Ripper
- Books: "The Hacker Playbook" series by Peter Kim, "Penetration Testing: A Hands-On Introduction to Hacking" by Georgia Weidman, "The Web Application Hacker's Handbook"
- Certifications: Offensive Security Certified Professional (OSCP), CompTIA Security+
Taller Práctico: Verificación Post-Instalación
- Execute Tool-X: After completing the installation steps, run
Tool-Xfrom your terminal. - Browse Categories: Familiarize yourself with the different categories of tools offered.
- Select a Tool: Choose a tool that you are familiar with or interested in (e.g., a specific scanning tool). Note its corresponding number.
- Install the Tool: Enter the number and confirm the installation when prompted.
- Verify Installation: Once the tool reports successful installation, exit Tool-X (usually by typing '0' or 'exit'). Then, attempt to run the newly installed tool directly from the terminal (e.g., if you installed Nmap, type
nmap --version). - Troubleshooting: If the tool does not run, revisit the Tool-X installation process. Check for any errors during the `sh install.sh` phase or the individual tool installation. Ensure all dependencies were met.
Preguntas Frecuentes
Q1: Is Tool-X safe to use?
Tool-X aggregates various third-party scripts. While generally considered useful, it's essential to exercise caution. Always review the source repository and be aware of the permissions and actions scripts might perform. For critical systems, manually installing and vetting tools is safer.
Q2: Can Tool-X be installed on Windows?
Tool-X is primarily designed for Linux-based systems and Android (via Termux). Direct installation on Windows is not officially supported and would likely require a virtual machine running Linux or WSL (Windows Subsystem for Linux).
Q3: What are the main dependencies for Tool-X?
The primary dependencies are Git for cloning the repository and a working shell environment. The installation script itself will pull additional dependencies required by the individual tools it installs.
Q4: How do I update Tool-X itself?
Typically, you would re-clone the repository or check the Tool-X menu for an update option if available. Running the `install.sh` script again after updating the repository might also refresh the framework.
El Contrato: Fortifying Your Digital Perimeter
You've successfully navigated the installation of Tool-X and learned how to deploy additional packages. This knowledge is just the first layer. The real challenge lies in understanding *why* each tool is used, its specific application in a penetration test, and how to interpret its output effectively. Your contract is to move beyond mere installation. Can you now select three tools from Tool-X, research their primary use cases in an ethical hacking scenario, and outline a basic attack chain using them? Document your findings and share your proposed attack vectors (hypothetically, of course) – the digital realm rewards proactive defense through offensive understanding.
```The Definitive Guide to Installing and Utilizing Tool-X for Offensive Security Testing
Introduction: Unveiling the Digital Frontlines
The digital landscape is a battlefield, and knowledge is your sharpest weapon. In the relentless pursuit of understanding system vulnerabilities, mastering attack vectors, and solidifying defenses, we often find ourselves needing specialized tools. Today, we're diving deep into one such utility: Tool-X. This isn't just about installation; it's about integrating a critical piece of your offensive security arsenal. Forget the quick fixes and the fragmented tutorials. We're building a robust understanding, step-by-step, for those who understand that true mastery requires meticulous execution.
Understanding Tool-X: More Than Just a Script
Tool-X is a powerful, albeit sometimes raw, framework designed to streamline the installation of various penetration testing tools. While it might not possess the polished interface of commercial alternatives, its utility lies in its ability to quickly deploy a wide array of scripts and applications often essential for reconnaissance, scanning, and exploitation phases. Think of it as a Swiss Army knife for the budding penetration tester, albeit one that requires a bit of hands-on sharpening. Its effectiveness hinges on understanding its architecture and dependencies.
Phase 1: Establishing the Foundation - System Preparation
Before we can deploy Tool-X, we need to ensure our environment is ready. This typically involves package manager updates and ensuring essential development tools are present. For systems like Termux on Android or Kali Linux, this means leveraging their respective package managers.
Prerequisites: The Bare Minimum
For this operation, you'll need a terminal-based environment. We'll assume you're running a Linux distribution or a compatible mobile environment like Termux. The primary dependencies are Git for cloning the repository and the package manager itself (e.g., `pkg` for Termux, `apt` for Debian/Ubuntu derivatives).
Phase 2: Acquiring the Arsenal - Cloning Tool-X
The first actual step in bringing Tool-X into your operational sphere is to clone its repository from its source. This ensures you have the latest version directly from the developers, minimizing the risk of using outdated or potentially compromised code. The standard procedure involves using Git, a version control system that is the backbone of most collaborative software development and open-source projects.
The command to fetch the Tool-X repository is:
git clone https://ift.tt/3rb76lTThis command will download the entire Tool-X project into a new directory named `Tool-X` within your current working directory. It’s crucial to monitor the output for any errors during this cloning process, as network interruptions or repository issues can halt the operation.
Phase 3: Navigating the Labyrinth - Directory Entry
Once the repository is successfully cloned, you need to navigate into the newly created directory to access the installation scripts. This is a fundamental step in interacting with the Tool-X framework.
Use the `cd` (change directory) command to enter the Tool-X folder:
cd Tool-XAfter entering the directory, it's good practice to list the contents to verify that the files have been downloaded correctly. The `ls` command will display all files and subdirectories within the current location.
lsPhase 4: Initiating the Deployment - The Installation Script
Within the `Tool-X` directory, you'll find an installation script. This is the core executable that sets up the framework and its dependencies. The script is typically run using a shell interpreter.
Execute the installation script with the following command:
sh install.shNote: Some versions might use `.aex` as an extension. If `install.sh` doesn't work, try `sh install.aex`.
This script will automate the process of downloading and installing numerous supporting packages and tools that Tool-X relies upon. Pay close attention to the output. You might be prompted to confirm installations or accept licenses. Thorough review of these prompts is advisable to understand exactly what is being added to your system.
Phase 5: Launching Tool-X - Accessing the Interface
Post-installation, Tool-X is ready to be run. The framework typically provides a command-line interface (CLI) that allows you to browse, search, and install individual tools bundled within its ecosystem.
To launch Tool-X, simply type the command:
Tool-XThis action should present you with the main menu or prompt, listing the categories of tools available for installation. The interface will guide you through selecting and installing specific packages as per your operational needs.
Phase 6: Package Management within Tool-X
Once Tool-X is running, you can manage other packages. The system allows you to download and install various tools that are categorized and made accessible through its interface. The process often involves selecting a package number and confirming the download. This is where the 'package' in "install packages" comes into play.
For example, if you see a list of tools and wish to install one, you would typically enter the corresponding number associated with that tool and follow the on-screen prompts. The framework handles the backend process of fetching and setting up these additional utilities.
Veredicto del Ingeniero: Eficiencia vs. Robustez
Tool-X offers undeniable efficiency for rapidly deploying multiple security tools, especially in environments where manual installation of each component would be time-consuming. Its strength lies in its comprehensiveness and its ability to act as a central hub for various scripts. However, it's crucial to acknowledge its limitations. The maintenance and security of such a repository are dependent on its maintainers. For enterprise-level security operations or highly sensitive engagements, a more controlled and audited approach to tool deployment is often preferred. Tool-X is best suited for individual practitioners, researchers, or educational purposes where the speed of tool acquisition is paramount and the user can exercise due diligence regarding the scripts being executed.
Arsenal del Operador/Analista
- Core Environment: Kali Linux, Parrot Security OS, Termux (Android)
- Scripting & Automation: Python, Bash
- Version Control: Git
- Network Analysis: Wireshark, tcpdump
- Web Application Testing: Burp Suite (Professional recommended for serious engagements), OWASP ZAP
- Exploitation Frameworks: Metasploit Framework
- Password Cracking: Hashcat, John the Ripper
- Books: "The Hacker Playbook" series by Peter Kim, "Penetration Testing: A Hands-On Introduction to Hacking" by Georgia Weidman, "The Web Application Hacker's Handbook"
- Certifications: Offensive Security Certified Professional (OSCP), CompTIA Security+
Taller Práctico: Verificación Post-Instalación
- Execute Tool-X: After completing the installation steps, run
Tool-Xfrom your terminal. - Browse Categories: Familiarize yourself with the different categories of tools offered.
- Select a Tool: Choose a tool that you are familiar with or interested in (e.g., a specific scanning tool). Note its corresponding number.
- Install the Tool: Enter the number and confirm the installation when prompted.
- Verify Installation: Once the tool reports successful installation, exit Tool-X (usually by typing '0' or 'exit'). Then, attempt to run the newly installed tool directly from the terminal (e.g., if you installed Nmap, type
nmap --version). - Troubleshooting: If the tool does not run, revisit the Tool-X installation process. Check for any errors during the `sh install.sh` phase or the individual tool installation. Ensure all dependencies were met.
Preguntas Frecuentes
Q1: Is Tool-X safe to use?
Tool-X aggregates various third-party scripts. While generally considered useful, it's essential to exercise caution. Always review the source repository and be aware of the permissions and actions scripts might perform. For critical systems, manually installing and vetting tools is safer.
Q2: Can Tool-X be installed on Windows?
Tool-X is primarily designed for Linux-based systems and Android (via Termux). Direct installation on Windows is not officially supported and would likely require a virtual machine running Linux or WSL (Windows Subsystem for Linux).
Q3: What are the main dependencies for Tool-X?
The primary dependencies are Git for cloning the repository and a working shell environment. The installation script itself will pull additional dependencies required by the individual tools it installs.
Q4: How do I update Tool-X itself?
Typically, you would re-clone the repository or check the Tool-X menu for an update option if available. Running the `install.sh` script again after updating the repository might also refresh the framework.
El Contrato: Fortifying Your Digital Perimeter
You've successfully navigated the installation of Tool-X and learned how to deploy additional packages. This knowledge is just the first layer. The real challenge lies in understanding *why* each tool is used, its specific application in a penetration test, and how to interpret its output effectively. Your contract is to move beyond mere installation. Can you now select three tools from Tool-X, research their primary use cases in an ethical hacking scenario, and outline a basic attack chain using them? Document your findings and share your proposed attack vectors (hypothetically, of course) – the digital realm rewards proactive defense through offensive understanding.
Sources: https://www.youtube.com/watch?v=oXvpnPfcosk
Disclaimer: This video is for educational purposes only. Copyright Disclaimer Under Section 107 of the Copyright Act 1976, allowance is made for "fair use" for purposes such as criticism, comment, news reporting, teaching, scholarship, and research. Fair use is a use permitted by copyright statute that might otherwise be infringing. Non-profit, educational or personal use tips the balance in favour of fair use. Thanks for Watching. Please Like and Comments. Please Subscribe to our Channel.