La luz tenue del monitor iluminaba el código desordenado. Otro día, otra consola escupiendo advertencias. En este circo digital, JavaScript es el acto principal, el hilo conductor que une la experiencia del usuario y la lógica del lado del cliente. Forget the marketing fluff; this is the raw, unadulterated truth about building with JS. Si aspiras a ser un "desarrollador" de verdad, no un mero "codificador", necesitas entender las tripas.
El ecosistema de JavaScript es vasto y en constante evolución. Dominarlo no es solo una cuestión de aprender un lenguaje; es adquirir una mentalidad analítica y ofensiva para construir interfaces dinámicas, interactuar con APIs y, sí, asegurarte de que tus aplicaciones sean robustas. Este no es un curso para principiantes temerosos, sino un campo de entrenamiento para quienes buscan un puesto real en el desarrollo front-end. Si buscas una certificación seria, considera plataformas como Udemy que ofrecen cursos completos a precios accesibles, a menudo complementados por materiales de estudio descargables y acceso de por vida.
¿Qué es JavaScript? (Teoría)
JavaScript es un lenguaje de scripting interpretado, dinámico y de alto nivel. Nacido en los confines de los navegadores web, ha trascendido sus orígenes para convertirse en un pilar del desarrollo moderno, impulsando desde sitios web interactivos hasta aplicaciones de servidor con Node.js. Su naturaleza asíncrona y su vasto ecosistema de librerías y frameworks (React, Angular, Vue.js) lo hacen indispensable. Para los analistas de seguridad, entender JavaScript es crucial para detectar XSS, manipular el DOM y comprender modelos de ataque del lado del cliente.
Incorporar JavaScript en HTML
Hay dos formas principales de inyectar código JavaScript en tus páginas HTML:
Scripts incrustados: Direktamente en la etiqueta `
Hay fantasmas en la máquina, susurros de datos corruptos en los logs. Hoy no vamos a hablar de firewalls, ni de exploits. Vamos a hablar de cómo vender la única posesión valiosa que realmente poseemos en este mundo: nuestro conocimiento. La red es un campo de batalla, y tu currículum, tu CV, es tu primer manifiesto de intenciones. ¿Estás listo para la operación?
Antes de lanzar tu ofensiva, necesitas inteligencia. El mercado laboral digital es tu objetivo. ¿Dónde se congregan las oportunidades? No te limites a los portales masivos; bucea en bolsas de trabajo especializadas, grupos de LinkedIn y foros de comunidades técnicas. Tu objetivo es identificar los "puntos de entrada": las empresas, los proyectos y los roles que se alinean con tu perfil de riesgo controlado. Usa tus redes sociales como herramientas de OSINT (Open Source Intelligence): tu perfil de LinkedIn debe ser tu fachada más pulcra, tu Twitter, tu canal de comunicación técnica.
"La información es poder, y en la búsqueda de empleo, la información bien organizada te da una ventaja táctica significativa."
Identifica a los reclutadores y a los hiring managers. Entiende su lenguaje, sus prioridades. ¿Buscan soluciones rápidas o talento a largo plazo? Esta fase es crítica para no malgastar recursos en objetivos de baja probabilidad de éxito.
Fase 2: Construcción del Perfil de 'Arma' (CV y Portafolio)
Tu CV no es un historial, es un arma de persuasión. Olvídate de formatos aburridos. Piensa en él como un informe de inteligencia conciso y letal. Cada palabra cuenta. Optimízalo para los ATS: utiliza palabras clave relevantes del sector y de la oferta de empleo. Pero no te detengas ahí. La verdadera autenticidad reside en la demostración. Un portafolio robusto es tu prueba de concepto viviente. Para los perfiles técnicos, esto significa un repositorio de GitHub impecable, demostrando tu código, tus scripts, tus proyectos de seguridad o análisis de datos. Si tu especialidad es el pentesting, incluye informes de bug bounty (anonimizados si es necesario) o CTF resolutas. Para analistas de datos, notebooks de Jupyter con análisis claros y resultados impactantes.
Considera estos puntos clave para tu CV:
Sección de Habilidades Técnicas: Sé específico. En lugar de "Programación", lista "Python (Django, Flask), SQL (PostgreSQL), Bash Scripting, Docker".
Experiencia Laboral: Cuantifica tus logros siempre que sea posible. "Reduje el tiempo de análisis de logs en un 30% mediante la automatización con Python" es mucho más efectivo que "Analicé logs".
Proyectos Personales/Bug Bounty: Destaca tu iniciativa y tu capacidad para resolver problemas fuera del entorno corporativo. Esto demuestra pasión y tenacidad.
Si buscas información sobre cómo optimizar tu CV para sistemas de seguimiento de candidatos (ATS), profundiza en recursos como este análisis de Álvaro Chirou, que ofrece perspectivas valiosas sobre cómo tu CV puede ser filtrado antes de que un humano lo vea.
Fase 3: Simulación de Ataque Controlado (Entrevistas)
La entrevista es tu simulación de penetración. El reclutador es tu objetivo, y sus preguntas, tu vector de ataque. Debes estar preparado para todo. Practica tus respuestas en voz alta. Grábate si es necesario. Anticipa las preguntas sobre tus debilidades: enfócalas como oportunidades de aprendizaje y crecimiento. ¿Te preguntan por un error? Describe el error, la lección aprendida y cómo lo mitigaste o qué medidas tomaste para evitar que se repitiera. Esta es la mentalidad de un operador de élite: analizar el fallo, aprender y adaptarse.
"Las preguntas difíciles no son trampas, son oportunidades para demostrar tu resiliencia y tu capacidad de análisis bajo presión."
Para roles técnicos, espera preguntas específicas. Si buscas un puesto de seguridad, te interrogarán sobre metodologías de pentesting, análisis forense, o cómo responderías a un incidente de seguridad específico. Si es análisis de datos, prepárate para explicar tu approach a un problema de modelado o la interpretación de métricas. Es aquí donde la formación continua y las certificaciones, como las que se ofrecen en plataformas como Udemy, marcan la diferencia. Invierte en tu conocimiento; es tu mejor defensa y tu ataque más certero.
Fase 4: Post-Explotación y Negociación
Has pasado el primer filtro, has respondido el interrogatorio. Ahora, la fase de post-explotación: la negociación. No aceptes la primera oferta sin procesarla. Investiga los rangos salariales para roles similares en tu ubicación y sector. Utiliza la información recopilada en la fase de reconocimiento. Presenta tu contraoferta de forma profesional, respaldada por tus habilidades y el valor que aportas, tal como lo harías al justificar el alcance de un pentest. Recuerda, este es un proceso de negocio. Tu valor es lo que dictará tu compensación.
Arsenal del Operador/Analista
Herramientas de Creación de CV:Canva (diseño visual), Editores de texto avanzado (VS Code con extensiones para CV Markdown).
Plataformas de Búsqueda y Networking: LinkedIn Premium, bolsas de trabajo especializadas (ej: Stack Overflow Jobs, GitHub Jobs), grupos de Telegram y Discord de comunidades técnicas.
Repositorios de Código: GitHub, GitLab. Imprescindible para perfiles técnicos.
Cursos y Certificaciones: Udemy, Coursera, edX, certificaciones específicas del sector (OSCP, CISSP, etc.). Invertir en conocimiento es la mejor estrategia a largo plazo.
Herramientas de Comunicación: Plataformas de videollamada (Zoom, Google Meet) para entrevistas virtuales.
Preguntas Frecuentes
¿Cuánto debe durar un CV?
Idealmente, una página para candidatos con menos de 10 años de experiencia. Para perfiles muy senior, dos páginas es aceptable, pero cada línea debe justificar su espacio.
¿Qué hago si no tengo experiencia laboral relevante?
Enfócate en proyectos personales, contribuciones a código abierto, certificaciones y voluntariado. Demuestra tu potencial y tu capacidad de aprendizaje.
¿Cómo reacciono ante preguntas sobre mis 'mayores debilidades'?
Elige una debilidad real pero no crítica para el puesto, y enfócate en cómo la estás trabajando para mejorarla. Demuestra autoconciencia y proactividad.
¿Es necesario tener un perfil de GitHub para roles no técnicos?
No estrictamente, pero tener un espacio donde muestres tus intereses, proyectos personales o incluso un blog puede ser un diferenciador notable.
¿Debería mentir en mi CV?
Nunca. La integridad es la base de cualquier carrera sólida. Sé honesto y enfócate en presentar tus fortalezas de la mejor manera posible.
El Contrato: Tu Próximo Movimiento
Has absorbido las tácticas. Ahora, el contrato es contigo mismo: ejecutar. La búsqueda de empleo no es un sprint, es una campaña metódica. Aplica estos principios, adapta tu estrategia a cada oportunidad y no subestimes el poder de la preparación. La red está llena de oportunidades, pero solo los operadores disciplinados y analíticos las capitalizan.
El Contrato: Tu Plan de Acción Inmediato
Diseña tu CV esta semana, enfócate en un puesto específico y realiza una simulación de entrevista contigo mismo o con un colega. No esperes la recompensa; crea el valor y la recompensa vendrá. Ahora, dime: ¿cuál es la táctica de búsqueda de empleo que te ha funcionado mejor y por qué?
The screen flickers under the dim glow of the monitor. Another night, another ghost in the machine. We're not here to build firewalls today; we're dissecting the very mechanisms that can bypass them. Today, we dive into the dark art of password cracking, specifically using Python. Forget the Hollywood portrayals; this is about systematic, brute-force logic. Understanding how these tools work is paramount for any security professional looking to fortify defenses against them. This isn't about breaking into systems illegally; it's about understanding the attack vectors so you can effectively build defenses. As the saying goes, to truly secure a castle, you must first understand how it can be breached.
There are ghosts in the data streams, whispers of weak credentials echoing through forgotten protocols. The first line of defense for any system, any organization, is often protected by what seems to be the simplest element: a password. Yet, how often is this fundamental safeguard treated with the carelessness of a forgotten door? Today, we pull back the curtain on how such weaknesses are exploited, not to encourage malfeasance, but to illuminate the path to robust security. We'll be building a rudimentary password cracker using Python, dissecting the brute-force methodology. This is a technical deep-dive, a walkthrough for those who understand that true mastery comes from understanding the adversary's tools.
Password cracking is the process of recovering a password from data that has been protected by a password. This can involve various methods, from simple dictionary attacks to sophisticated brute-force algorithms. In the realm of cybersecurity, understanding these techniques is not just an academic exercise; it's a critical component of penetration testing and vulnerability assessment. Knowing how an attacker might try to guess or force their way into a system allows defenders to implement more effective authentication mechanisms and protective measures. The goal here is not to endorse unauthorized access, but to equip you with the knowledge to defend against it.
Ethical Considerations and Responsible Disclosure
Before we write a single line of code, let's be crystal clear: unauthorized access to systems or data is illegal and unethical. The techniques we explore are for educational purposes, within controlled environments, and with explicit permission. This knowledge should be leveraged for defensive security, penetration testing of systems you own or have explicit authorization to test, and bug bounty hunting. The cybersecurity community thrives on responsible disclosure. If you discover a vulnerability, follow established protocols to report it. The `info@dhruvon.com` contact listed previously is a pointer towards legitimate channels, not an invitation for nefarious activities.
"The security of your network is only as strong as your weakest link. And more often than not, that link is a forgotten password." - cha0smagick
Why Python for Password Cracking?
Python has become the lingua franca of security professionals and developers alike, and for good reason. Its:
Simplicity and Readability: Python's syntax is clean, making it easy to write, debug, and understand complex cracking logic.
Extensive Libraries: Modules like `hashlib` for cryptographic hashing, `itertools` for efficient iteration, and `threading` or `multiprocessing` for parallel processing are invaluable. For more advanced tasks, libraries such as `paramiko` for SSH or `requests` for web interactions are readily available.
Cross-Platform Compatibility: Write once, run on Windows, macOS, or Linux.
Rapid Prototyping: Quickly develop and test cracking tools without getting bogged down in boilerplate code.
While Python is excellent for rapid development and understanding concepts, for high-performance, large-scale cracking operations, compiled languages like C or Go might be considered. However, the accessibility and ecosystem of Python make it the undisputed choice for learning and practical application in many scenarios. If you're serious about mastering these techniques, investing in formal Python training, perhaps through comprehensive online courses, is a sound strategy.
The Brute-Force Methodology Explained
At its core, a brute-force attack is a trial-and-error method used to obtain information, typically by trying every possible combination. In the context of password cracking, this means systematically attempting every possible password until the correct one is found. This process typically involves:
Generating Potential Passwords: This is the most crucial part. It can range from a simple list of common words (dictionary attack) to generating all possible character combinations within a given length and character set.
Hashing: Each potential password is run through the same hashing algorithm that was used to store the original password.
Comparison: The generated hash is compared against the target hash. If they match, the password has been cracked.
Iteration: The process repeats for the next potential password.
The effectiveness of a brute-force attack is directly proportional to the strength of the password and the computational resources available. For extremely strong, long passwords with a mix of characters, a pure brute-force approach can take an infeasible amount of time, even with powerful hardware. This is why attackers often combine brute-force with dictionary attacks or leverage pre-computed rainbow tables for certain hashing algorithms.
Walkthrough: Building Your First Password Cracker
Let's get our hands dirty. We'll build a basic password cracker that attempts to guess a password given a target hash and a wordlist. For this example, we'll use Python's `hashlib` for hashing and simple file I/O for the wordlist. For demonstration, we'll assume the target is an MD5 hash. Remember to always use this in a legal and ethical manner.
Step 1: Prepare Your Environment
Ensure you have Python installed. You won't need to install any external libraries for this basic version, as `hashlib` is built-in.
Step 2: Obtain a Wordlist
A wordlist is a file containing a list of potential passwords, one per line. You can find many wordlists online (e.g., Rockyou.txt, SecLists). For a serious engagement, analyzing common password patterns for the target environment and crafting a custom wordlist is often more effective than generic ones. Advanced users might consider platforms like Penetration Testing with Kali Linux which often come with curated wordlists.
Let's assume you have a file named words.txt in the same directory as your script.
Step 3: Write the Python Script
Create a Python file (e.g., cracker.py) with the following code:
import hashlib
import time

def crack_password(hashed_password, wordlist_file):
    """
    Attempts to crack a password using a wordlist and MD5 hashing.
    """
    start_time = time.time()
    try:
        with open(wordlist_file, 'r', encoding='utf-8') as wf:
            for line in wf:
                password_attempt = line.strip() # Remove leading/trailing whitespace and newline characters

                # Hash the password attempt using MD5
                hashed_attempt = hashlib.md5(password_attempt.encode()).hexdigest()

                # Compare the hashed attempt with the target hash
                if hashed_attempt == hashed_password:
                    end_time = time.time()
                    print(f"[+] Password Found: {password_attempt}")
                    print(f"[+] Cracked in {end_time - start_time:.2f} seconds.")
                    return password_attempt

        print("[-] Password not found in the wordlist.")
        end_time = time.time()
        print(f"[-] Attempted in {end_time - start_time:.2f} seconds.")
        return None
    except FileNotFoundError:
        print(f"[-] Error: Wordlist file '{wordlist_file}' not found.")
        return None
    except Exception as e:
        print(f"[-] An unexpected error occurred: {e}")
        return None

if __name__ == "__main__":
    # Example Usage:
    # Replace 'target_md5_hash_here' with the actual MD5 hash you want to crack.
    # Replace 'words.txt' with the path to your wordlist file.
    target_hash = 'YOUR_MD5_HASH_HERE' # e.g., 'e10adc3949ba59abbe56e057f20f883e' for 'admin'
    wordlist = 'words.txt'

    if target_hash == 'YOUR_MD5_HASH_HERE':
        print("Please replace 'YOUR_MD5_HASH_HERE' with the actual MD5 hash.")
    else:
        print(f"[*] Attempting to crack hash: {target_hash}")
        crack_password(target_hash, wordlist)
Step 4: Execution and Analysis
Place your words.txt file in the same directory and replace 'YOUR_MD5_HASH_HERE' with the MD5 hash you want to test. Then run the script:
python cracker.py
If the password exists in your wordlist and matches the MD5 hash, the script will output the found password and the time taken. If not, it will indicate that the password was not found.
"A weak hash is a broken lock. A comprehensive wordlist is the skeleton key. Speed is the crowbar." - cha0smagick
For real-world scenarios, especially in bug bounty hunting, you'll encounter stronger hashes like SHA-256, SHA-512, bcrypt, or scrypt. Cracking these requires more computational power and often specialized tools. This is where investing in powerful hardware or cloud-based cracking services becomes a consideration. For those aiming to master advanced techniques, resources like PortSwigger's Web Security Academy offer invaluable insights into web vulnerabilities, including authentication bypasses.
Beyond Brute-Force: Advanced Techniques
Pure brute-force, while fundamental, is often too slow for modern, complex passwords. Security professionals and attackers alike employ more sophisticated techniques:
Dictionary Attacks: Using pre-compiled lists of common passwords and permutations.
Hybrid Attacks: Combining dictionary words with common substitutions (e.g., 'password123' becomes 'P@ssw0rd123').
Rainbow Tables: Pre-computed tables that store hash chains, allowing for very quick lookups for certain algorithms.
Rule-Based Attacks: Applying specific rules (e.g., appending numbers, changing case) to dictionary words.
GPU Cracking: Utilizing the parallel processing power of GPUs for significantly faster hash computations. Tools like Hashcat and John the Ripper are industry standards for this.
Mastering these advanced techniques often involves specialized hardware and software, and understanding the nuances of different hashing algorithms is crucial. For those looking to build or optimize such tools, delving into C or CUDA programming might be necessary.
Arsenal for the Modern Analyst
To effectively analyze and defend against password-based attacks, the right tools are essential. Here's a glimpse into the typical toolkit:
Password Cracking Software:
Hashcat: The world's fastest and most advanced password recovery utility.
John the Ripper: Another powerful and widely used password cracker.
Wordlists: A curated collection of password lists is vital. Consider exploring resources like SecLists.
Scripting Languages: Python remains a favorite for custom tools and automation.
Hardware: For serious cracking, GPUs are almost a necessity. Consider NVIDIA GPUs for their CUDA support, which is heavily utilized by cracking software.
Books: For a foundational understanding, "The Web Application Hacker's Handbook" and "Serious Cryptography" by Jean-Philippe Aumasson are highly recommended.
Frequently Asked Questions
Q1: Is building a password cracker legal?
Building the tool itself is legal. Using it to access systems or data without explicit authorization is illegal and unethical. Always ensure you have permission.
Q2: What's the difference between a dictionary attack and brute-force?
A dictionary attack uses a list of common words and phrases. Brute-force attempts every possible combination of characters, making it more exhaustive but also much slower.
Q3: How can I protect my own passwords?
Use strong, unique passwords for every account. Combine uppercase and lowercase letters, numbers, and symbols. Employ a password manager and enable two-factor authentication (2FA) wherever possible.
Q4: Can I crack any password?
With enough time and computational resources, theoretically yes. However, modern encryption and password policies make it practically impossible for very strong passwords. The goal of good security is to make cracking infeasible within a relevant timeframe.
The Contract: Securing Your Digital Frontier
You've seen the mechanics, the raw power behind systematically guessing credentials. This knowledge is a double-edged sword. You now have a clearer view of the vulnerabilities that plague systems worldwide, often due to simple oversight. The contract is this: use this understanding defensively. The strength of any digital fortress is not in its walls alone, but in the vigilance and foresight of its architects. Your mission, should you choose to accept it, is to apply this technical insight to build stronger defenses, to identify weaknesses before they are exploited, and to advocate for robust security practices. The next step in your journey might involve exploring vulnerabilities in authentication protocols or developing more sophisticated threat detection mechanisms. The digital landscape is a perpetual battleground; be on the right side.
Now, I put it to you: What are your strategies for defending against brute-force attacks beyond the obvious? Share your insights, your go-to tools, or even code snippets that showcase effective countermeasures in the comments below. Let's build a more secure digital world, one analyzed threat at a time.
The digital frontier is a vast expanse of code and consensus, and building on the blockchain is no longer a niche pursuit for cypherpunks. It's a gateway to decentralization, immutability, and a new economic paradigm. But between the hype and the empty promises, there's the gritty reality of development. This isn't about creating another proof-of-concept; this is about architecting a robust, end-to-end blockchain application grounded in Solidity, anchored to the Ethereum network, and brought to life with Web3.js. Forget the theoretical whitepapers; we're going to get our hands dirty in the forge.
The security of such applications is paramount. A single vulnerability in a smart contract can lead to catastrophic financial losses, a digital heist that echoes through the ledger for eternity. This guide is your blueprint to not only build but to fortify your decentralized applications against the shadows lurking in the network. We'll navigate the complexities of smart contract logic, the nuances of Ethereum's virtual machine, and the critical handshake between your frontend and the blockchain.
Before we write a single line of code, we need to grasp the foundational elements. Think of it as understanding the anatomy of a digital fortress before you lay the first brick.
Ethereum: The decentralized, open-source blockchain that powers our application. It's a global, distributed ledger that allows for the execution of smart contracts. Understanding gas fees, transaction finality, and network congestion is crucial for any serious developer.
Solidity: The primary programming language for writing smart contracts on Ethereum. It's a high-level, object-oriented language that compiles down to EVM bytecode. Mastering Solidity is akin to learning the secret incantations that command the blockchain.
Web3.js: A JavaScript library that enables your frontend application to interact with the Ethereum blockchain. It acts as the bridge, allowing users to send transactions, read contract data, and manage their accounts.
Development Environment: Tools like Truffle, Hardhat, or Foundry are essential for compiling, testing, and deploying smart contracts. Think of these as your secure command centers for orchestrating development.
Wallets: User interfaces that allow individuals to manage their Ethereum accounts and interact with decentralized applications (dApps). MetaMask is the industry standard, acting as your digital identity and transaction manager.
Setting Up Your Development Environment
A robust development environment is the bedrock of efficient and secure dApp creation. Skipping this step is like trying to build a skyscraper without proper blueprints or construction tools. For serious projects, I highly recommend an integrated suite like Hardhat or Truffle. While Ganache provides a local blockchain for testing, integrating with a framework streamlines the entire workflow.
First, ensure you have Node.js and npm (or Yarn) installed. These are prerequisites for most modern JavaScript development, including blockchain interactions.
$ node -v
$ npm -v
Next, let's set up a project directory. We'll focus on Hardhat for its flexibility and growing community support.
$ mkdir my-blockchain-app
$ cd my-blockchain-app
$ npm init -y
$ npm install --save-dev hardhat
$ npx hardhat
This command initiates the Hardhat setup. Choose the "Create a basic sample project" option and follow the prompts. Hardhat will set up your project structure, including directories for contracts, scripts, and tests.
"The first rule of smart contract development is to assume your code will be scrutinized by attackers. Write for failure, and you might just achieve success."
Writing Your First Solidity Smart Contract
Now, let's dive into the heart of the matter: writing the smart contract. For this example, we'll create a simple decentralized storage contract, demonstrating basic data storage and retrieval. This isn't just code; it's a set of rules enforced by the network.
Create a new file in your contracts/ directory, say SimpleStorage.sol.
// SPDX-License-Identifier: MIT
pragma solidity ^0.8.0;

contract SimpleStorage {
    mapping(address => string) private ownerToContent;
    address public owner;

    event ContentStored(address indexed owner, string content);

    constructor() {
        owner = msg.sender;
    }

    function storeContent(string memory _content) public {
        require(msg.sender == owner, "Only the owner can store content.");
        ownerToContent[msg.sender] = _content;
        emit ContentStored(msg.sender, _content);
    }

    function getContent() public view returns (string memory) {
        return ownerToContent[msg.sender];
    }
}
This contract defines a mapping to store content associated with an address, an `owner` variable, and functions to store and retrieve that content. The `require` statement is a critical security guardrail.
Deploying to an Ethereum Testnet
Deploying directly to the mainnet without rigorous testing is a rookie mistake that can lead to financial ruin. We'll use a testnet like Sepolia. You'll need some test ETH, which you can obtain from a faucet.
First, configure your hardhat.config.js file:
require("@nomicfoundation/hardhat-toolbox");

/** @type import('hardhat/config').HardhatUserConfig */
module.exports = {
  solidity: "0.8.20", // Use the version matching your contract
  networks: {
    sepolia: {
      url: "YOUR_INFURA_OR_ALCHEMY_URL", // Get from Infura or Alchemy
      accounts: ["YOUR_PRIVATE_KEY"]     // Your wallet's private key
    }
  }
};
You'll need to obtain an RPC URL from a service like Infura or Alchemy and your wallet's private key. Handle your private key with extreme caution; never expose it.
Now, compile and deploy:
$ npx hardhat compile
$ npx hardhat run scripts/deploy.js --network sepolia
This script (which you'll need to create in the scripts/ directory) will deploy your `SimpleStorage` contract to the Sepolia testnet. Note the contract address returned; it's your application's address on the blockchain.
Building the Frontend with Web3.js
A decentralized application without a user interface is like a powerful engine locked away in a vault. Web3.js is your key. For modern dApps, using frameworks like React or Vue.js with Web3.js integration is standard practice. If you're serious about building production-ready applications, leveraging a platform that abstracts some of Web3.js's complexities, such as ethers.js, is a wise investment. However, for clarity, we'll demonstrate with plain JavaScript and Web3.js.
Install Web3.js:
$ npm install web3
In your frontend JavaScript file:
// Assuming you have MetaMask installed and enabled
if (window.ethereum) {
    window.web3 = new Web3(window.ethereum);
    // Request account access
    window.ethereum.enable();
} else if (window.web3) {
    window.web3 = new Web3(window.web3.currentProvider);
} else {
    console.log('Non-Ethereum browser detected. You should consider installing MetaMask!');
}
This code snippet initializes Web3.js, connecting to the user's Ethereum provider (like MetaMask).
Integrating Frontend and Smart Contract
This is where the magic happens: connecting your frontend interface to the deployed smart contract. You’ll need the contract's ABI (Application Binary Interface) and its deployed address.
First, compile your contract using Hardhat. The ABI will be located in the artifacts/contracts/SimpleStorage.sol/SimpleStorage.json file.
In your JavaScript:
const contractAddress = "YOUR_DEPLOYED_CONTRACT_ADDRESS"; // The address from your deployment script
const contractABI = [ /* Paste your ABI JSON here */ ]; // Or import from file

const simpleStorageContract = new window.web3.eth.Contract(contractABI, contractAddress);

async function storeData() {
    const content = document.getElementById('contentInput').value;
    const accounts = await window.web3.eth.getAccounts();
    const senderAccount = accounts[0];

    await simpleStorageContract.methods.storeContent(content).send({ from: senderAccount });
    console.log("Content stored!");
}

async function retrieveData() {
    const accounts = await window.web3.eth.getAccounts();
    const senderAccount = accounts[0];

    const storedContent = await simpleStorageContract.methods.getContent().call({ from: senderAccount });
    document.getElementById('contentDisplay').innerText = storedContent;
}
This code interacts with your `SimpleStorage` contract. The `send` method executes a transaction (like `storeContent`), while `call` reads data from the blockchain without creating a transaction.
"The blockchain is a promise of transparency. But transparency doesn't equal security. Code is law, and flawed code has devastating consequences."
Security Considerations and Best Practices
Building on Ethereum is akin to operating in a dense, high-stakes urban environment. Security isn't an afterthought; it's the very foundation of trust. Neglecting it is akin to leaving the vault door wide open.
Reentrancy Attacks: A smart contract can be tricked into calling itself recursively before the initial execution is complete, draining funds. Use checks-effects-interactions pattern and reentrancy guards.
Integer Overflow/Underflow: Before Solidity 0.8.0, arithmetic operations could wrap around, leading to unexpected values. Use SafeMath or rely on Solidity's built-in protection (0.8+).
Gas Limits and Loops: Inefficient loops can exhaust gas limits, making your contract unusable. Optimize your code meticulously.
Access Control: Always use modifiers like `onlyOwner` or role-based access control for sensitive functions. Don't let just anyone execute critical operations.
External Contract Calls: Be extremely cautious when interacting with other contracts. They might be malicious or have vulnerabilities of their own.
Audits: For any production-level contract, a professional security audit is non-negotiable. It's like having a seasoned detective review your security protocols before the heist. Companies like CertiK or ConsenSys Diligence offer these services – an essential investment if you're managing significant value.
Once you've mastered the basics, the real work begins. Consider integrating with decentralized storage solutions like IPFS for larger files, exploring Layer 2 scaling solutions (e.g., Arbitrum, Optimism) to reduce transaction costs, and implementing robust testing suites. For deployment to mainnet, you'll need to secure your private keys using hardware wallets or secure key management systems. Exchanges like Binance or Kraken are where you might acquire ETH, but never store large amounts there for operational deployment.
Remember, the decentralized web is still evolving. Staying updated with the latest developments, security research, and best practices is a continuous process. The knowledge gained here is a starting point for building resilient, secure, and impactful blockchain applications.
For those looking to accelerate their learning and gain formal recognition, pursuing certifications like EWF (Ethereum Web Developer) or exploring advanced courses on platforms such as Coursera or Udacity focused on blockchain security and smart contract auditing can significantly enhance your expertise.
Frequently Asked Questions
What gas price should I use?
Gas prices fluctuate based on network congestion. You can check current gas prices on sites like Etherscan Gas Tracker or use Web3.js/ethers.js to estimate. For critical transactions, you might pay a higher price for faster confirmation.
How do I handle private keys securely in a frontend application?
You should never embed private keys directly in frontend code. Use wallet integrations like MetaMask, which manage keys client-side, or explore solutions for managing keys on a secure backend if you're building a more complex dApp.
What are the main differences between Truffle and Hardhat?
Hardhat is generally considered more flexible and has a faster compilation speed. Truffle has a more established ecosystem and integrated tools. Both are excellent choices, and the best one often comes down to personal preference and project requirements.
Is Solidity the only language for smart contracts?
No, but it's the most dominant for Ethereum and EVM-compatible chains. Other languages like Vyper exist, offering different trade-offs in security and features. Chains like Solana use Rust.
How can I test my smart contracts thoroughly?
Use your development framework (Hardhat/Truffle) to write comprehensive unit tests and integration tests. Simulate various scenarios, including edge cases and potential attack vectors. Deploying to a testnet is also a critical step before mainnet deployment.
Arsenal of the Operator/Analyst
Development Frameworks: Hardhat, Truffle, Foundry
Development Environment: VS Code with Solidity extensions, Node.js
Learning Resources: CryptoZombies, Solidity Documentation, ConsenSys Best Practices
Recommended Books: "Mastering Ethereum" by Andreas M. Antonopoulos and Gavin Wood, "The Web Application Hacker's Handbook" (for general web security principles applicable to dApps)
The Contract: Fortifying Your Decentralized Fortress
Your mission, should you choose to accept it, is to take the `SimpleStorage` contract and enhance its security. Implement an access control mechanism that allows multiple designated addresses to store content, not just the initial owner. Document your changes and explain the potential vulnerabilities you mitigated. Deploy this enhanced contract to a testnet and briefly outline a frontend interaction that utilizes the new roles. Prove you can build, but more importantly, prove you can defend.
La luz parpadeante del monitor era la única compañía mientras el código fuente de una aplicación web escupía errores crípticos. Una pregunta resonaba en la oscuridad: "¿Cómo diablos empiezo en este circo digital llamado ciberseguridad?". Si te encuentras mirando el mismo abismo, esta guía es tu linterna. Olvida las promesas de hackeos instantáneos; aquí hablamos de cimientos, de sudor y de las cicatrices de la experiencia que forjan a un verdadero operador.
Antes de ensuciarte las manos con Wireshark o depurar exploits, debes tener claro qué te impulsa. La ciberseguridad no es un camino de rosas; es un campo de batalla digital donde la curiosidad es tu arma principal. ¿Buscas desentrañar los secretos de sistemas que otros consideran impenetrables? ¿Te mueve un sentido de justicia para proteger a los inocentes de las sombras digitales? ¿O simplemente amas el desafío intelectual de resolver problemas complejos bajo presión? Tu motivación es tu ancla. Cuando las horas de depuración te agoten y los logs parezcan un dialecto alienígena, será tu 'por qué' el que te mantenga en pie.
Muchos aspirantes se pierden en la búsqueda de herramientas llamativas o en la obsesión por la "hacking ético" sin entender sus raíces. No te equivoques: la sutileza y la paciencia son virtudes clave. Un verdadero operador no solo sabe cómo romper un sistema, sino cómo entenderlo a un nivel fundamental para prever y mitigar ataques. Piensa en ello como un duelista: necesita conocer cada ángulo del cuerpo de su oponente, no solo su punto débil.
Construyendo los Muros: Redes, Sistemas y Código
Ignora a quienes te venden la ciberseguridad como un atajo. Es una disciplina que exige una base sólida. Si no entiendes cómo fluye la información a través de una red, cómo interactúan los procesos en un sistema operativo, o cómo escribir un script que automatice tareas tediosas, estás construyendo sobre arena.
Redes: El Sistema Circulatorio Digital.
Protocolos Fundamentales: TCP/IP, UDP, DNS, HTTP/S, SSH. Debes conocerlos como a tus propias venas. Herramientas como Wireshark te permitirán ver el tráfico en crudo, desmenuzar paquetes y entender las comunicaciones en tiempo real. Un análisis de red profundo es la primera habilidad que separa a los aficionados de los profesionales.
Arquitectura de Red: Firewalls, proxies, routers, switches. Comprende su función y cómo se interconectan. ¿Tu firewall es una defensa real o un placebo para la gerencia?
Sistemas Operativos: El Campo de Batalla.
Linux: La espina dorsal de la mayoría de servidores e infraestructuras. Domina la línea de comandos (Bash), la gestión de usuarios, permisos y servicios. Familiarízate con distribuciones como Ubuntu, CentOS o Debian.
Windows: Aunque a menudo visto como menos "cool", es omnipresente en entornos corporativos. Entender el Active Directory, GPOs y el registro es crucial para cualquier analista de seguridad.
Programación y Scripting: Tu Kit de Herramientas Avanzado.
Python: Es el lenguaje *de facto* en ciberseguridad. Su sintaxis limpia y la vasta cantidad de bibliotecas (Scapy para redes, Requests para web, etc.) te permiten automatizar tareas de pentesting, análisis de datos o desarrollo de herramientas. Un curso de Python para Ciberseguridad es una inversión inteligente.
Otros Lenguajes: Bash para scripting en Linux, JavaScript para entender vulnerabilidades web, y C/C++ si te interesa el análisis de malware o la explotación de bajo nivel.
Si te sientes abrumado, no te desesperes. Un buen punto de partida es invertir en recursos de calidad. Un curso de redes para principiantes o un libro como 'Python for Data Analysis' pueden sentar bases robustas.
Descifrando el Territorio: Roles y Especializaciones
La ciberseguridad es un universo, no un solo planeta. Cada órbita tiene su propia gravedad y sus propios desafíos. Antes de lanzarte a la aventura, investiga el mapa:
Pentesting (Pruebas de Penetración): El arte de simular ataques para encontrar vulnerabilidades. Aquí entran los hackers "éticos". Requiere una mentalidad ofensiva y un conocimiento profundo de técnicas de explotación.
Analista de SOC (Centro de Operaciones de Seguridad): El centinela. Monitorea, detecta y responde a incidentes de seguridad. Aquí las herramientas SIEM (Security Information and Event Management) son tus ojos y oídos.
Ingeniero de Seguridad: Diseña, implementa y mantiene la infraestructura de seguridad de una organización. Piensa en firewalls, IDS/IPS, VPNs.
Analista Forense Digital: El detective. Recupera y analiza datos de sistemas comprometidos para reconstruir eventos y encontrar evidencia.
Especialista en Seguridad Cloud: Protege entornos en la nube (AWS, Azure, GCP). Un campo en auge con desafíos únicos.
Threat Hunter: Proactivamente busca amenazas avanzadas que han evadido las defensas tradicionales. Requiere hipótesis, análisis de datos y una gran dosis de ingenio.
Cada rol requiere un conjunto de habilidades distinto. No intentes ser un maestro de todo; encuentra tu nicho y profundiza. Plataformas como LinkedIn son tus aliadas para conectar con profesionales de estas áreas. Un mensaje directo y bien redactado puede abrir puertas a conversaciones valiosas.
Entrenando en la Zona de Guerra: Experiencia Práctica
La teoría es importante, pero sin práctica, solo son palabras en un manual. Los laboratorios virtuales son tu gimnasio. Aquí es donde las habilidades se forjan y las ideas se validan.
Hack The Box: Un clásico. Máquinas con diferentes niveles de dificultad que simulan sistemas vulnerables. Es un excelente lugar para poner a prueba tus conocimientos de pentesting.
TryHackMe: Más guiado para principiantes. Ofrece "salas" (rooms) que enseñan conceptos específicos paso a paso, desde lo básico de redes hasta técnicas de explotación.
VulnHub: Repositorio de máquinas virtuales vulnerables preconfiguradas para descargar. Ideal para crear tu propio entorno de pruebas offline.
CTFs (Capture The Flag): Competiciones donde resuelves desafíos de seguridad para obtener "flags". Busca eventos online o locales. Son intensos y te exponen a una variedad enorme de escenarios.
Participar activamente en estos entornos te enseña resiliencia y te expone a vectores de ataque que raramente encontrarás en libros de texto. No te limites a seguir tutoriales; desvíate, experimenta, rompe cosas. Así se aprende.
Certificaciones: ¿Necesarias o vanidad?
Ah, las certificaciones. Un tema candente. ¿Son una llave mágica para el éxito en ciberseguridad? La respuesta corta: no son mágicas, pero pueden ser una llave muy útil.
¿Por qué importan?
Validación de Conocimientos: Demuestran que has estudiado y superado un examen estandarizado. Son una forma para los reclutadores de filtrar candidatos.
Estructura de Aprendizaje: Prepararse para una certificación te obliga a cubrir un currículo específico, asegurando que no te dejes lagunas importantes.
Credibilidad Profesional: Especialmente en ciertos roles, tener certificaciones relevantes (como la OSCP para pentesting ofensivo o la CISSP para roles de gestión y arquitectura) te da un peso profesional significativo.
Sin embargo:
No Sustituyen la Experiencia: Un CV con muchas certificaciones pero sin experiencia práctica será rápidamente descartado. El conocimiento teórico es solo la mitad de la ecuación.
Costo y Tiempo: Algunas certificaciones son caras y requieren dedicación. Asegúrate de que se alinean con tus objetivos de carrera.
Recomendaciones para empezar:
CompTIA Security+: Una excelente certificación de nivel de entrada que cubre conceptos fundamentales de seguridad de forma amplia.
CEH (Certified Ethical Hacker): Popular, aunque a veces criticada por ser más teórica que práctica. Útil para entender el panorama general.
OSCP (Offensive Security Certified Professional): El estándar de oro para pentesting. Rigurosa, práctica y muy respetada. Requiere un dominio avanzado.
Mi consejo: usa las certificaciones como escalones. Comienza con las de nivel básico para construir tu base y avanza hacia las más especializadas y difíciles a medida que ganas experiencia. No te obsesiones con coleccionarlas; úsalas para mejorar tus habilidades y tu empleabilidad.
Arsenal del Operador/Analista
Un operador que se precie no va a la guerra con las manos vacías. Necesita sus herramientas. Aquí una selección que debe estar en tu radar:
Software Esencial:
Burp Suite (Professional): Indispensable para cualquier pentester web. Automatiza y facilita el análisis de tráfico HTTP/S. La versión gratuita es limitada; la Pro es una inversión obligatoria.
Kali Linux / Parrot OS: Distribuciones de Linux pre-cargadas con herramientas de seguridad. Son tu campo de operaciones.
Nmap: El escáner de red por excelencia. Reconocimiento de puertos, servicios y sistemas operativos.
Metasploit Framework: Una navaja suiza para la explotación. Permite desarrollar, probar y ejecutar exploits.
Jupyter Notebooks: Para análisis de datos, scripting en Python y visualización. Es tu cuaderno de laboratorio digital.
VS Code / Sublime Text: Editores de código eficientes para desarrollar scripts y analizar código.
Hardware (Opcional, pero útil):
Raspberry Pi: Pequeño y versátil para montar herramientas de seguridad caseras o laboratorios portátiles.
Adaptador WiFi compatible con modo monitor: Fundamental para auditorías de redes inalámbricas (ej: Alfa Network).
Libros Clave:
"The Web Application Hacker's Handbook" (Dafydd Stuttard, Marcus Pinto)
"Hacking: The Art of Exploitation" (Jon Erickson)
"Applied Network Security Monitoring" (Richard Bejtlich, Tao Wei, Eberhard Schulz)
"Practical Malware Analysis" (Michael Sikorski, Andrew Honig)
Plataformas de Aprendizaje y Bugs:
HackerOne / Bugcrowd: Si tu interés es el bug bounty, estas plataformas te conectan con empresas que pagan por encontrar fallos.
PortSwigger Web Security Academy: Tutoriales gratuitos increíblemente detallados sobre vulnerabilidades web, cortesía de los creadores de Burp Suite.
No necesitas tener todo desde el día uno. Empieza con lo esencial para tu área de interés y ve ampliando tu arsenal a medida que tus necesidades y conocimientos evolucionan. Considera la suscripción a herramientas de pago como una inversión, no un gasto.
La Cadena de Custodia del Conocimiento
El panorama de la ciberseguridad es un ecosistema en constante mutación. Lo que es vanguardista hoy, puede ser obsoleto mañana. La complacencia es el primer síntoma de la obsolescencia profesional.
Para mantenerte afilado como un bisturí de cirujano, debes cultivar hábitos de aprendizaje continuo:
Sigue Fuentes Fiables: Blogs de empresas de seguridad de renombre (Mandiant, CrowdStrike), sitios de noticias especializadas (The Hacker News, Bleeping Computer), y repositorios de CVEs (MITRE CVE).
Consumo de Medios: Podcasts como "Darknet Diaries", "Security Now" o "Risky Business" ofrecen perspectivas valiosas.
Participa en Comunidades: Foros, grupos de Discord o Slack dedicados a la ciberseguridad. El intercambio de ideas y soluciones es invaluable.
Lee Código y Documentación: No te limites a usar herramientas; entiende cómo funcionan por debajo del capó.
Prueba Constantemente: Dedica tiempo semanal a probar nuevas técnicas, herramientas o atacar máquinas en laboratorios virtuales.
La ciberseguridad no es solo un trabajo; es una mentalidad. Requiere una curiosidad insaciable y una voluntad de adaptarse y aprender. Si no te gusta estar en un estado de aprendizaje perpetuo, este no es tu campo.
Preguntas Frecuentes (FAQ)
¿Necesito ser un genio de la informática para empezar en ciberseguridad?
No, no es necesario ser un genio. Lo que sí se requiere es una fuerte base lógica, curiosidad, perseverancia y la voluntad de aprender continuamente. Las habilidades técnicas se desarrollan con estudio y práctica.
¿Cuánto tiempo se tarda en ser un profesional de ciberseguridad?
Depende del rol y la profundidad de conocimiento. Para roles de nivel inicial, podrías estar listo en 1-2 años de estudio y práctica intensiva. Para roles más especializados o de liderazgo, puede tomar de 5 a 10 años o más de experiencia acumulada.
¿Qué plataforma de bug bounty es mejor para empezar?
Plataformas como HackerOne y Bugcrowd tienen programas para diferentes niveles. Empieza por entender los programas de "Vulnerability Disclosure Policy" (VDP) que suelen ser más accesibles para principiantes antes de saltar a programas de pago.
¿Es importante aprender sobre criptografía desde el principio?
Entender los conceptos básicos de la criptografía (cifrado simétrico/asimétrico, hashing, certificados digitales) es muy útil, especialmente para la seguridad web y de redes. Sin embargo, la experiencia práctica en otras áreas suele tener prioridad inicial.
El Contrato: Tu Primer Simulacro de Reconocimiento
Has absorbido la teoría, has visto el arsenal y entiendes la mentalidad. Ahora, es hora de ponerlo a prueba. Tu misión, si decides aceptarla:
Desafío:
Elige una Máquina Virtual Vulnerable: Descarga una máquina de VulnHub (ej: "Kioptrix Level 1").
Prepara tu Entorno: Configura Kali Linux en una máquina virtual (VMware, VirtualBox). Asegúrate de que esté en una red interna/host-only para aislarla.
Fase de Reconocimiento: Utiliza Nmap para escanear la máquina virtual y descubrir sus puertos abiertos y servicios. Documenta tus hallazgos.
Fase de Enumeración: Investiga los servicios que encontraste. ¿Hay alguna versión conocida de software con vulnerabilidades públicas? (Busca en Google, Exploit-DB).
Reporte Inicial: Escribe un breve informe (no más de una página) detallando tu proceso de reconocimiento y tus hallazgos iniciales.
Este ejercicio, aunque simple, simula el primer paso crítico en cualquier operación de seguridad: el reconocimiento. Un reconocimiento deficiente lleva a errores catastróficos. Demuestra que puedes mapear el terreno antes de intentar tomarlo.
Ahora es tu turno. ¿Qué herramienta de tu arsenal virtual usarías tú para este primer reconocimiento? ¿Qué consejo le darías a un novato total? Comparte tus pensamientos y tu propio código de escaneo en los comentarios. El saber colectivo nos hace más fuertes.
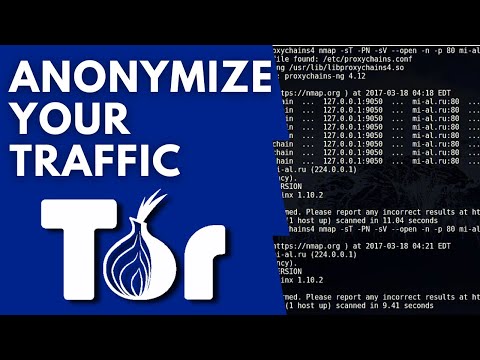
The digital landscape is a battlefield, and your traffic is the intel. In this concrete jungle, unencrypted packets are like neon signs screaming your location. We’re not here to chat about firewalls; we’re here to disappear. Today, we dive deep into the art of masking your digital presence, turning your network traffic into a phantom. We'll be dissecting two potent tools: Proxychains and the notorious Tor network. This isn't about casual browsing; it's about tactical anonymity, the kind you need when you're peeling back layers of a system or simply want to exist outside the surveillance grid. Forget privacy policies; we're building our own.
The core of this operation is making any TCP connection made by any given application act like a ghost. We want to force traffic through proxies, and when combined with Tor, we achieve a level of obscurity that makes attribution a high-stakes gamble. This guide is your blueprint for building that cloak of invisibility.
Deconstructing Proxychains
Proxychains is a versatile tool that acts as an intermediary, forcing any TCP connection from an application through a proxy server. Think of it as a bouncer for your network requests, redirecting them to a specific backstage entrance before they hit the main stage. It's not magic; it's engineering. You configure it, and then you tell your applications to talk through it.
The configuration file, `proxychains.conf`, is your command center. Here, you define the type of proxy chain (dynamic, strict, random) and list your proxy servers. For our purposes, we'll focus on a dynamic chain, allowing Proxychains to intelligently route traffic through multiple proxies.
"Networking is not about the lines on the diagram. It's about the packets that flow, and how they are controlled." - Ancient Network Operator Proverb
The power of Proxychains lies in its simplicity and its ability to integrate with virtually any TCP-based application. From a simple `curl` command to a full-blown web browser, if it makes network calls, Proxychains can reroute them. This makes it an indispensable tool for penetration testers and security researchers who need to ensure their activities originate from an unexpected location.
Beneath the Onion: Tor's Layers
The Tor (The Onion Router) network is the backbone of many anonymity efforts. It's a decentralized network of relays designed to anonymize your internet traffic. Instead of a direct connection from you to a server, your traffic is encrypted in multiple layers, like an onion, and bounced through a series of volunteer-operated servers (relays). Each relay decrypts one layer of encryption to know which is the next hop, passing the remaining encrypted data to the next relay. The final relay, the exit node, decrypts the final layer and sends the traffic to its destination. Crucially, the exit node does not know the original source IP address, and the entry node does not know the final destination.
This multi-hop approach makes tracing the origin of the traffic incredibly difficult, though not impossible. Understanding the architecture of Tor—entry nodes, middle nodes, and exit nodes—is critical. While Tor offers robust anonymity, it's essential to acknowledge its limitations. Exit nodes can potentially monitor unencrypted traffic, which is why using HTTPS is always recommended, even over Tor.
Weaving the Cloak: Proxychains + Tor
The real magic happens when we combine the routing capabilities of Proxychains with the anonymity provided by Tor. By configuring Proxychains to use the Tor network's SOCKS proxy (typically running on `127.0.0.1:9050`), we can force ANY application's TCP connections through Tor. This bypasses the native Tor Browser bundle and allows you to anonymize specific applications or even your entire system's traffic.
This integration is paramount for operations where you need granular control over your anonymization. Imagine needing to scan a target using Nmap from an IP address that is not your own and is protected by Tor's exit nodes. Using Proxychains with Tor empowers you to do precisely that.
The critical step is ensuring your `proxychains.conf` file is correctly set up. You'll want to specify a dynamic chain and point it to the Tor SOCKS proxy. This setup ensures that your traffic not only goes through a proxy but is also layered with Tor's encryption and anonymization protocols.
Taller Práctico: Encrypting Your Footprints
Let's get our hands dirty. This is where theory meets the gritty reality of command lines.
Installation: The Foundation
First, you need the building blocks. On Debian/Ubuntu systems, this is usually as simple as:
sudo apt update
sudo apt install tor proxychains -y
For other distributions, consult your package manager or compile from source. Ensure the Tor service is running:
sudo systemctl start tor
sudo systemctl enable tor # To ensure it starts on boot
Verify Tor is listening, typically on port 9050:
sudo ss -tulnp | grep 9050
Proxychains Configuration: The Blueprint
Edit the configuration file. The default location is usually `/etc/proxychains.conf`. You'll want to ensure it looks something like this, paying close attention to the `chain_type` and the specific proxy.
# proxychains.conf
strict_chain
#     Use the following proxies for strict chain, it terminates on the first host that fails.
#     For example, if you want to chain 192.168.1.1, 192.168.1.2 and 192.168.1.3, you can
#     write the following config:
#     server 192.168.1.1
#     server 192.168.1.2
#     server 192.168.1.3
#
# quiet_chain
#     Use the following proxies, while the chain stops only when all the previous proxies
#     in the list are already dead. This is the default behaviour.
#
# dynamic_chain
#     Use the following proxies, while the chain stops only when all the previous proxies
#     in the list are already dead. When you run out of proxies, it will try to find
#     new proxies on the fly. (This is the default chain type)
#
# Note that you can not mix chain types.
#
# The following are the default values that will be used if you do not specify the
# country, state and city. This is useful for random chain.
country 00
state 00
city 00

# Always run Tor as a SOCKS proxy on 127.0.0.1:9050
# Ensure this is the FIRST entry in your proxylist.
# The Tor service MUST be running for this to work.
socks5 127.0.0.1 9050

# Other proxies can be added here if needed.
# For example, a different SOCKS proxy:
# socks4 192.168.1.2 1080
# Or an HTTP proxy:
# http 192.168.1.3 8080
Crucially, the `socks5 127.0.0.1 9050` line must be present and correctly configured to point to your running Tor instance.
Running Applications: The Infiltration
Now, launch your target application prefixed with `proxychains`.
For a web browser (e.g., Firefox):
proxychains firefox
For a command-line tool like `curl` to check your IP:
proxychains curl ifconfig.me
You should see an IP address that is part of the Tor network, not your actual public IP.
The Fissures in the Armor
While Proxychains and Tor offer significant anonymity, they are not foolproof. The exit node is a critical point of failure. If the traffic between the exit node and the destination server is not encrypted (i.e., not HTTPS), the operator of the exit node can see and potentially modify your data. This is why employing end-to-end encryption, preferably TLS/SSL, is non-negotiable. Tools like HTTPS Everywhere can help enforce this.
Furthermore, sophisticated adversaries might employ timing attacks or traffic correlation to de-anonymize users, especially if they control both entry and exit nodes. Browser fingerprinting and client-side vulnerabilities can also betray your identity. Therefore, always practice good operational security (OPSEC) alongside your technical anonymization tools.
"Anonymity is a shield, but even the best shields can be pierced by the right weapon." - cha0smagick
Consider your threat model. Are you hiding from your ISP, a malicious actor, or state-level surveillance? Each scenario demands a different level of precaution. For critical operations, using a virtual machine to isolate your anonymized activities is standard practice. This prevents potential leaks from your host operating system.
Arsenal del Operador/Analista
Proxychains: The traffic rerouter. Essential for forcing applications through proxies.
Tor Browser Bundle: For general browsing and understanding Tor's ecosystem. While we use Tor as a service here, the bundle is a great starting point.
Nmap: Network scanner that can be anonymized with Proxychains for reconnaissance.
Wireshark/tcpdump: Network analysis tools to understand traffic patterns (use with caution and ethically).
Virtual Machine Software (e.g., VirtualBox, VMware): For isolating anonymized activities and creating secure, reproducible environments.
Books: "The Web Application Hacker's Handbook" for understanding targets, and any advanced guides on network security and anonymity protocols.
Certifications: While not directly tied, certifications like OSCP or CISSP demonstrate a foundational understanding of security that complements these tools.
Preguntas Frecuentes
What is the primary function of Proxychains?
Proxychains forces any TCP connection from a given application to go through specified proxy servers, effectively masking the origin IP address of those connections.
How does Tor provide anonymity?
Tor anonymizes traffic by encrypting it in multiple layers and routing it through a volunteer network of relays, making it difficult to trace the connection back to its origin.
Can I use Proxychains with any application?
As long as the application makes TCP connections, Proxychains can generally be used to reroute its traffic. However, some applications with specific network handling might require custom configurations.
Is using Tor and Proxychains completely risk-free?
No. While it significantly enhances anonymity, vulnerabilities can exist, particularly at the Tor exit node if traffic is unencrypted (no HTTPS) or through advanced correlation attacks. OPSEC is crucial.
How can I verify my anonymization is working?
You can use websites like "ifconfig.me" or "checkip.amazonaws.com" to check your public IP address. Before running traffic through `proxychains`, check your IP; after, run the check again using `proxychains curl ifconfig.me`. The IPs should differ.
El Contrato: Advanced Anonymity Scenarios
You've mastered the basics of weaving Proxychains and Tor into a single cloak of digital invisibility. Now, the contract: Imagine you need to conduct reconnaissance on a sensitive target. Your objective is to map open ports and identify running services without revealing your presence. How would you leverage Proxychains and Tor not just for basic IP masking, but to actively confuse potential network defenders? Consider using random proxy chains within Proxychains, or periodically switching Tor entry nodes. Discuss the potential detection vectors and how you might further obfuscate your methodology to evade sophisticated Intrusion Detection Systems (IDS) or honeypots. What are the trade-offs in terms of speed and reliability when implementing these advanced obfuscation techniques?