Showing posts with label MITM. Show all posts

Mastering Network Attacks: A Defensive Blueprint for the Modern Operator

The digital battlefield is a chaotic symphony of packets and protocols, a constant flux where threats emerge from the ether like phantoms. In this realm, understanding the anatomy of network attacks isn't just knowledge; it's the tactical advantage. We're not here to play offense, but to build defenses so robust they laugh in the face of disruption. This is your deep dive into the heart of network assaults, framed not for the attacker, but for the guardian.

Network vulnerabilities are the cracks in our digital fortresses, exploited by those who thrive in chaos. From the subtle whispers of a Man-in-the-Middle attack to the deafening roar of a Distributed Denial of Service (DDoS), the attack surface is vast and ever-changing. To defend, you must first dissect.

The Network Attack Landscape: A Threat Hunter's Perspective

The OSI model, a theoretical construct, often becomes a battleground in reality. Attacks can manifest at any layer:

  • Layer 1 (Physical) & Layer 2 (Data Link): While less common for sophisticated remote attacks, physical access or compromised network hardware can lead to issues like MAC flooding or unauthorized network access. Think rogue access points or tapped cables – the low-tech backdoors that often go unnoticed.
  • Layer 3 (Network) & Layer 4 (Transport): This is where IP-based assaults thrive. IP spoofing, ICMP floods, and SYN floods aim to overwhelm routing tables or connection states. Distributed Denial of Service (DDoS) attacks, often amplified by botnets, are a prime example, aiming to render services inaccessible by sheer volume. Understanding traffic patterns and anomalous connection requests is key here.
  • Layer 5 (Session), Layer 6 (Presentation), Layer 7 (Application): The higher layers are fertile ground for more nuanced attacks. This is where session hijacking, DNS poisoning, and application-specific exploits like SQL injection or Cross-Site Scripting (XSS) reside. A Man-in-the-Middle (MITM) attack often operates here, intercepting and potentially altering communications between two parties.

Common Network Attack Vectors and Their Countermeasures

Let's strip down some of the most prevalent threats and, more importantly, how to build your shield against them.

Distributed Denial of Service (DDoS)

Anatomy of the Assault: Imagine an army of compromised machines (a botnet) bombarding a server with millions of connection requests simultaneously. The target server, overwhelmed, can't respond to legitimate users, effectively shutting down its service. It's a brute-force method, sheer volume over sophistication.

Defensive Strategy:

  • Rate Limiting: Configure firewalls and intrusion prevention systems (IPS) to limit the number of requests from a single IP address or subnet over a given period.
  • Content Delivery Networks (CDNs) & Specialized DDoS Mitigation Services: Services like Cloudflare or Akamai act as a buffer. They absorb and filter malicious traffic before it even reaches your origin servers. They leverage massive global infrastructure to distribute and scrub traffic.
  • Traffic Scrubbing Centers: These specialized facilities analyze incoming traffic, identify malicious patterns, and filter out attack traffic while allowing legitimate requests to pass through.
  • Network Architecture: Distribute your services geographically. A single point of failure is an invitation.

Man-in-the-Middle (MITM)

Anatomy of the Assault: The attacker subtly inserts themselves into the communication channel between two parties. They can eavesdrop, steal credentials, or even inject malicious content into the data stream, all while the two communicating entities believe they are talking directly to each other. ARP spoofing on local networks or compromised Wi-Fi hotspots are common enablers.

Defensive Strategy:

  • End-to-End Encryption (TLS/SSL): Ensure all sensitive communications use robust encryption protocols. This makes intercepted data unreadable without the decryption keys.
  • Secure Network Protocols: Advocate for and implement protocols that inherently offer better security, like SFTP over FTP, or HTTPS over HTTP.
  • Network Segmentation: Isolate critical systems. A breach in one segment shouldn't automatically grant access to others.
  • Public Key Infrastructure (PKI) & Certificate Pinning: For applications, certificate pinning can prevent connections to imposter servers by ensuring only trusted certificates are accepted.
  • User Education: Train users to be wary of suspicious network prompts, especially regarding SSL/TLS certificate warnings.

DNS Poisoning (DNS Cache Poisoning)

Anatomy of the Assault: The Domain Name System (DNS) translates human-readable domain names (like example.com) into IP addresses. DNS poisoning involves corrupting the DNS resolver's cache with false information. When a user tries to visit a legitimate website, they are instead redirected to a malicious site controlled by the attacker, often for phishing or malware distribution.

Defensive Strategy:

  • DNSSEC (DNS Security Extensions): This suite of protocols adds a layer of authentication to DNS data, allowing clients to verify the origin and integrity of DNS responses.
  • Secure DNS Servers: Use reputable and secured DNS servers. Ensure your own internal DNS servers are hardened and regularly updated.
  • Monitor DNS Traffic: Look for unusual DNS query patterns, unexpected responses, or sudden spikes in traffic to suspicious domains.
  • Regular Cache Flushing: While not a primary defense, periodically flushing DNS caches can mitigate the impact of a stale, poisoned entry.

The Operator's Toolkit: Essential for Defense

Building a robust defense requires the right tools and knowledge. While the offensive side may boast shiny exploits, the defensive side relies on meticulous analysis and proactive hardening.

  • Wireshark: The gold standard for packet analysis. Understanding traffic flow, identifying anomalies, and dissecting attack payloads is impossible without it. For serious analysis, the 101 Labs - Wireshark WCNA training can illuminate its full potential.
  • Intrusion Detection/Prevention Systems (IDS/IPS): Tools like Snort or Suricata are your digital sentinels, monitoring network traffic for malicious patterns and actively blocking them.
  • Firewalls (Next-Generation): Beyond simple port blocking, modern firewalls offer deep packet inspection, application control, and threat intelligence integration.
  • Security Information and Event Management (SIEM): Tools like Splunk or ELK Stack aggregate logs from across your network, enabling centralized analysis and threat hunting.
  • Content Delivery Networks (CDNs) & DDoS Mitigation Services: As mentioned, services like Cloudflare are indispensable for absorbing and filtering volumetric attacks.

The SSCP Certification Pathway: Building Core Competencies

For those serious about establishing foundational knowledge and proving their expertise in systems security, the Systems Security Certified Practitioner (SSCP) certification is a critical step. It covers a broad spectrum of security concepts, including access controls, cryptography, risk management, and operational security, all vital for understanding and countering network attacks.

To accelerate your journey towards this certification, consider a comprehensive training program. A 13-hour video training course with included practice exams can provide the concentrated knowledge needed to pass. Investing in your skills is the ultimate offensive move against the threats that seek to exploit your systems.

Veredicto del Ingeniero: The Unseen Architecture of Defense

Network attacks are not abstract threats; they are the tangible consequences of architectural flaws and negligence. The tools and techniques discussed are merely enablers for a deeper mindset: the proactive, analytical posture of a defender. DDoS, MITM, DNS poisoning – these are not just attack names; they are syndromes of exploited weaknesses. Your defense must be layered, adaptive, and constantly evolving. Relying solely on perimeter defenses is like building a castle wall and leaving the gates wide open. True security lies in understanding the attack vectors intimately, fortifying every layer, and maintaining constant vigilance. The digital realm rewards preparedness; it punishes complacency.

Arsenal del Operador/Analista

  • Packet Analysis: Wireshark (Essential), tcpdump (Command-line).
  • Network Monitoring: Nagios, Zabbix, Prometheus.
  • Threat Intelligence Platforms: MISP, ThreatConnect.
  • Log Aggregation & Analysis: Elasticsearch/Logstash/Kibana (ELK Stack), Splunk.
  • Firewall/IPS: pfSense, OPNsense, Snort, Suricata.
  • DDoS Mitigation: Cloudflare, Akamai; internal rate-limiting configurations.
  • Certifications to Pursue: SSCP, Security+, Network+, CISSP, OSCP.
  • Books: "The Web Application Hacker's Handbook", "Network Security Essentials".

Taller Práctico: Fortaleciendo tu Infraestructura contra Ataques de Nivel de Red

This hands-on section guides you through simulated defensive measures. Remember: these exercises are for authorized testing environments only. Never attempt these on systems you do not own or have explicit permission to test.

  1. Configurar Firewall Rules for DDoS Mitigation

    Objective: Implement basic rate limiting on an edge firewall (simulated).

    Scenario: Protect a web server from excessive connection attempts.

    
    # Example using iptables on a Linux server (requires root privileges)
    # Allow established connections
    iptables -A INPUT -m conntrack --ctstate ESTABLISHED,RELATED -j ACCEPT
    
    # Allow traffic on common web ports (HTTP, HTTPS)
    iptables -A INPUT -p tcp --dport 80 -j ACCEPT
    iptables -A INPUT -p tcp --dport 443 -j ACCEPT
    
    # Rate limit new incoming connections per IP for port 80 (e.g., 10 new connections per minute)
    iptables -A INPUT -p tcp --dport 80 -m state --state NEW -m recent --set --name WEB_LIMIT --rsent-qlen 10 --rsent-max 10 --timeout 60
    iptables -A INPUT -p tcp --dport 80 -m state --state NEW -m recent --update --name WEB_LIMIT --seconds 60 -j DROP
    
    # Repeat for port 443 if necessary
    echo "Basic rate limiting configured for web ports."
        

    Analysis: This configuration attempts to limit the rate of new TCP connections to ports 80 and 443. Legitimate users, once connected, will fall into the ESTABLISHED state and bypass these rules. Attackers trying to initiate many new connections will be dropped after exceeding the configured limit.

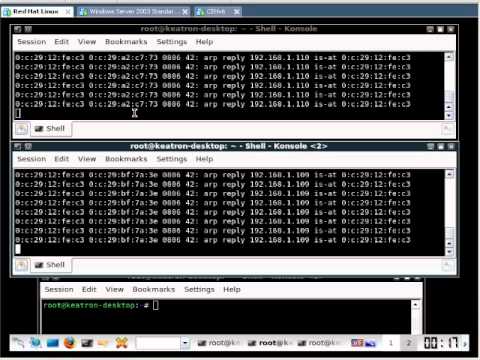
  2. Detecting ARP Spoofing with Ettercap (Ethical Use ONLY)

    Objective: Understand how ARP spoofing works and how to detect it.

    Scenario: In a controlled lab environment, use Ettercap to simulate an ARP spoofing attack and then use Wireshark to identify the malicious traffic.

    Disclaimer: This procedure is for educational purposes in a lab environment ONLY. Unauthorized ARP spoofing is illegal and harmful.

    1. Set up a simple lab network (e.g., two client VMs and an attacker VM running Kali Linux).
    2. On the attacker VM, start Ettercap: sudo ettercap -T -q -i eth0 (replace eth0 with your network interface).
    3. Perform a scan for hosts and select the target IP address (e.g., a victim VM) and the gateway IP.
    4. Initiate the ARP poisoning attack via Ettercap's MITM menu.
    5. On the victim VM, open Wireshark. Filter for ARP traffic (arp).
    6. Observe the ARP replies: You will see the attacker's MAC address being advertised for the gateway's IP address, and vice-versa, indicating the MITM position.

    Detection: Network monitoring tools that detect duplicate MAC addresses for different IPs or unusual ARP traffic patterns can alert you to such threats.

Frequently Asked Questions

  • What is the most common network attack vector today?

    While DDoS remains prevalent, phishing attacks (often leading to credential theft and subsequent network compromise) and exploit kits targeting unpatched vulnerabilities at the application layer are extremely common.

  • How can I protect my home network from basic attacks?

    Keep your router's firmware updated, use strong, unique passwords for your Wi-Fi and router admin interface, enable WPA2/WPA3 encryption, and be cautious of unknown Wi-Fi networks.

  • Is network security a continuous process?

    Absolutely. The threat landscape evolves daily. Continuous monitoring, regular vulnerability assessments, and ongoing security awareness training are crucial.

  • What's the difference between an IDS and an IPS?

    An Intrusion Detection System (IDS) monitors for suspicious activity and alerts administrators. An Intrusion Prevention System (IPS) does the same but can also actively block or prevent the detected malicious activity.

The Contract: Secure Your Digital Perimeter

You've seen the blueprints of network warfare. Now, the contract is yours to fulfill: implement at least one of the defensive strategies discussed today in your lab environment. Whether it's setting up basic rate limiting, analyzing traffic with Wireshark for specific patterns, or researching DNSSEC implementation for a hypothetical network, the act of building and testing defenses solidifies knowledge. Share your findings, your challenges, or your improved configurations in the comments below. Let's turn theory into hardened reality.

Recommended Resources

For comprehensive, hands-on IT certification training, including Cisco CCNA, CompTIA Security+, and more, visit our website. Use coupon code 'youtube' for substantial discounts. Special offer: get 30 days of access for just $1 via this link: https://ift.tt/emaTcBx.

Need a push? Grab your FREE motivation goodies here: https://ift.tt/FbLvB5Y.

Defending Against Man-in-the-Middle Attacks: A Deep Dive into Bettercap and Network Security

The flickering neon sign of a public Wi-Fi hotspot casts long shadows, a siren song to attackers lurking in the digital ether. You think you're browsing securely, but in reality, your data might be a pawn in a dangerous game. Today, we're not just talking about vulnerabilities; we're dissecting the anatomy of a Man-in-the-Middle (MitM) attack, specifically using the potent tool Bettercap. Our mission at Sectemple is to equip you with knowledge, not to arm malicious actors. This post is a deep dive for the blue team, an educational exposé to fortify your defenses. We'll examine the attack vectors, understand their mechanics, and, most importantly, outline robust mitigation strategies.

Table of Contents

Understanding the MitM Threat Landscape

In the shadowy alleys of the internet, trust is a currency easily debased. A Man-in-the-Middle (MitM) attack is a clandestine interception, where an adversary positions themselves between two communicating parties, relaying and potentially altering their messages without either knowing. This is not theoretical fiction; it's a tangible threat, especially in unsecured environments like public Wi-Fi. Imagine a hacker on the same network as you – perhaps at your local library or a coffee shop. Without proper defenses, your login credentials, financial data, and sensitive communications become prime targets. This post serves as a cautionary tale and a technical guide for defenders, detailing precisely how these attacks are executed so you can build impenetrable walls around your digital assets.

Anatomy of an Attack: ARP Spoofing and DNS Poisoning

At the heart of many local network MitM attacks lie two fundamental techniques: ARP Spoofing and DNS Poisoning. Understanding these is critical for effective defense.

ARP Spoofing (Address Resolution Protocol Spoofing): ARP maps IP addresses to MAC addresses on a local network. An attacker floods the network with falsified ARP messages, falsely associating their MAC address with a legitimate IP address (like the gateway or another victim's IP). Consequently, traffic intended for the legitimate device is rerouted through the attacker's machine.

DNS Poisoning (DNS Cache Poisoning): The Domain Name System (DNS) translates human-readable domain names (like example.com) into IP addresses. DNS poisoning involves corrupting a DNS resolver's cache with false information. When a user requests a website, the poisoned DNS server returns a malicious IP address, directing the user to an attacker-controlled site instead of the legitimate one.

Bettercap: The Attacker's Toolkit Deconstructed

Bettercap is a powerful, modular, and extensible framework designed for network reconnaissance and manipulation. While its capabilities can be used for legitimate security testing under strict authorization, it's also the weapon of choice for many performing illicit MitM attacks. Understanding its modules:

  • Network Probe: Bettercap's initial step is often to survey the network. It can identify all active devices, their IP addresses, MAC addresses, and operating systems. This reconnaissance phase is crucial for planning the attack.
  • ARP Spoofing Module: This is Bettercap's workhouse for initiating the interception. It allows an attacker to spoof ARP responses, effectively tricking devices into sending their traffic through the attacker's machine.
  • DNS Spoofing Module: Once traffic is intercepted, Bettercap can modify DNS requests. This module allows the attacker to redirect users to phishing sites or serve malicious content by hijacking DNS resolutions.
  • Packet Sniffing and Modification: Bettercap can capture, inspect, and even modify packets in transit. This means an attacker can not only view usernames and passwords transmitted over unencrypted protocols but also alter website content as it's being delivered to the victim.

The ease with which Bettercap can chain these modules together makes it a formidable, albeit dangerous, tool for initial network access and data exfiltration.

Fortifying Your Network: Detection and Prevention Strategies

Detecting and mitigating MitM attacks requires a multi-layered approach, focusing on network integrity and secure communication protocols.

Network Segmentation: Isolate critical systems and sensitive data on separate network segments. This limits the scope of an ARP spoofing attack.

Static ARP Entries: On critical servers or workstations, configure static ARP entries. This prevents the system from accepting dynamic ARP updates, making it resilient to ARP spoofing.

Intrusion Detection/Prevention Systems (IDS/IPS): Deploy IDS/IPS solutions that can detect anomalous ARP traffic patterns or suspicious DNS queries. Tools like Snort or Suricata can be configured with rules to identify ARP spoofing attempts.

Network Monitoring Tools: Regularly monitor network traffic for unusual activity. Look for devices communicating with unexpected MAC addresses, or a surge in traffic to/from uncommon IP addresses.

DHCP Snooping: On managed switches, enable DHCP snooping. This feature inspects DHCP messages and builds a binding table of IP-to-MAC address mappings, preventing spoofed ARP requests from being accepted.

DNSSEC (DNS Security Extensions): Implement DNSSEC for authenticated and integrity-protected DNS responses. This helps prevent DNS poisoning by ensuring the integrity of DNS data.

Guide to Detection: Spotting ARP Spoofing

  1. Monitor ARP Tables: Regularly check the ARP tables on your network devices (routers, servers). Look for duplicate IP addresses with different MAC addresses, or unexpected MAC addresses associated with known IP addresses (especially the gateway).
  2. Utilize Network Scanning Tools: Tools like nmap or built-in commands like arp -a can help identify devices on the network. Compare the MAC addresses discovered with expected values.
  3. Employ Dedicated MitM Detection Tools: Software like arpwatch can log ARP activity and alert administrators to suspicious changes in MAC-to-IP bindings.
  4. Analyze Network Traffic: Use packet analyzers like Wireshark to inspect traffic for unusual ARP packets, particularly Gratuitous ARPs, or a high volume of ARP requests/replies that could indicate spoofing.

The Ultimate Defense: Encrypting Your Connection

While network-level defenses are crucial, the most potent shield against MitM attacks, especially packet sniffing and content modification, is end-to-end encryption. When your connection is encrypted, even if an attacker intercepts your traffic, the data remains unreadable gibberish to them.

  • HTTPS Everywhere: Ensure all web traffic uses HTTPS. Browsers often indicate this with a padlock icon. Tools like 'HTTPS Everywhere' browser extensions can help enforce this.
  • VPNs (Virtual Private Networks): When using public Wi-Fi, a reputable VPN is non-negotiable. A VPN encrypts all your traffic from your device to the VPN server, creating a secure tunnel through the insecure network.
  • SSH Tunneling: For specific applications or command-line access, SSH tunneling can create encrypted channels for otherwise unencrypted protocols.
  • Secure Protocols: Always prioritize communication protocols that inherently offer encryption, such as SFTP over FTP, IMAPS/SMTPS over POP3/SMTP, and secure versions of other services.

If your connection isn't encrypted, it's an open book. Anyone with the right tools and network access can read it.

Engineer's Verdict: Bettercap and Responsible Disclosure

Bettercap is an exceptional tool for understanding network protocols and practicing defensive security measures. Its modular design and ease of use make it accessible for learning complex network attacks. However, its power necessitates a strong ethical compass. Using Bettercap on any network without explicit, written authorization is illegal and unethical. The true value of such tools lies not in executing attacks, but in using the insights gained to build more robust security postures. For penetration testers and security researchers, it's a vital part of the reconnaissance and vulnerability assessment toolkit, but always wielded within the bounds of ethical hacking and responsible disclosure. Understanding an attack vector is the first step to defending against it.

Operator's Arsenal: Essential Security Tools

For any security professional or enthusiast serious about network defense, a well-equipped digital arsenal is paramount. Beyond Bettercap for understanding threats, consider these essentials:

  • Wireshark: The de facto standard for network protocol analysis. Essential for deep packet inspection and identifying anomalies.
  • Nmap: For network discovery and security auditing. Understanding what devices are on your network is step one.
  • Metasploit Framework: A comprehensive platform for developing, testing, and executing exploits, vital for understanding attack surfaces.
  • OpenVPN/WireGuard: For establishing secure, encrypted VPN tunnels, especially critical on untrusted networks.
  • Intrusion Detection Systems (IDS): Such as Snort or Suricata, for real-time network threat detection.
  • Security Books: Classics like "The Web Application Hacker's Handbook" and "Network Security Toolkit" provide foundational knowledge.
  • Certifications: Consider certifications like CompTIA Security+, OSCP (Offensive Security Certified Professional), or CISSP (Certified Information Systems Security Professional) to formalize your expertise.

FAQ: Mitigating Network Interception

Q1: How can I tell if I'm being targeted by a MitM attack on public Wi-Fi?

A1: Look for unusual browser warnings (e.g., certificate errors), redirects to unexpected websites, or intermittent connectivity issues. Your device's ARP table might also show unexpected MAC addresses for your gateway.

Q2: Is using a VPN on public Wi-Fi enough to be safe from all MitM attacks?

A2: A VPN provides strong protection by encrypting your traffic, making it unreadable to attackers on the local network. However, it does not protect against phishing attacks that trick you into revealing credentials or malware already present on your device.

Q3: What are the most common protocols targeted in MitM attacks?

A3: Unencrypted protocols are the primary targets. This includes HTTP, FTP, Telnet, and older versions of email protocols like POP3/IMAP/SMTP. Modern secure protocols like HTTPS, SFTP, and SSH are highly resistant.

Q4: Can I use my firewall to prevent ARP spoofing?

A4: A host-based firewall on your individual machine doesn't directly prevent ARP spoofing, as the attack operates at the network layer before traffic reaches your host's IP stack. However, network firewalls and IDS/IPS systems with specific rules can detect and block suspicious ARP activity.

The Contract: Securing Your Digital Footprint

The digital realm is a battlefield where vigilance is your strongest weapon. You've peered into the mechanics of MitM attacks, understanding how tools like Bettercap can exploit network vulnerabilities. You've learned about ARP spoofing and DNS poisoning, the insidious ploys that can reroute your data or trick you into visiting malicious sites. You've seen the power of encryption, the ultimate shield that renders intercepted data useless.

Now, the contract. Your mission, should you choose to accept it, is to apply this knowledge proactively. Today, conduct a network assessment of your own environment, or any network you are authorized to test. Identify all devices, scrutinize your router's client list, and check the ARP table on your primary workstation. If you use public Wi-Fi regularly, commit to using a VPN 100% of the time. Your digital life depends on your diligence. The shadows are always watching; ensure your defenses are robust.

Man-in-the-Middle Attacks: An Ethical Hacker's Deep Dive into Interception

The digital ether hums with a constant stream of data, a silent symphony of packets dancing between devices. But in this intricate ballet, shadows lurk. The Man-in-the-Middle (MitM) attack is one such specter, a silent eavesdropper manipulating the conversation, not through brute force, but through insidious deception. It’s the digital equivalent of a corrupt diplomat intercepting messages, altering them, and relaying them with a sinister smile. Today, we strip away the illusion and dissect this classic threat from the perspective of an ethical operator. We’re not just observing; we’re understanding the anatomy of compromise to better fortify our own digital ramparts.

Understanding the Core Threat: The MitM Interception

At its heart, a Man-in-the-Middle attack is a form of eavesdropping where the attacker secretly relays and potentially alters the communication between two parties who believe they are directly communicating with each other. Imagine two individuals speaking through a third party who is deliberately misinterpreting or twisting their words. The victims are unaware that their conversation is compromised, making MitM attacks particularly dangerous. This isn't about kicking down doors; it's about subtly rerouting the traffic, creating a phantom presence between the legitimate endpoints. The attacker positions themselves within the network path, intercepting packets, examining their contents, and in many cases, injecting their own malicious data or modifying the existing flow. This can be achieved through various techniques, ranging from ARP spoofing on local networks to more sophisticated DNS poisoning or SSL stripping on broader infrastructures. The objective is always the same: gain unauthorized access to sensitive information or control over the communication channel.

Common Attack Vectors for MitM

The digital landscape offers a smorgasbord of opportunities for an attacker aiming to insert themselves into a communication flow. Understanding these vectors is the first line of defense.
  • ARP Spoofing: On a local area network (LAN), this is a classic. An attacker sends falsified Address Resolution Protocol (ARP) messages to link their MAC address with the IP address of a legitimate device (like the gateway or another client). This tricks the target device into sending traffic to the attacker’s machine instead of the intended destination.
  • DNS Spoofing/Cache Poisoning: The Domain Name System (DNS) acts as the internet's phonebook. DNS spoofing involves corrupting DNS records to redirect users to malicious websites that closely resemble legitimate ones. Cache poisoning occurs when an attacker injects false data into a DNS resolver's cache, leading to widespread redirection.
  • SSL/TLS Stripping: Modern communication often relies on encryption (HTTPS). SSL stripping is an attack where the attacker intercepts an HTTPS connection and relays it as a plain HTTP connection to the end-user, while maintaining an HTTPS connection to the server. The user sees an insecure HTTP connection but might not realize their data is no longer encrypted in transit to the attacker.
  • Wi-Fi Eavesdropping: Public Wi-Fi networks are notorious hunting grounds. An attacker can set up a rogue access point with a legitimate-sounding name (e.g., "Free Airport WiFi") to lure unsuspecting users. Once connected, all traffic can be routed through the attacker's machine.
  • Proxy Server Manipulation: Compromising or setting up a malicious proxy server can allow an attacker to intercept and modify traffic passing through it.

Ethical Hacking Demonstration: ARP Spoofing with `arpspoof`

Let's get our hands dirty. This is a controlled demonstration, performed in a isolated lab environment. Never attempt this on networks you do not own or have explicit permission to test. **Prerequisites:**
  • A Linux-based operating system (Kali Linux, Parrot OS, etc.)
  • Two target machines on the same network segment: one victim, one attacker.
  • Network interface configured for promiscuous mode.
  • Wireshark or `tcpdump` for traffic analysis.
**Steps:**
  1. Initial Reconnaissance: Identify the IP addresses and MAC addresses of the gateway and the victim machine.
    
    # On Kali/Attacker machine
    ip addr show
    arp -a
            
  2. Enable IP Forwarding: To act as a genuine Man-in-the-Middle, the attacker machine needs to forward packets between the victim and the gateway.
    
    echo 1 > /proc/sys/net/ipv4/ip_forward
            
  3. Initiate ARP Spoofing: We will use the `arpspoof` tool (part of the `dsniff` suite). This command tells the victim that the attacker's MAC address is the gateway's MAC address.
    
    # Target = Victim IP, Gateway = Gateway IP
    arpspoof -i <your_interface> -t <victim_ip> <gateway_ip>
            
    This command needs to be run in conjunction with another that tells the gateway that the attacker's MAC address is the victim's MAC address. You'll typically run two instances of `arpspoof` in separate terminals or use `ettercap`.
    
    # Target = Gateway IP, Gateway = Victim IP
    arpspoof -i <your_interface> -t <gateway_ip> <victim_ip>
            
    Alternatively, `ettercap` can simplify this process by handling both sides of the spoofing.
  4. Sniff the Traffic: With ARP spoofing in place, traffic between the victim and gateway now flows through the attacker's machine. Use Wireshark or `tcpdump` to capture and analyze the data.
    
    # Example using tcpdump
    tcpdump -i <your_interface> -n -vv
            
    You will start seeing packets that were originally intended for the gateway being sent to your machine, and packets from the gateway being sent to your machine for onward transmission to the victim.
  5. Disable IP Forwarding: Crucially, once testing is complete, remember to disable IP forwarding to restore normal network operations.
    
    echo 0 > /proc/sys/net/ipv4/ip_forward
            

Beyond Eavesdropping: MitM for Control

The implications of an active MitM attack extend far beyond passive sniffing. An attacker in the middle can:
  • Inject Malicious Content: Modify downloaded files, inject JavaScript into web pages to steal credentials or install malware, and alter email content.
  • Hijack Sessions: Steal session cookies and impersonate the user on websites without needing their password.
  • Perform Credential Harvesting: Intercept login attempts, capturing usernames and passwords.
  • Manipulate Transactions: Alter financial transaction details, redirecting funds.
The power of MitM lies in its stealth. Victims often have no immediate indication that their communication has been tampered with.

Mitigation Strategies: Building Digital Fortifications

Defending against MitM attacks requires a multi-layered approach, combining technical controls with user awareness.
  • Use HTTPS Everywhere: End-to-end encryption is paramount. Browsers and applications should enforce HTTPS connections. Tools like the "HTTPS Everywhere" browser extension can help.
  • Network Segmentation: Segmenting networks limits the scope of ARP spoofing attacks. Devices on different segments won’t be vulnerable to each other's ARP poisoning.
  • Static ARP Entries: Manually configuring static ARP entries on critical network devices can prevent spoofing attempts, though this is often impractical in large environments.
  • Intrusion Detection/Prevention Systems (IDPS): Modern IDPS can detect anomalous ARP traffic patterns indicative of spoofing.
  • VPNs on Untrusted Networks: Virtual Private Networks (VPNs) encrypt all traffic between your device and the VPN server, making it unreadable to attackers on local networks, even if they perform a MitM. This is your best bet when using public Wi-Fi.
  • Employee Training: Educate users about the risks of public Wi-Fi, phishing attempts, and the importance of verifying website security indicators (like the padlock icon).
  • Certificate Pinning: For web applications, certificate pinning ensures that the client only accepts connections to servers presenting a specific, pre-defined certificate, thwarting SSL stripping.

Veredicto del Ingeniero: ¿Vale la pena adoptar MitM?

From an ethical hacking perspective, understanding and being able to perform MitM attacks is crucial. It exposes the vulnerabilities in network protocols, application implementations, and user behavior. It’s a foundational skill for penetration testers and bug bounty hunters. However, for any organization aiming for robust security, the *adoption* of MitM as a defensive strategy is nonsensical. Instead, the *understanding* of MitM should drive the implementation of strong, layered security controls. For defenders, the goal is to make MitM attacks technically unfeasible or economically unviable. This means prioritizing encryption, secure network configurations, and continuous monitoring. The temptation is always there to take the easy route, but in cybersecurity, the easy route is usually the one paved with compromised data.

Arsenal del Operador/Analista

To effectively analyze and defend against MitM attacks, a well-equipped arsenal is indispensable.
  • Network Analysis Tools: Wireshark (for packet capture and deep inspection), tcpdump (command-line packet capture).
  • MitM Frameworks: Ettercap (comprehensive suite for MitM attacks), Cain & Abel (Windows-based credential recovery and network analysis), Bettercap (powerful, modular framework).
  • Network Scanners: Nmap (for network discovery and vulnerability scanning), Angry IP Scanner.
  • Packet Crafting Tools: Scapy (Python library for packet manipulation).
  • VPN Software: OpenVPN, WireGuard, commercial VPN clients.
  • Secure Browsers/Extensions: Firefox, Brave, uBlock Origin, HTTPS Everywhere.
  • Books: "The Web Application Hacker's Handbook", "Network Security Assessment" by David Simon, "Practical Packet Analysis" by Chris Sanders.
  • Certifications: Offensive Security Certified Professional (OSCP), CompTIA Security+, Certified Ethical Hacker (CEH).

Preguntas Frecuentes

  • ¿Puede un atacante robar mis contraseñas si uso HTTPS? Si el sitio web implementa HTTPS correctamente y no hay SSL stripping o compromiso del certificado del lado del servidor, tus contraseñas están cifradas en tránsito. Sin embargo, vulnerabilidades en el lado del cliente o ataques de phishing aún pueden comprometer credenciales.
  • ¿Es un VPN suficiente para protegerme de MitM en Wi-Fi público? Un VPN cifra todo tu tráfico saliente, lo que hace que sea inútil para un atacante de MitM en esa red local. Es una de las defensas más efectivas para redes no confiables.
  • ¿Cómo puedo saber si estoy siendo víctima de un ataque MitM? Presta atención a las advertencias del navegador sobre certificados inválidos, cambios inesperados en la navegación (sitios que solían ser HTTPS ahora son HTTP), y rendimiento de red inusual. Sin embargo, los ataques sofisticados pueden ser indetectables.
  • ¿Qué es el SSL Stripping y cómo funciona? Es un ataque donde el atacante elimina la capa de cifrado SSL/TLS de una conexión HTTPS, haciéndola transitar como HTTP. Esto permite al atacante ver todos los datos en texto plano.

El Contrato: Asegura el Perímetro Digital

You’ve seen the mechanics, the tools, and the vulnerabilities. Now, the contract is yours to fulfill: Implement at least two of the mitigation strategies discussed in this post within your own network or for your personal devices. For those operating networks, deploy an IDPS and enforce HTTPS Everywhere. For individuals, commit to using a reputable VPN on all public Wi-Fi connections and verify certificate validity diligently. Document your implementation. What challenges did you face? What insights did you gain? Share your findings and your code, if applicable, in the comments below. The digital realm demands constant vigilance. Prove you’re ready to stand guard.

Guía Definitiva: Dominando la Red Local con Evillimiter para Pentesting

La red local. Un ecosistema cerrado, aparentemente seguro, pero a menudo un campo de batalla latente para el atacante. Lasaduras de seguridad se cierran, los sistemas se parchean, pero la verdadera guerra se libra en la interconexión invisible. Hoy, no vamos a hablar de brechas a escala global, sino de las entrañas de tu propia red. Vamos a desmantelar la ilusión de seguridad con una herramienta que susurra control en cada paquete: Evillimiter. Olvida la poesía de los firewalls; aquí hablamos de ingeniería de redes desde la trinchera.

Este no es un tutorial para aficionados. Esto es para aquellos que entienden que la defensa solo es tan fuerte como la ofensiva que la pone a prueba. Hemos visto las redes corporativas caer por fallos tontos, por descuidos imperdonables. Y a menudo, el punto de entrada es la red local, ese territorio que creemos conocer como la palma de nuestra mano. Evillimiter, en las manos adecuadas, es una llave maestra. Y mi trabajo es enseñarte cómo forjarla, no para robar, sino para entender la fragilidad del sistema. La información aquí expuesta es para fines educativos y de concienciación sobre seguridad. Cualquier uso indebido de estas técnicas recae enteramente sobre tus hombros. Yo solo abro el telón.

Tabla de Contenidos

Introducción al Dominio de la Red Local

Una red local (LAN) es el microcosmos digital donde operan la mayoría de las organizaciones. Es el lugar donde los datos fluyen libremente entre estaciones de trabajo, servidores e impresoras. Pero esa misma fluidez es un vector de ataque. La mayoría de las veces, estas redes confían en la "seguridad a través de la oscuridad" o en configuraciones básicas que pasan por alto el verdadero panorama de amenazas. Evillimiter entra en juego como un agente disruptor. No se trata de encontrar una vulnerabilidad de día cero en un protocolo, sino de explotar las debilidades inherentes a cómo los dispositivos se comunican y cómo los usuarios interactúan en un entorno controlado.

El objetivo de esta guía es desmitificar Evillimiter, presentándolo no como una herramienta maliciosa, sino como una pieza más en el arsenal del pentester y del administrador de sistemas que necesita comprender las tácticas ofensivas para edificar defensas robustas. Analizaremos su funcionamiento, su instalación y, lo más importante, cómo interpretar los resultados para mejorar la postura de seguridad.

Evillimiter: El Arsenal de Interrupción

Evillimiter es una suite de herramientas de código abierto diseñada para realizar ataques de denegación de servicio (DoS) y manipulación de tráfico en redes locales. Su principal fortaleza radica en su facilidad de uso y su capacidad para afectar a múltiples protocolos de red, como ARP, ICMP, DNS y DHCP. No requiere permisos de root en la mayoría de los casos y puede ser ejecutado desde un dispositivo conectado a la misma red que los objetivos. Piensa en él como un simulador de desastres controlados, permitiéndote identificar puntos débiles antes de que un atacante real lo haga.

"La seguridad no es un producto, es un proceso." - Bruce Schneier. Con Evillimiter, entendemos ese proceso al forzarlo a un colapso controlado.

Las funcionalidades clave de Evillimiter incluyen:

  • ARP Spoofing: Envenenar la caché ARP de los dispositivos para redirigir el tráfico a través de tu máquina.
  • DNS Spoofing: Manipular las respuestas DNS para dirigir a los usuarios a sitios web maliciosos o falsificados.
  • DHCP Spoofing: Conceder direcciones IP falsas o redirigir el tráfico del servidor DHCP legítimo.
  • Packet Injection: Insertar paquetes maliciosos en la comunicación entre dos hosts.
  • ICMP Redirect: Manipular el enrutamiento del tráfico a nivel de red.

La versatilidad de Evillimiter lo convierte en una herramienta indispensable para simular ataques de Man-in-the-Middle (MITM) y realizar auditorías de red exhaustivas. Para aquellos que buscan automatizar estas pruebas de forma profesional, la versión de pago de herramientas como Burp Suite Professional ofrece capacidades analíticas y de escaneo más profundas, aunque Evillimiter sigue siendo un excelente punto de partida para entender los mecanismos subyacentes.

Instalación y Preparación del Campo de Batalla

Instalar Evillimiter es, por lo general, un proceso sencillo, especialmente en sistemas Linux. La mayoría de las distribuciones modernas tienen los paquetes necesarios disponibles a través de sus gestores de paquetes, o se puede compilar desde el código fuente. Para un operador serio, la eficiencia en la configuración es clave.

Requisitos:

  • Un sistema operativo Linux (Kali Linux, Ubuntu, Debian son opciones comunes).
  • Acceso a la red local que se desea auditar.
  • Conocimiento básico de redes TCP/IP.

Pasos de Instalación (Ejemplo en Debian/Ubuntu):

  1. Actualizar el sistema:
    sudo apt update && sudo apt upgrade -y
  2. Instalar dependencias (si es necesario, aunque Evillimiter a menudo incluye las suyas): Es vital asegurarse de tener `python3-pip` y `python3-dev` si se instala desde fuentes.
    sudo apt install python3-pip python3-dev -y
  3. Clonar el repositorio o instalar vía pip: La forma más común y actualizada es vía pip.
    sudo pip3 install evillimiter
    Alternativamente, desde el código fuente (requiere clonar el repositorio de GitHub):
    git clone https://github.com/bitbrute/evillimiter.git
    cd evillimiter
    sudo python3 setup.py install
    La instalación vía pip es generalmente preferible para mantenerte actualizado con las últimas versiones y parches de seguridad. La gestión de dependencias es crítica; un script mal configurado puede ser un fuego amigo.
  4. Verificar la instalación:
    evillimiter --help
    Si ves la salida de ayuda, la instalación fue exitosa.

Una vez instalado, el siguiente paso es la preparación del entorno. Asegúrate de que tu máquina atacante esté en la misma subred que tus objetivos. Un escaneo inicial con herramientas como `nmap` o `masscan` te dará un mapa del terreno. Identifica las direcciones IP de tus objetivos y las de los gateways (routers). Para un análisis más profundo y automatizado, herramientas como Metasploit Framework integran módulos que aprovechan técnicas similares a Evillimiter, pero con un alcance y capacidades de post-explotación significativamente mayores.

Dominio de la Red Local: Un Walkthrough Técnico

Aquí es donde la teoría se encuentra con la práctica. Ejecutaremos Evillimiter para simular un ataque de ARP Spoofing, el pilar de muchos ataques MITM en redes locales. Recuerda, esto se hace en un entorno controlado y con fines educativos.

Escenario: Queremos interceptar el tráfico entre un cliente (ej. 192.168.1.100) y el router (192.168.1.1) en una red local.

Paso 1: Identificar IPs y Gateway.

Primero, debemos conocer las direcciones IP de tu máquina (atacante), el objetivo y el gateway. Puedes usar `ip addr show` o `ifconfig` para obtener tu IP. Usa `nmap -sn 192.168.1.0/24` (ajustando el rango a tu red) para escanear la red y encontrar las IPs objetivo y del gateway.

Supongamos que:

  • IP del atacante: 192.168.1.150
  • IP del objetivo: 192.168.1.100
  • IP del Gateway (Router): 192.168.1.1

Paso 2: Ejecutar Evillimiter para ARP Spoofing.

El comando básico para iniciar un ataque de ARP spoofing contra un objetivo específico es:

sudo evillimiter --target 192.168.1.100 --gateway 192.168.1.1

Este comando instruye a Evillimiter para que envíe paquetes ARP falsos tanto al objetivo como al gateway. Le dice al objetivo que la dirección MAC del gateway es, en realidad, la de tu máquina atacante. De manera similar, le dice al gateway que la dirección MAC del objetivo es la de tu máquina. Como resultado, todo el tráfico destinado al objetivo o proveniente de él será redirigido a través de tu máquina. Una vez que el tráfico pasa por ti, puedes optar por dejarlo continuar hacia su destino, inyectar paquetes o registrarlo para su posterior análisis.

Paso 3: Monitorizar el Tráfico.

Con el ataque activo, el tráfico de la red ahora fluye a través de tu sistema. Aquí es donde el verdadero análisis comienza. Puedes usar herramientas como Wireshark o tcpdump para capturar y analizar este tráfico. Si has configurado Evillimiter para inyectar paquetes o realizar DNS spoofing, observarás estas manipulaciones en tiempo real.

Para capturar el tráfico con tcpdump mientras Evillimiter está activo:

sudo tcpdump -i eth0 -w network_traffic.pcap

(Reemplaza `eth0` con tu interfaz de red activa).

Este archivo `network_traffic.pcap` contiene todo lo que pasó por tu máquina. Abrirlo con Wireshark te permitirá ver cada paquete, cada solicitud HTTP, cada paquete DNS. Es la radiografía de la comunicación de tu red. Si buscas análisis forense detallado y recupera información crítica de sistemas comprometidos, herramientas como Autopsy o Volatility Framework para análisis de memoria son indispensables y se complementan con la inteligencia obtenida de interceptaciones de red como esta.

Estrategias de Ataque Avanzado y Mitigación

Evillimiter no es solo para ARP spoofing. Explora sus otras modalidades:

  • DNS Spoofing:
    sudo evillimiter --target 192.168.1.100 --gateway 192.168.1.1 --dns-spoof hosts.txt
    Donde `hosts.txt` es un archivo que mapea dominios a direcciones IP (ej: `1.2.3.4 evil.com`). Esto redirigirá todas las peticiones de `evil.com` a la IP especificada por el atacante. Es fundamental para simular phishing o redireccionamiento a sitios maliciosos.
  • DHCP Spoofing:
    sudo evillimiter --dhcp-spoof
    Esto puede llevar a la asignación de direccionamiento IP incorrecto a los clientes, o peor aún, a redirigir el tráfico a través de un servidor DHCP malicioso controlado por el atacante.

Mitigación: La Defensa Inteligente

Para defenderse de ataques como los que simula Evillimiter, se requieren varias capas de seguridad:

  • ARP Spoofing:
    • Implementar ARP estático en dispositivos críticos.
    • Utilizar herramientas de detección de ARP spoofing como ArpON (ARP handler inspection) o módulos dentro de Snort o Suricata.
    • Utilizar switches gestionables con funcionalidades de Dynamic ARP Inspection (DAI).
  • DNS Spoofing:
    • Utilizar servidores DNS internos seguros y configurados correctamente.
    • Fomentar el uso de DNSSEC para validación de respuestas.
    • Filtros de contenido y proxies web pueden detectar o bloquear el acceso a sitios maliciosos conocidos.
    • Monitorizar logs de DNS para actividades sospechosas.
  • DHCP Spoofing:
    • Configurar DHCP Snooping en los switches.
    • Establecer puertos del switch como `untrusted` para evitar que dispositivos no autorizados inunden la red con peticiones DHCP.

La monitorización continua y las auditorías regulares de seguridad son la piedra angular de una defensa efectiva. No esperes a ser atacado; anticípate. Las certificaciones como la CompTIA Security+ ofrecen una base sólida, mientras que la OSCP (Offensive Security Certified Professional) te sumerge en las técnicas ofensivas que debes dominar para defenderte eficazmente.

Veredicto del Ingeniero: ¿Por Qué Evillimiter?

Evillimiter es una herramienta potente para el operador de seguridad que busca entender las vulnerabilidades de las redes locales. Su curva de aprendizaje es baja, lo que la hace accesible para quienes se inician en el pentesting de redes. Permite simular ataques MITM y DoS de manera rápida y efectiva, proporcionando valiosas lecciones sobre la fragilidad de los protocolos de red estándar.

Sin embargo, no es una solución mágica para el pentesting profesional avanzado. Carece de la sofisticación y las capacidades de post-explotación de suites como Metasploit o frameworks de análisis de tráfico más robustos.

Pros:

  • Fácil de instalar y usar.
  • Excelente para demostraciones rápidas y aprendizaje de conceptos básicos de MITM.
  • Código abierto y gratuito.
  • Actúa directamente en la capa de enlace y red, puntos críticos de la infraestructura.

Contras:

  • Capacidades de análisis y post-explotación limitadas.
  • Puede ser detectado por sistemas de detección de intrusiones (IDS) si no se usa con cuidado.
  • No ofrece las funcionalidades avanzadas de enmascaramiento o evasión de herramientas comerciales.

En resumen, Evillimiter es un gran punto de partida para entender cómo se manipula una red local. Es una navaja suiza para tareas específicas, pero para operaciones a gran escala o análisis forense profundo, necesitarás un arsenal más completo. Si buscas herramientas que ofrezcan comparativas exhaustivas o funcionalidades de escaneo de aplicaciones web, considera investigar Acunetix o OWASP ZAP, aunque estas se centran más en aplicaciones web que en la infraestructura de red.

Preguntas Frecuentes

¿Es Evillimiter legal de usar?

El uso de Evillimiter es legal siempre y cuando se aplique en tu propia red o en redes para las que tengas permiso explícito de auditoría. Usarlo en redes ajenas sin autorización es ilegal.

¿Cómo puedo detectar si mi red está siendo atacada con Evillimiter?

Busca inconsistencias en la tabla ARP de tus dispositivos, tráfico de red inusual, lentitud o redireccionamientos inesperados. Herramientas de monitorización de red y IDS/IPS pueden alertar sobre patrones de ARP spoofing.

¿Puedo usar Evillimiter en Windows?

Evillimiter está diseñado principalmente para Linux. Si bien existen herramientas con funcionalidades similares para Windows, la experiencia y el soporte son mejores en entornos Linux.

¿Qué tan efectivo es contra redes empresariales?

Su efectividad depende de la configuración de seguridad de la red. En redes mal protegidas o con configuraciones básicas, puede ser muy efectivo para simular ataques iniciales. Redes empresariales maduras con firewalls de última generación y sistemas IDS/IPS avanzados lo detectarán y bloquearán rápidamente.

¿Existen alternativas a Evillimiter para aprender sobre ARP Spoofing?

Sí, herramientas como Ettercap (con GUI y CLI), Cain & Abel (Windows) o scripts personalizados en Python utilizando bibliotecas como Scapy son excelentes alternativas para aprender y experimentar con ARP spoofing.

El Contrato: Asegura tu Propio Perímetro

Has desmantelado la teoría y has visto la práctica. Ahora, el contrato es tuyo. Tu misión, si decides aceptarla, es aplicar estos conocimientos en tu propio entorno lab. Configura una red virtual con VirtualBox o VMware, despliega un par de máquinas Linux (una como atacante, otra como objetivo) y un router virtual (como pfSense). Luego, ejecuta Evillimiter. No te conformes con el solo ataque. Intenta registrar el tráfico, identifica los paquetes DNS falsos y analiza cómo puedes mitigar estos ataques configurando ARP estático o DAI en un switch virtual.

Demuestra que puedes no solo romper, sino también construir y proteger. El conocimiento sin aplicación es solo ruido digital. Ahora, hazlo tuyo. El campo de batalla digital te espera.

Guía Definitiva para Erradicar Virus de Redirección Maliciosos en Blogger

La red, ese laberinto de servidores y protocolos, está plagada de sombras. Y a veces, esas sombras se manifiestan como un molesto redirigimiento, un espejismo digital que te arrastra hacia las cloacas de internet. Últimamente, muchos han tropezado con una particularmente insistente: un virus de redirección en Blogger que, tras unos minutos navegando, te escupe a dominios maliciosos reconocidos por cualquier antivirus medio decente. El culprit principal: elpaisactual.com/portada-2/. Un clásico del malware de bajo nivel, diseñado para sembrar el caos y la desconfianza.

Las soluciones estándar, esa primera línea de defensa que todos intentamos, fallan estrepitosamente. Borrar historial, caché, cookies; restablecer la configuración por defecto del navegador… nada. La red de seguridad de Blogger parecía impoluta, pero los síntomas persistían, como un fantasma recorriendo los cables. Tras semanas de frustración, de noches en vela frente a logs crípticos, tropecé con la respuesta. Una solución tan simple, tan estúpida, que te hace cuestionar la complejidad del universo digital.

Tabla de Contenidos

Introducción Operacional: El Enemigo Invisible

La red no es un lugar seguro. Es un campo de batalla encubierto. Hemos visto el enemigo, una redirección que opera como un caballo de Troya, pero su origen es nebuloso. Los foros se llenan de quejas, un hilo común de desesperación. Las respuestas oficiales, a menudo, apuntan a lo interno: tu PC, tu navegador. Pero los análisis superficiales son un lujo que no podemos permitirnos. La verdad, como siempre, se esconde en las capas inferiores.

Este tipo de ataque no es una broma. No es un simple error. Es una pieza de ingeniería maliciosa. Redirigirte a elpaisactual.com/portada-2/ no es un accidente; es una puerta a trampas mayores: adware, phishing, o peor. El objetivo es claro: explotar tu confianza, tu necesidad de información, para instalar más software indeseado o robar tus credenciales.

"Si puedes obtener el nombre de usuario y la contraseña de una persona, el sistema es el problema, no la persona."

La arquitectura de la red y las extensiones del navegador se convierten en puntos ciegos vulnerables. El usuario final, ajeno a estas complejidades, es la víctima perfecta. Pero nosotros no somos usuarios pasivos. Somos analistas, operadores. Nuestra misión es desentrañar la verdad.

Fase de Diagnóstico Técnico: Identificando el Vector

Cuando me enfrenté a este problema, la primera reacción fue la más obvia: limpiar el entorno local. Eliminar el historial de navegación, las galletas, la caché. Reiniciar el navegador. Nada. El redirigimiento persistía, como un invitado no deseado que se niega a irse. Esto me indicó que el problema no residía en la corrupción de datos del navegador, sino en una capa más profunda o externa.

La clave llegó al examinar las herramientas que utilizaba para conectarme a internet. VPNs, proxies… estas capas de abstracción, destinadas a protegernos o a permitirnos acceder a contenido restringido, se convierten en vectores de ataque cuando están comprometidas o mal configuradas. En mi caso particular, el culpable se reveló como una extensión de Chrome: Ultrasurf.

Sí, una herramienta comúnmente utilizada para evadir la censura y acceder a contenido restringido, se había convertido en el conducto para el malware. Al desactivar Ultrasurf, la redirección cesó de inmediato. La web volvió a comportarse como debía. La investigación posterior reveló una conexión sorprendentemente absurda: el tráfico de Ultrasurf me estaba redirigiendo desde Beskai, Jawa. Una ubicación geográfica que, francamente, me hizo dudar de la realidad. Este fallo de enrutamiento indicaba una manipulación externa del tráfico gestionado por la extensión.

La lección aquí es clara: no confíes ciegamente en tus herramientas de anonimato o acceso. Pueden ser el eslabón más débil de tu cadena de seguridad. La siguiente fase es entender cómo y por qué ocurrió esto.

Análisis de Causas Raíces: La Ingeniería Social Detrás del Malware

La causa exacta de esta redirección maliciosa no es trivial. Sin embargo, la evidencia apunta a una táctica de Man-in-the-Middle (MITM). Un atacante logró interceptar el tráfico de Ultrasurf, o quizás la propia extensión fue comprometida en un nivel más profundo.

Observemos el dominio que se menciona: postlnk.com. Este dominio, junto con la ubicación geográfica anómala sugerida, indica que el ataque podría estar geográficamente dirigido. El atacante podría estar explotando vulnerabilidades en la infraestructura de red o en la propia extensión para inyectar tráfico malicioso. El objetivo final no es solo redirigirte, sino convencerte de que instales Adware u otro tipo de malware.

La imagen 1, si estuviera disponible, mostraría cómo se escanea la URL https://elpaisactual.com/portada-2/ y se analiza su tráfico y origen. Este tipo de análisis forense digital es crucial para mapear la infraestructura del atacante y sus métodos. El hecho de que la solución solo funcionara para mí, y no necesariamente para otros usuarios o en otras geografías, subraya la naturaleza dinámica y segmentada de este ataque. Dependiendo de tu ubicación y de cómo se enrute tu tráfico a través de Ultrasurf, podrías ser un objetivo o no.

Estamos ante una obra maestra de MITM, orquestada con fines puramente maliciosos. La falta de un canal formal para reportar incidentes tan específicos (como este que intercepta tráfico de una VPN específica) nos obliga a compartir hallazgos en plataformas públicas como esta. Es un llamado a la comunidad para que esté alerta y colabore en la defensa colectiva.

"La seguridad no es un producto, es un proceso."

Estrategias de Mitigación y Erradicación

Para erradicar esta y otras amenazas similares, debemos adoptar un enfoque multifacético:

  1. Desactivar Extensiones Sospechosas: Si experimentas redirecciones extrañas, el primer paso es desactivar temporalmente todas las extensiones del navegador, especialmente aquellas relacionadas con VPNs, proxies, aceleradores de descarga o bloqueadores de anuncios no confiables. Vuelve a activarlas una por una para identificar la culpable.
  2. Verificar Proxies y VPNs: Asegúrate de que tu configuración de proxy sea legítima y que la VPN que utilizas provenga de una fuente confiable. Investiga la reputación de tu proveedor de VPN y verifica si hay informes de actividad maliciosa asociada a sus servidores. Considera el uso de servicios de pentesting para auditar tu propia configuración.
  3. Escaneo de Malware Profundo: Ejecuta escaneos completos de tu sistema con software antivirus y antimalware de buena reputación. Herramientas como Malwarebytes o ESET pueden detectar amenazas que otros antivirus podrían pasar por alto.
  4. Análisis de Tráfico de Red: Para los más técnicos, herramientas como Wireshark pueden ser invaluables. Capturar el tráfico de red mientras ocurre la redirección puede revelar los dominios de destino y los protocolos utilizados por el malware.
  5. Seguridad del Navegador: Mantén tu navegador siempre actualizado. Las actualizaciones suelen incluir parches de seguridad críticos que protegen contra vulnerabilidades conocidas. Considera el uso de navegadores centrados en la privacidad como Brave o Firefox con configuraciones de seguridad reforzadas.
  6. Auditoría de Plugins (para Blogger): Aunque el problema no se originó en Blogger *per se*, es vital revisar cualquier plugin o script que hayas añadido a tu blog. Un script malicioso inyectado en el código de tu plantilla podría ser el vector.

La solución en mi caso fue simple: desactivar Ultrasurf. Pero el origen del problema, la interceptación del tráfico, requiere una vigilancia constante. Para aquellos que gestionan sitios o buscan soluciones robustas, las plataformas de bug bounty y los servicios de auditoría de seguridad son inversiones esenciales.

Arsenal del Operador/Analista

  • Navegadores Seguros: Brave, Firefox (con extensiones de seguridad como uBlock Origin y Privacy Badger).
  • Herramientas de Diagnóstico: Wireshark, Malwarebytes, ESET Online Scanner.
  • Proxies y VPNs de Confianza: Investiga proveedores con buena reputación y políticas claras de no registro. Considera el uso de servicios como Mullvad o ProtonVPN.
  • Plataformas de Bug Bounty: HackerOne, Bugcrowd (para entender las vulnerabilidades modernas y reportarlas).
  • Libros Esenciales: "The Web Application Hacker's Handbook" (para entender las vulnerabilidades web), "Practical Malware Analysis" (para profundizar en el análisis de código malicioso).
  • Certificaciones Relevantes: OSCP (Offensive Security Certified Professional), CISSP (Certified Information Systems Security Professional) - para credenciales y conocimientos avanzados en ciberseguridad.

Preguntas Frecuentes (FAQ)

¿Por qué mi antivirus no detecta la redirección?

Los ataques de redirección a menudo explotan vulnerabilidades en la configuración de red o en aplicaciones de terceros (como extensiones de navegador), en lugar de introducir archivos maliciosos directamente en tu sistema. El antivirus tradicional puede no tener la capacidad de detectar o bloquear estas manipulaciones de tráfico en tiempo real.

¿Es seguro usar Ultrasurf después de este incidente?

La seguridad de Ultrasurf en esta situación específica es cuestionable. Aunque fue diseñada para la libertad de acceso, la interceptación de su tráfico indica que puede ser un vector de ataque. Se recomienda precaución extrema y, si no es estrictamente necesario, considerar alternativas más seguras y auditadas.

¿Cómo puedo proteger mi propio blog de Blogger de este tipo de ataques?

Mantén tu plantilla limpia de scripts de terceros no confiables, utiliza contraseñas fuertes, habilita la autenticación de dos factores y revisa periódicamente los permisos otorgados a cualquier herramienta de administración o widget que hayas agregado. Además, asegúrate de que tu propio acceso a internet sea seguro.

¿Qué debo hacer si sospecho que mi tráfico está siendo interceptado?

Desactiva inmediatamente cualquier servicio de VPN o proxy que estés utilizando. Cambia tus contraseñas clave y ejecuta escaneos de malware. Si el problema persiste, considera aislar tu máquina de la red o buscar ayuda profesional de un experto en ciberseguridad.

El Contrato Definitivo Contra el Malware

Hemos desentrañado la madeja de una redirección maliciosa, un ataque que se esconde en la conveniencia de una extensión de VPN. La solución, en este caso, fue tan simple como desconectar un interruptor, pero la causa subyacente es un recordatorio sombrío de la constante batalla que libramos en el ciberespacio. La confianza es una moneda frágil en la red; una vez rota, puede ser difícil de restaurar.

Tu contrato ahora es claro: no confíes ciegamente en las herramientas que usas para navegar. Sé un detective implacable de tu propio entorno digital. Investiga, verifica, y sobre todo, mantente informado. La próxima vez, el ataque podría ser más sofisticado. Y tú, armado con conocimiento, estarás preparado.

Tu Desafío: Mapea el Ataque MITM

Toma una página de este análisis. Si te encuentras con una redirección web sospechosa, tu desafío esdocumentar la cadena completa. Identifica el punto de origen de la redirección, los dominios intermedios y el destino final. Utiliza herramientas como traceroute (o tracert en Windows), nslookup/dig, y un analizador de paquetes como Wireshark para mapear la ruta que toma tu tráfico. Comparte tus hallazgos (de forma anónima si es necesario) en los comentarios. ¿Puedes construir un mapa detallado de la infraestructura del atacante?

Guía Definitiva para Realizar un Ataque de Denegación de Servicio (DoS) con Ettercap

La luz tenue de la consola de Kali Linux proyecta sombras danzantes sobre mi escritorio mientras los logs continúan su monólogo incesante. Hoy no buscaremos fantasmas en la máquina; vamos a desmantelar una ilusión de conectividad. Los ataques de Denegación de Servicio (DoS) son la piedra angular de las tácticas de interrupción, un método crudo pero efectivo para paralizar sistemas. Comprender su mecánica es esencial, no para perpetrar el caos, sino para fortificar nuestras defensas. Este no es un juego de niños; el poder de paralizar una red, aunque sea temporalmente, conlleva responsabilidades. La información que compartimos hoy es para fines educativos estrictamente. **El uso de estas técnicas en redes o sistemas sin permiso explícito puede acarrear severas consecuencias legales y éticas.** El año 2013 nos dejó una lección vívida: un ataque DoS de proporciones masivas no solo ralentizó, sino que llegó a afectar la infraestructura crítica de internet, incluyendo nodos neurálgicos como el de Londres. El objetivo es simple pero devastador: negar el acceso a servicios esenciales, ya sea web, correo electrónico, o la propia funcionalidad de un sistema, hasta su colapso total. La técnica predilecta es la inundación de tráfico, una avalancha digital que ahoga las conexiones y corrompe la comunicación.

Tabla de Contenidos

Introducción Técnica: El Ataque DoS

Un ataque de Denegación de Servicio (DoS) apunta a saturar un sistema o recurso de red con tráfico ilegítimo, impidiendo que los usuarios legítimos accedan a él. A diferencia de otros ataques que buscan exfiltrar datos o comprometer la integridad, el DoS se centra en la disponibilidad. La técnica más común implica sobrecargar el objetivo con una cantidad masiva de solicitudes, agotando sus recursos (ancho de banda, potencia de procesamiento, memoria) hasta que falla o se vuelve inaccesible.

La complejidad de un ataque DoS puede variar. Desde simples scripts que bombardean una IP con paquetes hasta sofisticadas redes de bots (DDoS - Distributed Denial of Service) controladas remotamente. En este tutorial, nos enfocaremos en una variante de DoS que, si bien no paraliza la internet global, puede interrumpir la navegación en una red local: el DNS Spoofing, amplificado por Ettercap.

La Herramienta Clave: Ettercap

Ettercap es una potente suite de herramientas para la interceptación y manipulación de tráfico de red. Es capaz de realizar ataques Man-in-the-Middle (MITM) en LANs, capturando y modificando en tiempo real los datos que fluyen entre dos puntos de comunicación. Su versatilidad lo convierte en una herramienta indispensable para auditores de seguridad y, lamentablemente, para atacantes.

Para un profesional de la ciberseguridad, dominar Ettercap es crucial para entender cómo los atacantes pueden explotar las debilidades de los protocolos de red, especialmente ARP (Address Resolution Protocol). Hoy, lo usaremos para redirigir inteligentemente las peticiones DNS, un primer paso hacia un ataque DoS más incapacitante.

Paso 1: Verificación e Instalación de Ettercap

Antes de sumergirnos en las profundidades de la red, debemos asegurarnos de tener nuestras herramientas listas. Kali Linux, la distribución predilecta para muchos profesionales de la seguridad, suele venir con Ettercap preinstalado. Sin embargo, una verificación nunca está de más. Abre tu terminal y ejecuta el siguiente comando para comprobar la versión:

~# ettercap -v

Si Ettercap no se encuentra en tu sistema, o si deseas la última versión disponible en los repositorios, puedes instalarlo fácilmente con el gestor de paquetes APT:

~# sudo apt-get update
~# sudo apt-get install ettercap

Asegúrate de ejecutar estos comandos con privilegios de superusuario para que la instalación se complete correctamente. Este paso es fundamental; sin Ettercap, nuestro plan se desmorona antes de empezar.

Paso 2: Configuración del Ataque Man-in-the-Middle (MITM)

La base de nuestro ataque DoS será un ataque Man-in-the-Middle (MITM) utilizando ARP Spoofing. Esto nos permite posicionarnos entre el objetivo y el router (o cualquier otro punto de conexión), interceptando y redirigiendo su tráfico. Ejecutaremos Ettercap en modo texto para una mayor claridad y control.

El comando que utilizaremos es el siguiente:

~# ettercap -T -q -M arp:remote -i eth0

Analicemos las opciones:

  • -T: Inicia Ettercap en modo texto puro, ideal para terminales.
  • -q: Modo silencioso. Evita que Ettercap muestre el contenido detallado de cada paquete que intercepta, manteniendo la salida más limpia.
  • -M arp:remote: Especifica el tipo de ataque MITM a realizar. En este caso, ARP spoofing remoto. Esto engaña a las máquinas de la red haciéndoles creer que Ettercap es el gateway legítimo.
  • -i eth0: Indica la interfaz de red a utilizar. Reemplaza eth0 por el nombre de tu interfaz de red (ej: wlan0 si usas Wi-Fi) si es diferente.

Tras ejecutar este comando, Ettercap comenzará a escanear la red local y a poblar la tabla ARP. Verás una interfaz de texto donde se listan las IPs y MACs de los dispositivos detectados. La persistencia en la observación de esta interfaz es clave para el análisis de red.

Paso 3: Obtención de la IP de Destino

Ahora, necesitamos un objetivo para nuestra redirección de tráfico. En este escenario de DNS spoofing, queremos que las solicitudes de nombres de dominio (ej: corgiorgy.com) sean redirigidas a una IP específica. Para ello, utilizaremos la herramienta nslookup para obtener la dirección IP asociada a un nombre de dominio.

Vamos a suponer que queremos redirigir el tráfico hacia la IP de corgiorgy.com. Ejecuta el siguiente comando en otra terminal:

~# nslookup corgiorgy.com

La salida te proporcionará la dirección IP (o varias IPs) asociadas con ese dominio. Anota la IP que deseas usar como destino para tu ataque. Por ejemplo, si corgiorgy.com resuelve a 192.168.1.100, esa será nuestra IP de redirección.

Nota Importante: La elección del dominio y la IP de destino es crucial. Para fines de prueba, se recomienda usar dominios que no sean críticos y una IP controlada por ti (ej: una máquina virtual que hayas configurado para simular un servidor malicioso) o una IP pública que, al ser visitada, no cause problemas.

Paso 4: Configuración del DNS Spoofing en Ettercap

La magia ocurre ahora. Vamos a configurar Ettercap para interceptar las peticiones DNS y redirigirlas a la IP que obtuvimos. Esto se hace editando el archivo de configuración etter.dns.

Navega hasta el directorio de configuración de Ettercap:

~# cd /etc/ettercap/

Lista los archivos en el directorio para confirmar la presencia de etter.dns:

~# ls

Ahora, edita el archivo etter.dns con tu editor de texto preferido. Usaremos vim como ejemplo:

~# vim etter.dns

Dentro de vim:

  1. Presiona ESC para entrar en modo de comandos.
  2. Escribe :set nu para activar la numeración de líneas, lo que facilitará la navegación.
  3. Presiona i para entrar en modo de inserción y poder editar el archivo.

Busca una línea apropiada (a menudo la línea 59, pero puede variar) o crea una nueva entrada. El formato para un DNS spoofing es:

* NombreDominio IP_a_redirigir

Por ejemplo, si deseas redirigir todas las peticiones de corgiorgy.com a la IP 192.168.1.100, añadirías:

* corgiorgy.com 192.168.1.100

Asegúrate de que el asterisco (*) esté presente y que la IP y el dominio estén escritos correctamente. Un pequeño error aquí puede invalidar todo el ataque.

Para guardar los cambios en vim:

  1. Presiona ESC nuevamente para salir del modo de inserción.
  2. Escribe :w y presiona Enter para guardar.
  3. Escribe :q! y presiona Enter para salir (si no quieres guardar los cambios, usa :q! solo).

La precisión en este paso es vital. Un archivo etter.dns mal configurado no activará el spoofing como esperamos, dejando nuestras defensas intactas.

Paso 5: Activación del Ataque

Con Ettercap en modo MITM y el archivo etter.dns configurado, es hora de activar la funcionalidad de DNS spoofing.

Regresa a la terminal donde Ettercap está ejecutándose (o inicia uno nuevo si lo cerraste). Presiona la tecla P para acceder a las opciones de filtrado y plugins. En el menú que aparece, escribe dns_spoof y presiona Enter para activarlo.

Ettercap ahora interceptará las solicitudes DNS y las redirigirá según lo configurado en etter.dns. Las máquinas en la red que intenten acceder a corgiorgy.com serán dirigidas hacia 192.168.1.100, en lugar de su IP real.

Visualmente, esto se traduce en que los usuarios en la red no podrán navegar a sitios web (a menos que sean la IP de redirección o sitios que no dependan de DNS de la misma manera) y verán mensajes de error o páginas que no son las esperadas. El acceso a internet se verá impedido para ellos, logrando así una denegación de servicio parcial.

Para detener el ataque: Cuando estés listo para finalizar, dentro de la interfaz de Ettercap en ejecución, presiona la tecla Q. Si cierras la terminal sin salir correctamente (Q), el ataque podría continuar ejecutándose en segundo plano, y eso es negligencia.

Una vez que salgas de Ettercap, la red debería volver a la normalidad. Los usuarios recuperarán el acceso a internet y las resoluciones DNS volverán a ser correctas.

Veredicto del Ingeniero: El Impacto Real de un DoS

Este tutorial demuestra una técnica de ataque DoS relativamente simple pero impactante a nivel local. El DNS Spoofing, aunque no derriba grandes corporaciones por sí solo, puede ser un componente de ataques más complejos o una forma de interrumpir operaciones críticas en una red más pequeña. La efectividad de un ataque DoS radica en su capacidad para agotar recursos, y entender cómo se logra es la primera línea de defensa.

Pros:

  • Demuestra la vulnerabilidad de ARP y DNS en redes locales.
  • Fácil de ejecutar con herramientas estándar como Ettercap.
  • Proporciona una visión práctica de la interrupción de servicios.

Contras:

  • Limitado a la red local bajo el control del atacante.
  • Fácil de detectar y mitigar con configuraciones de red adecuadas.
  • No es un ataque de explotación directa de vulnerabilidades de software, sino de protocolo.

Recomendación: Dominar estas técnicas es esencial para cualquier profesional de la seguridad que busque proteger sistemas. Saber cómo funciona un ataque te permite construir defensas más robustas.

Arsenal del Operador/Analista

Para aquellos que buscan profundizar en la seguridad de redes y la defensa contra ataques como el DoS, un arsenal bien equipado es indispensable:

  • Herramientas de Red y Pentesting:
    • Ettercap: Para MITM y manipulación de tráfico.
    • Wireshark: El estándar de oro para el análisis de paquetes de red. Indispensable para entender el tráfico interceptado.
    • Nmap: Para el escaneo de puertos y descubrimiento de red.
    • Metasploit Framework: Una suite completa para desarrollar y ejecutar exploits, incluyendo módulos para ARP spoofing y DoS.
  • Sistemas Operativos Especializados:
    • Kali Linux: La distribución Linux más popular para pruebas de penetración y auditoría de seguridad.
    • Parrot Security OS: Una alternativa robusta a Kali, también repleta de herramientas de seguridad.
  • Libros Clave:
    • "The Nmap Network Scanner: Interactive Scripting with the Nmap Scripting Engine" por Gordon "Fyodor" Lyon.
    • "Network Security Assessment: Know Your Network" por Chris McNab.
    • "Hacking: The Art of Exploitation" por Jon Erickson (para una comprensión profunda de los mecanismos de ataque a bajo nivel).
  • Certificaciones Relevantes:
    • CompTIA Network+: Fundamentos sólidos de redes.
    • CompTIA Security+: Principios de ciberseguridad.
    • Offensive Security Certified Professional (OSCP): Certificación de pentesting práctico de alto nivel.

Invertir en estas herramientas y conocimientos es una apuesta segura para cualquier profesional que se tome en serio la ciberseguridad. Las plataformas de bug bounty como HackerOne y Bugcrowd a menudo requieren un dominio de estas herramientas para tener éxito.

Preguntas Frecuentes (FAQ)

¿Es legal realizar un ataque DoS?

Generalmente, no. Realizar un ataque DoS contra sistemas o redes que no te pertenecen o para los que no tienes permiso explícito es ilegal en la mayoría de las jurisdicciones y puede acarrear sanciones severas.

¿Cuál es la diferencia entre DoS y DDoS?

Un ataque DoS se origina desde una única fuente (una máquina o IP), mientras que un ataque DDoS (Distributed Denial of Service) se origina desde múltiples fuentes distribuidas (a menudo una red de bots o botnet), lo que lo hace mucho más potente y difícil de mitigar.

¿Cómo me protejo de un ataque DNS Spoofing?

Las medidas de protección incluyen el uso de ARP estático configurado en los switches, el uso de sistemas de detección de intrusos (IDS) que puedan alertar sobre envenenamiento ARP, y el uso de DNSSEC (DNS Security Extensions) para validar la autenticidad de las respuestas DNS.

¿Puede Ettercap ser usado para algo más que ataques?

Sí. Ettercap es una herramienta versátil que puede ser utilizada para auditorías de seguridad comprehensivas, análisis de tráfico de red, y para entender cómo funcionan las vulnerabilidades de protocolo en entornos controlados. Su uso ético es tan importante como el conocimiento de sus capacidades ofensivas.

El Contrato: Defensa Activa

Has navegado por las entrañas de un ataque DoS basado en DNS Spoofing. Ahora te enfrentas a un dilema: ¿eres solo un observador, o un arquitecto de la defensa?

Tu desafío: Diseña un plan de defensa en capas para una pequeña red corporativa (ej: 50 empleados, una intranet, acceso a internet y correo electrónico) contra ataques DoS y DNS Spoofing. Detalla las herramientas, configuraciones y procedimientos que implementarías. Considera tanto la prevención como la respuesta ante incidentes.

Comparte tus estrategias. ¿Qué herramientas de monitoreo usarías? ¿Cómo configurarías tu firewall? ¿Qué políticas de seguridad establecerías? Demuestra tu visión defensiva y pongamos a prueba las mentes más agudas.