
The digital frontier is a harsh mistress. Every project, from a rogue crypto mine to an ambitious NFT collection, needs a face. Not just any face, but a digital storefront that screams legitimacy and promises untold riches (or at least, a cool piece of digital art). Today, we're not just building a website; we're crafting a gateway, a siren's call to the digital art collectors of the world. We'll make a custom landing page, sprinkle in some Web3 magic with MetaMask integration, and then, for the ultimate audacity, deploy it all for free. Because in this game, every dollar saved is a dollar you can reinvest in the next big burn. Or a really strong cup of coffee.
Many think the NFT boom is over, a speculative bubble that popped. They’re wrong. The underlying tech, the ownership, the community – that’s the real gold. And every great gold rush needs a saloon, a place for prospectors to gather and show off their finds. That’s what this landing page is. It’s your digital saloon. We're not just slapping some HTML together; we're building a functional portal that connects your project to the wallets of potential collectors. Forget expensive hosting; Netlify is our back alley, operating in the shadows, serving up free bandwidth to those who know the handshake.
Project Overview: The Digital Saloon
Our mission is clear: construct a compelling NFT project landing page. This isn't just about pretty graphics; it's about functionality that resonates with the Web3 ethos. Expect to see:
- A dynamic countdown timer, building anticipation for your project's launch.
- Seamless MetaMask integration, allowing users to connect their wallets directly from the page.
- A free deployment strategy, leveraging Netlify to get your project live without bleeding your crypto reserves.
This tutorial is designed for those who understand that the best tools are often free, and the best strategies are born from a deep understanding of the underlying architecture. We'll move fast, like a sniper in the code. Let’s dissect the process.
Arsenal of the Operator/Analyst
Before we dive into the digital trenches, ensure your toolkit is sharp. For this operation, you'll need:
- Code Editor: Visual Studio Code is the industry standard for a reason. Efficient, extensible, and free.
- Version Control: Git and a GitHub account are non-negotiable. If you can't commit your changes, you're operating blind.
- Web Browser: Chrome or Firefox with developer tools are essential for real-time debugging.
- MetaMask Extension: The bridge to the Ethereum blockchain for testing.
- Basic Knowledge: HTML, CSS, and JavaScript fundamentals. If these are weak points, consider reinforcing them immediately. For a quick refresher, check out these crash courses:
The tools are secondary to the mindset. Remember, **"The function of good software is to make the obvious easy."** – Jon Postel. We’re making the obvious steps of deployment and integration easy, but the underlying complexity is where the real skill lies.
Taller Práctico: Configuración Inicial y Diseño
Every successful operation begins with meticulous setup. We'll establish the foundational structure of our landing page, drawing inspiration from projects that understand the power of presentation. Think of this as the blueprint before the infiltration.
Paso 1: Inicialización del Proyecto
- Create a new project directory on your local machine. Name it something evocative, like 'NFT-Gateway' or 'CryptoFront'.
- Inside this directory, create three essential files:
index.html: The core structure of your page.style.css: For all your visual branding and styling.script.js: Where the Web3 magic and dynamic elements will reside.
- Link your CSS and JavaScript files in the
index.htmlfile, typically within the<head>for CSS and before the closing</body>for JavaScript.
<!DOCTYPE html>
<html lang="en">
<head>
    <meta charset="UTF-8">
    <meta name="viewport" content="width=device-width, initial-scale=1.0">
    <title>My NFT Project - Landing Page</title>
    <link rel="stylesheet" href="style.css">
</head>
<body>
    <!-- Your content goes here -->

    <script src="script.js"></script>
</body>
</html>
Paso 2: Diseño de la Landing Page (HTML y CSS)
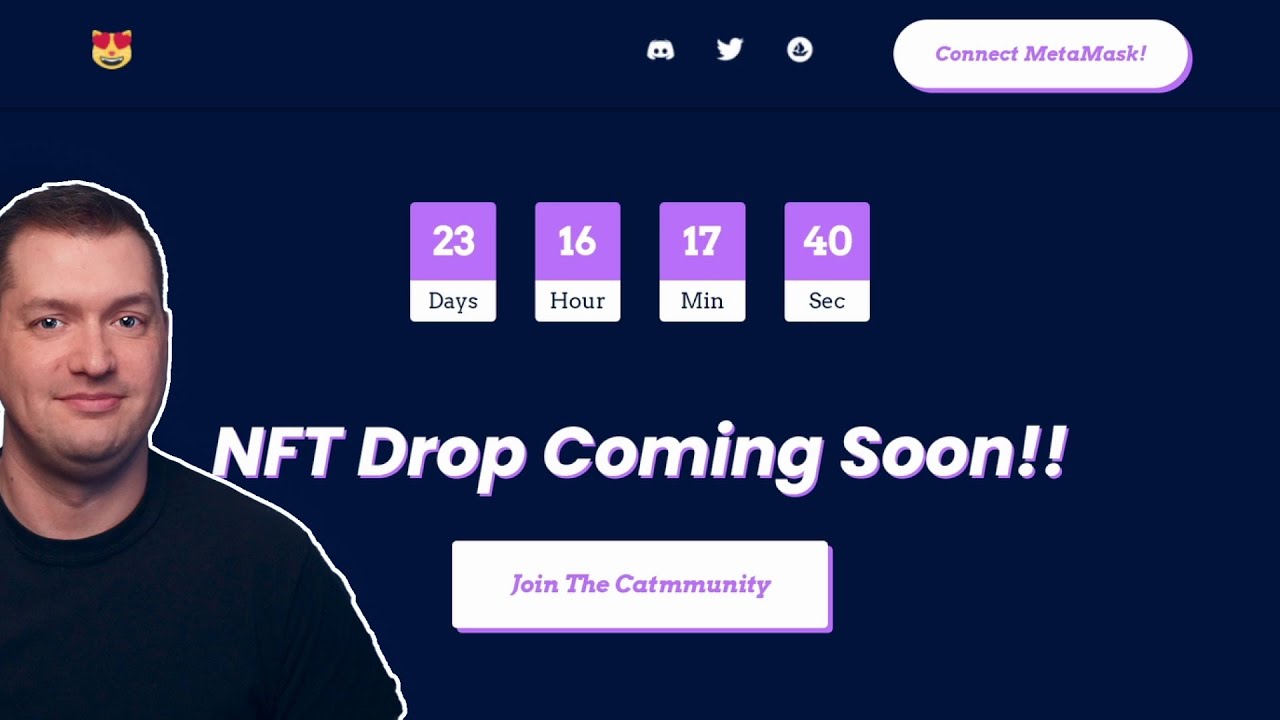
This is where you establish the visual narrative of your NFT project. Focus on a clean, modern aesthetic that conveys value and exclusivity. Consider these elements:
- Hero Section: A prominent banner with your project's name, logo, and a compelling tagline.
- Project Description: Briefly explain what makes your NFT collection unique.
- Countdown Timer: A visual element to build hype for the mint date.
- MetaMask Connect Button: The call to action for wallet integration.
- Collection Preview: Showcase some of the artwork.
Utilize CSS to style these components. Aim for responsiveness across all devices. Remember, a cluttered or slow-loading page is a vulnerability in itself.
/* Basic Styling Example */
body {
    font-family: 'Arial', sans-serif;
    background-color: #121212;
    color: #e0e0e0;
    margin: 0;
    padding: 0;
}

.hero {
    text-align: center;
    padding: 100px 20px;
    background-image: url('path/to/your/hero-image.jpg'); /* Replace with actual path */
    background-size: cover;
    background-position: center;
    height: 600px; /* Adjust as needed */
    display: flex;
    flex-direction: column;
    justify-content: center;
    align-items: center;
}

.hero h1 {
    font-size: 3.5em;
    margin-bottom: 20px;
    color: #ffffff; /* White for strong contrast */
}

.countdown {
    font-size: 2em;
    margin: 30px 0;
    color: #bb86fc; /* A distinct color for emphasis */
}

.connect-button {
    background-color: #03dac6; /* A vibrant call-to-action color */
    color: #121212;
    padding: 15px 30px;
    font-size: 1.2em;
    border: none;
    border-radius: 5px;
    cursor: pointer;
    transition: background-color 0.3s ease;
}

.connect-button:hover {
    background-color: #02a79e;
}

/* Add more styles for description, preview, etc. */
For the countdown timer, JavaScript will be essential. You'll need to calculate the difference between the current time and your project's launch time, then update the displayed timer dynamically. This involves basic date manipulation and `setInterval`.
Taller Práctico: Integración de MetaMask
Connecting to the blockchain is where your landing page transcends static content. This step requires careful handling of asynchronous operations and user permissions. Think of it as the secure channel establishment.
Paso 1: Detectar MetaMask
Your JavaScript needs to check if the user has MetaMask installed and is on a compatible network (like Ethereum Mainnet or a testnet).
async function connectWallet() {
    if (typeof window.ethereum !== 'undefined') {
        console.log('MetaMask is installed!');
        try {
            // Request account access
            const accounts = await window.ethereum.request({ method: 'eth_requestAccounts' });
            const account = accounts[0];
            console.log('Connected account:', account);
            // Update UI to show connected account
            document.querySelector('.connect-button').textContent = `Connected: ${account.substring(0, 6)}...${account.substring(account.length - 4)}`;
            document.querySelector('.connect-button').disabled = true;
            // You might want to fetch user's NFT balance or other relevant data here
        } catch (error) {
            console.error("User rejected the connection or encountered an error:", error);
            alert("Failed to connect wallet. Please try again.");
        }
    } else {
        console.log('MetaMask is not installed. Please install it to continue.');
        alert('MetaMask is not installed. Please install it from the browser extension store.');
        // Optionally, redirect to MetaMask download page
        // window.open('https://metamask.io/', '_blank');
    }
}

// Add event listener to your connect button
document.querySelector('.connect-button').addEventListener('click', connectWallet);
Paso 2: Handle Network and Account Changes
The user's wallet state can change (network switched, account logged out). It's good practice to listen for these events.
// Listen for account changes
if (typeof window.ethereum !== 'undefined') {
    window.ethereum.on('accountsChanged', function (accounts) {
        if (accounts.length === 0) {
            // MetaMask is locked or the user has disconnected their accounts
            console.log('Please connect your MetaMask wallet.');
            document.querySelector('.connect-button').textContent = 'Connect Wallet';
            document.querySelector('.connect-button').disabled = false;
        } else {
            console.log('Account changed to:', accounts[0]);
            document.querySelector('.connect-button').textContent = `Connected: ${accounts[0].substring(0, 6)}...${accounts[0].substring(accounts[0].length - 4)}`;
            document.querySelector('.connect-button').disabled = true;
        }
    });

    // Listen for network changes
    window.ethereum.on('chainChanged', function (chainId) {
        console.log('Network changed to:', chainId);
        // You might want to prompt the user to switch to the correct network
        // For example, check if chainId matches your project's required network ID
        if (parseInt(chainId, 16) !== 1) { // Example: not on Ethereum Mainnet
            alert('Please switch to the Ethereum Mainnet in MetaMask.');
            // Optionally, request a specific chain
            // window.ethereum.request({
            //     method: 'wallet_switchEthereumChain',
            //     params: [{ chainId: '0x1' }], // 0x1 for Mainnet
            // });
        }
    });
}
This integration isn't just a feature; it's a trust signal. It tells your users you're serious about Web3 and ready to transact. The security implications here are profound – always validate user inputs and handle potential errors gracefully. A failed connection can cost you a potential collector.
Veredicto del Ingeniero: ¿Vale la pena la integración de MetaMask?
Absolutely. For any NFT project, MetaMask integration is table stakes. It's not a "nice-to-have"; it's a fundamental requirement for user interaction. The setup is relatively straightforward with modern JavaScript libraries and the Ethereum provider API. The challenge lies not in the implementation, but in educating your users and handling edge cases (like users on mobile without a compatible browser, or those unfamiliar with crypto wallets). From a technical standpoint, it’s a low-cost, high-reward addition that opens the floodgates for direct interaction and potential minting. It’s the difference between a digital brochure and a functional marketplace entrance.
Gestión de Código y Despliegue Gratuito
Once your code is functional, the next step is to secure it and make it accessible. Think of Git as your time machine and Netlify as your covert logistics network.
Paso 1: Commit y Sincronización con GitHub
Commit your changes regularly. This isn't just for backup; it's a record of your development process. A clean commit history is a sign of a professional operator.
# Initialize Git if you haven't already
git init

# Stage your changes
git add .

# Commit your changes with a descriptive message
git commit -m "feat: Initial landing page structure and basic styling"

# If you have a remote repository on GitHub:
# git remote add origin https://github.com/your-username/your-repo-name.git
# git push -u origin main
Make sure to create a repository on GitHub (or a similar platform) and push your code there. This serves as your central repository and is crucial for the next step.
Paso 2: Despliegue Gratuito con Netlify
Netlify is a powerful platform that offers free hosting for static websites and integrates seamlessly with Git repositories. It handles the build process and deploys your site automatically whenever you push changes.
- Sign up for a free account on Netlify.
- Connect your GitHub account.
- Click "New site from Git" and select your repository containing the NFT landing page code.
- Configure your build settings:
- Branch to deploy: Usually
mainormaster. - Build command: Leave blank for simple static sites.
- Publish directory: Set to the root folder of your project (e.g.,
.or/) as there’s no build command needed.
- Branch to deploy: Usually
- Click "Deploy site". Netlify will assign you a random subdomain (e.g.,
random-name-123.netlify.app). You can later configure a custom domain if needed.
Your landing page is now live, accessible globally, and ready to capture the attention of the crypto-verse, all without spending a dime on hosting. This is the blueprint of efficient digital operations.
FAQ
Can I use my own custom domain with Netlify's free tier?
Yes, Netlify allows you to connect custom domains to your free sites. You can manage DNS settings through Netlify or your domain registrar.
What if users don't have MetaMask installed?
Your script should gracefully handle this by informing the user and providing a link to download MetaMask or explaining it's required for interaction.
Is it possible to create a fully functional NFT minting page with just HTML, CSS, and JS?
Yes, for basic minting functionalities that interact with a deployed smart contract, these technologies are sufficient. You'll need a smart contract already deployed on a blockchain, and your JavaScript will call its functions.
How do I update the countdown timer accurately?
You'll need to calculate the difference between the current time and your target mint date using JavaScript's Date objects and update the display using `setInterval` to refresh the timer periodically (e.g., every second).
El Contrato: Asegura tu Flanco Digital
You've built the gate. Now, how do you ensure it's secure and effective?
Desafío: Implement a simple script that, upon successful MetaMask connection, fetches the user's currently connected Ethereum network ID and displays it on the page. If the network is not the intended one (e.g., not Mainnet or a specific testnet), the script should visually alert the user (e.g., change the button color or display a warning message).
This exercise forces you to think about the state of the user's connection and reinforces the importance of operating on the correct blockchain. Fail here, and your users might mint on the wrong chain, leading to lost assets and irreparable damage to your project's reputation.